• Home
    • About Nourishing Matters
    • About Emily
    • Frequently Asked Questions
  • Recipes
    • Offerings
    • Past Programs and Events
    • Experience and Teaching Style
    • Articles and Features
    • Travel
Menu

nourishing matters

Street Address
City, State, Zip
Phone Number
where wholesome meets delicious

Your Custom Text Here

nourishing matters

  • Home
  • About
    • About Nourishing Matters
    • About Emily
    • Frequently Asked Questions
  • Recipes
  • Work with Me
    • Offerings
    • Past Programs and Events
  • Yoga
    • Experience and Teaching Style
  • Press
    • Articles and Features
  • Adventures
    • Travel

Sweet Smoky Salmon with Cauliflower and Cilantro Pesto

May 18, 2017 Emily Watson

I don't know how I don't have a fish recipe on this blog. Actually, scratch that. I do. It's not that I don't love fish. I do, but I don't cook a whole lot of it at home—for a few reasons. One, I can't stand the thought (and smell!) of fish wrappers sitting in the trash until trash night. Two, I'm always afraid I'm going to mess up a beautiful piece of expensive fish. Grains and beans, on the other hand, are virtually impossible to mess up and if I do, I won't be crying over the few dollars I wasted. And three, I have a hard time finding a reliable source of good-quality, sustainable fish. But fish is just so good for you and delicious, that I wanted to change the lack of fish in my life.

Recently,  I discovered a source of sustainable wild-caught salmon that I was happy with (hello there Wild Alaska Direct!), and the recipe wheels got to turning. I wanted something for the grill as the weather is just starting to warm up, but I also tested it on a George Foreman grill thingy. Does anyone but meal still use those? I haven't tested it on a plain skillet, but I can't see why that wouldn't work. You'll still get that smoky-caramelized action going on which is exactly what you're looking for.

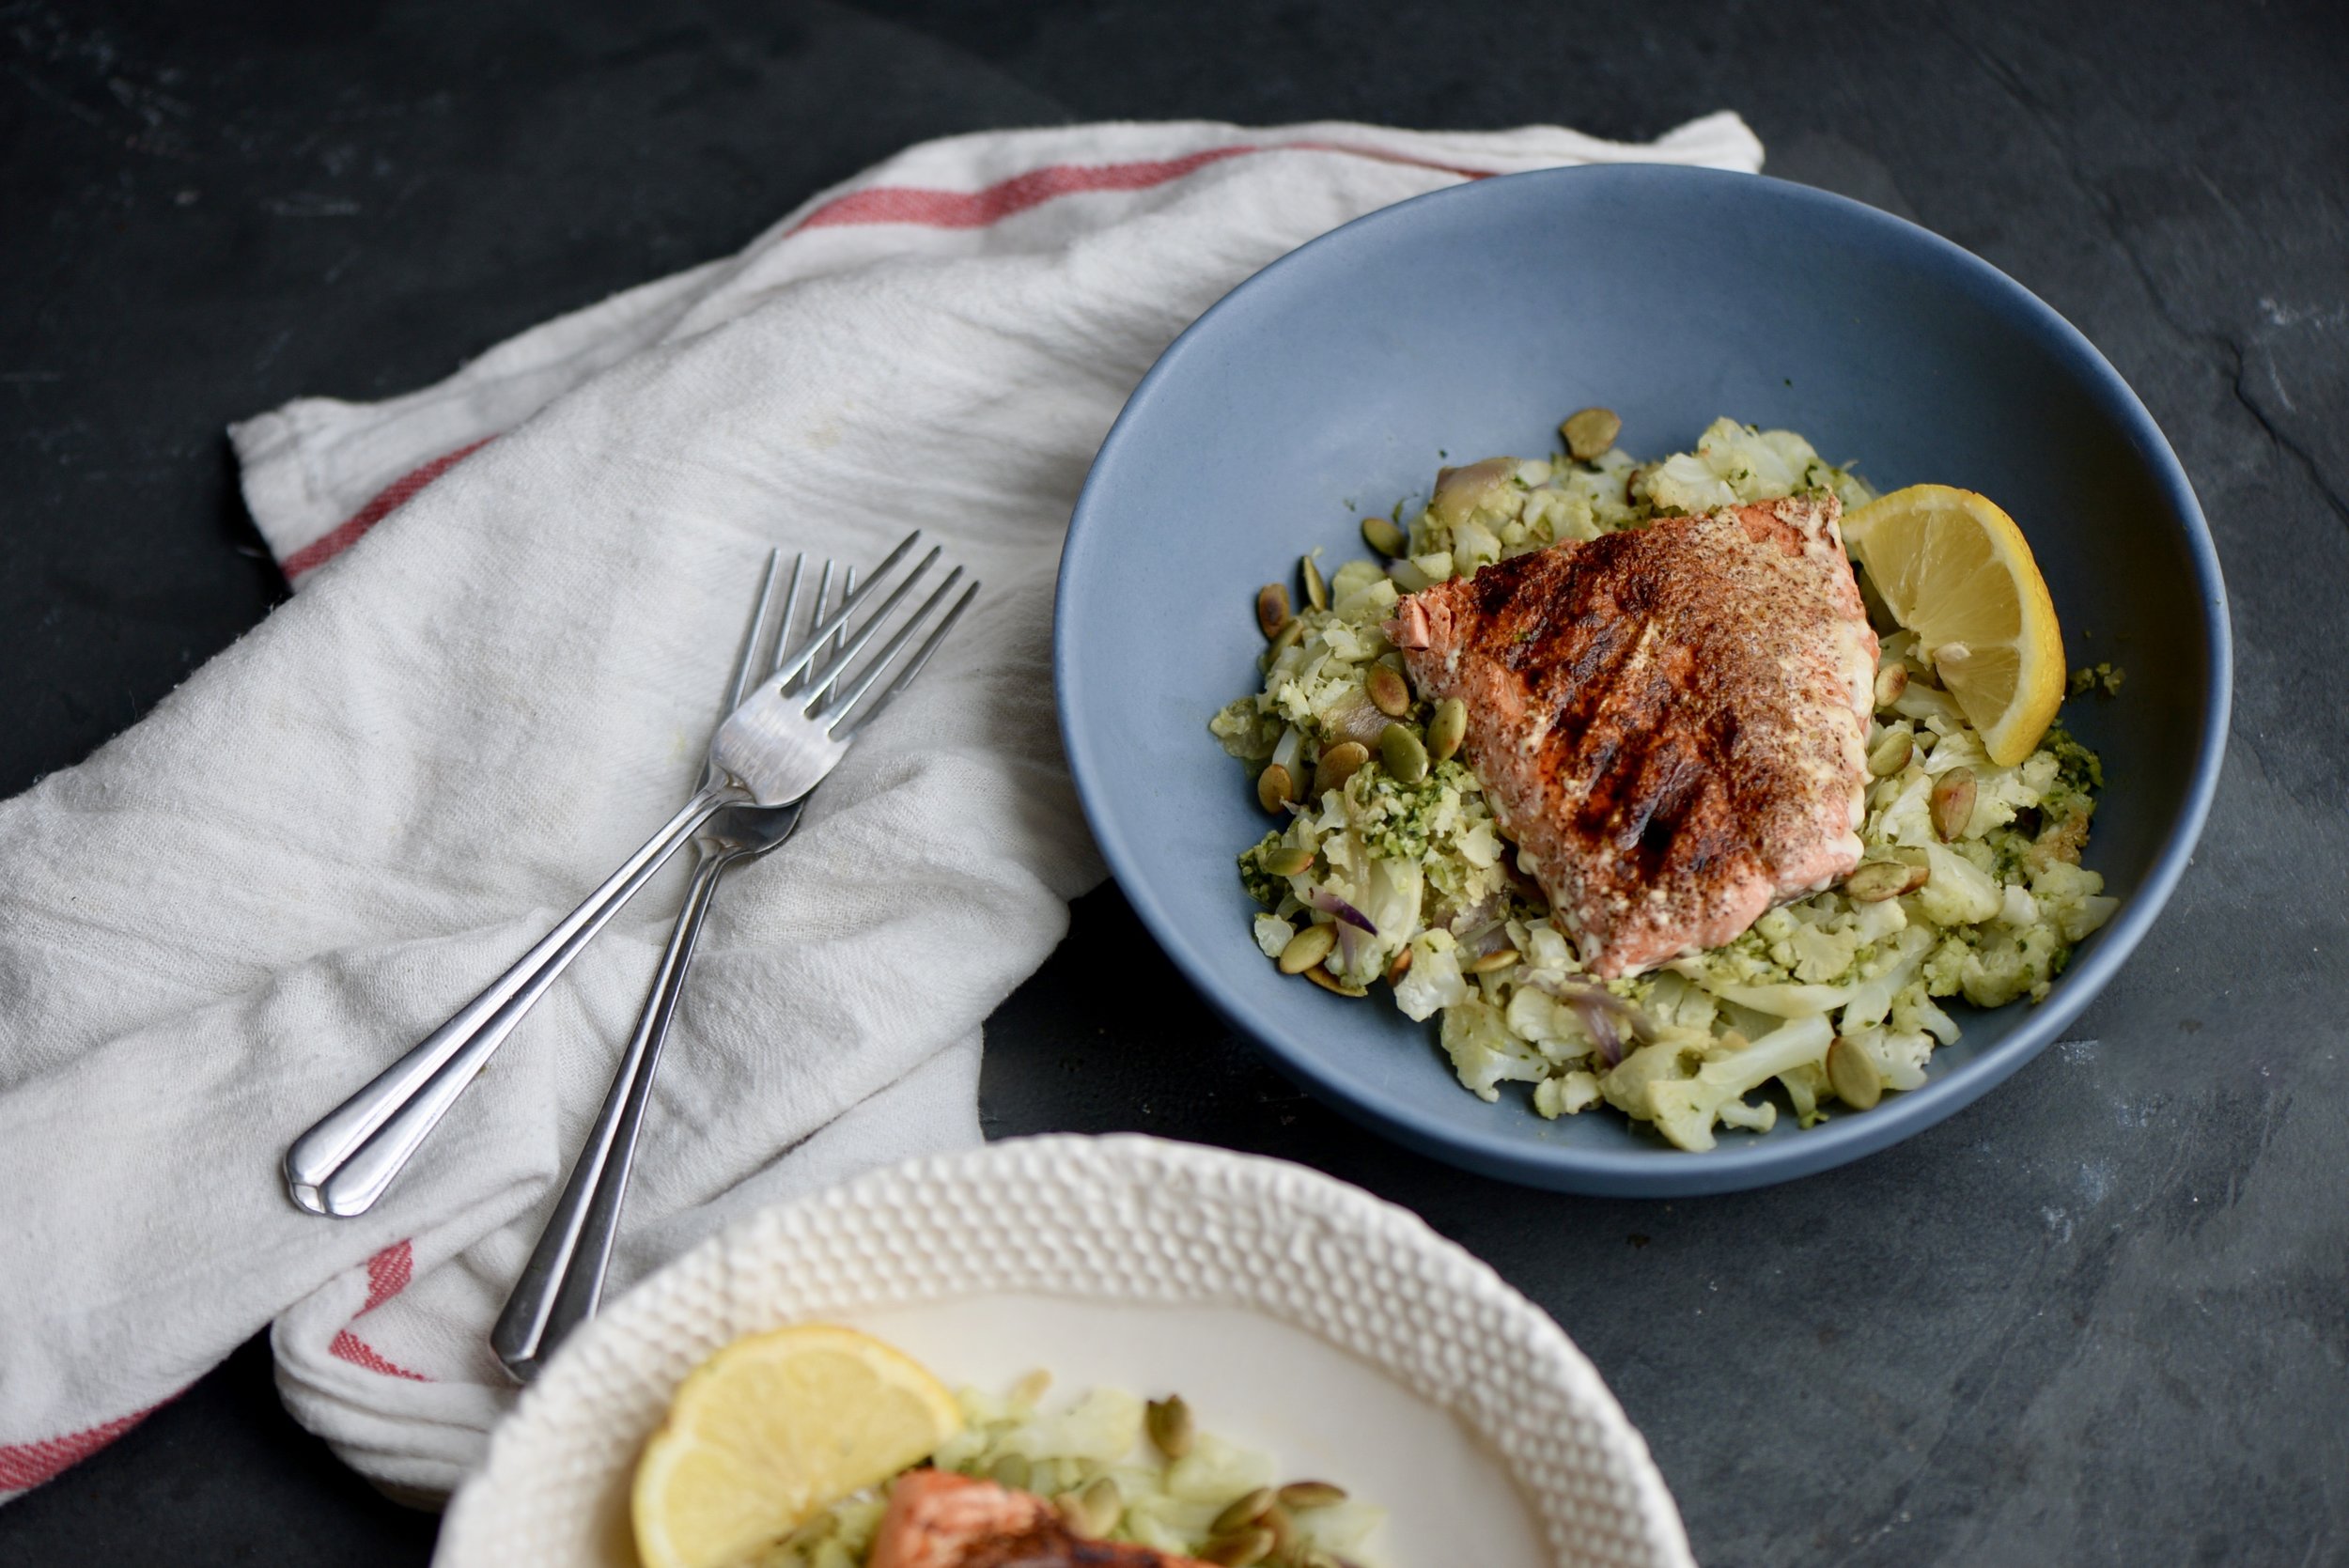
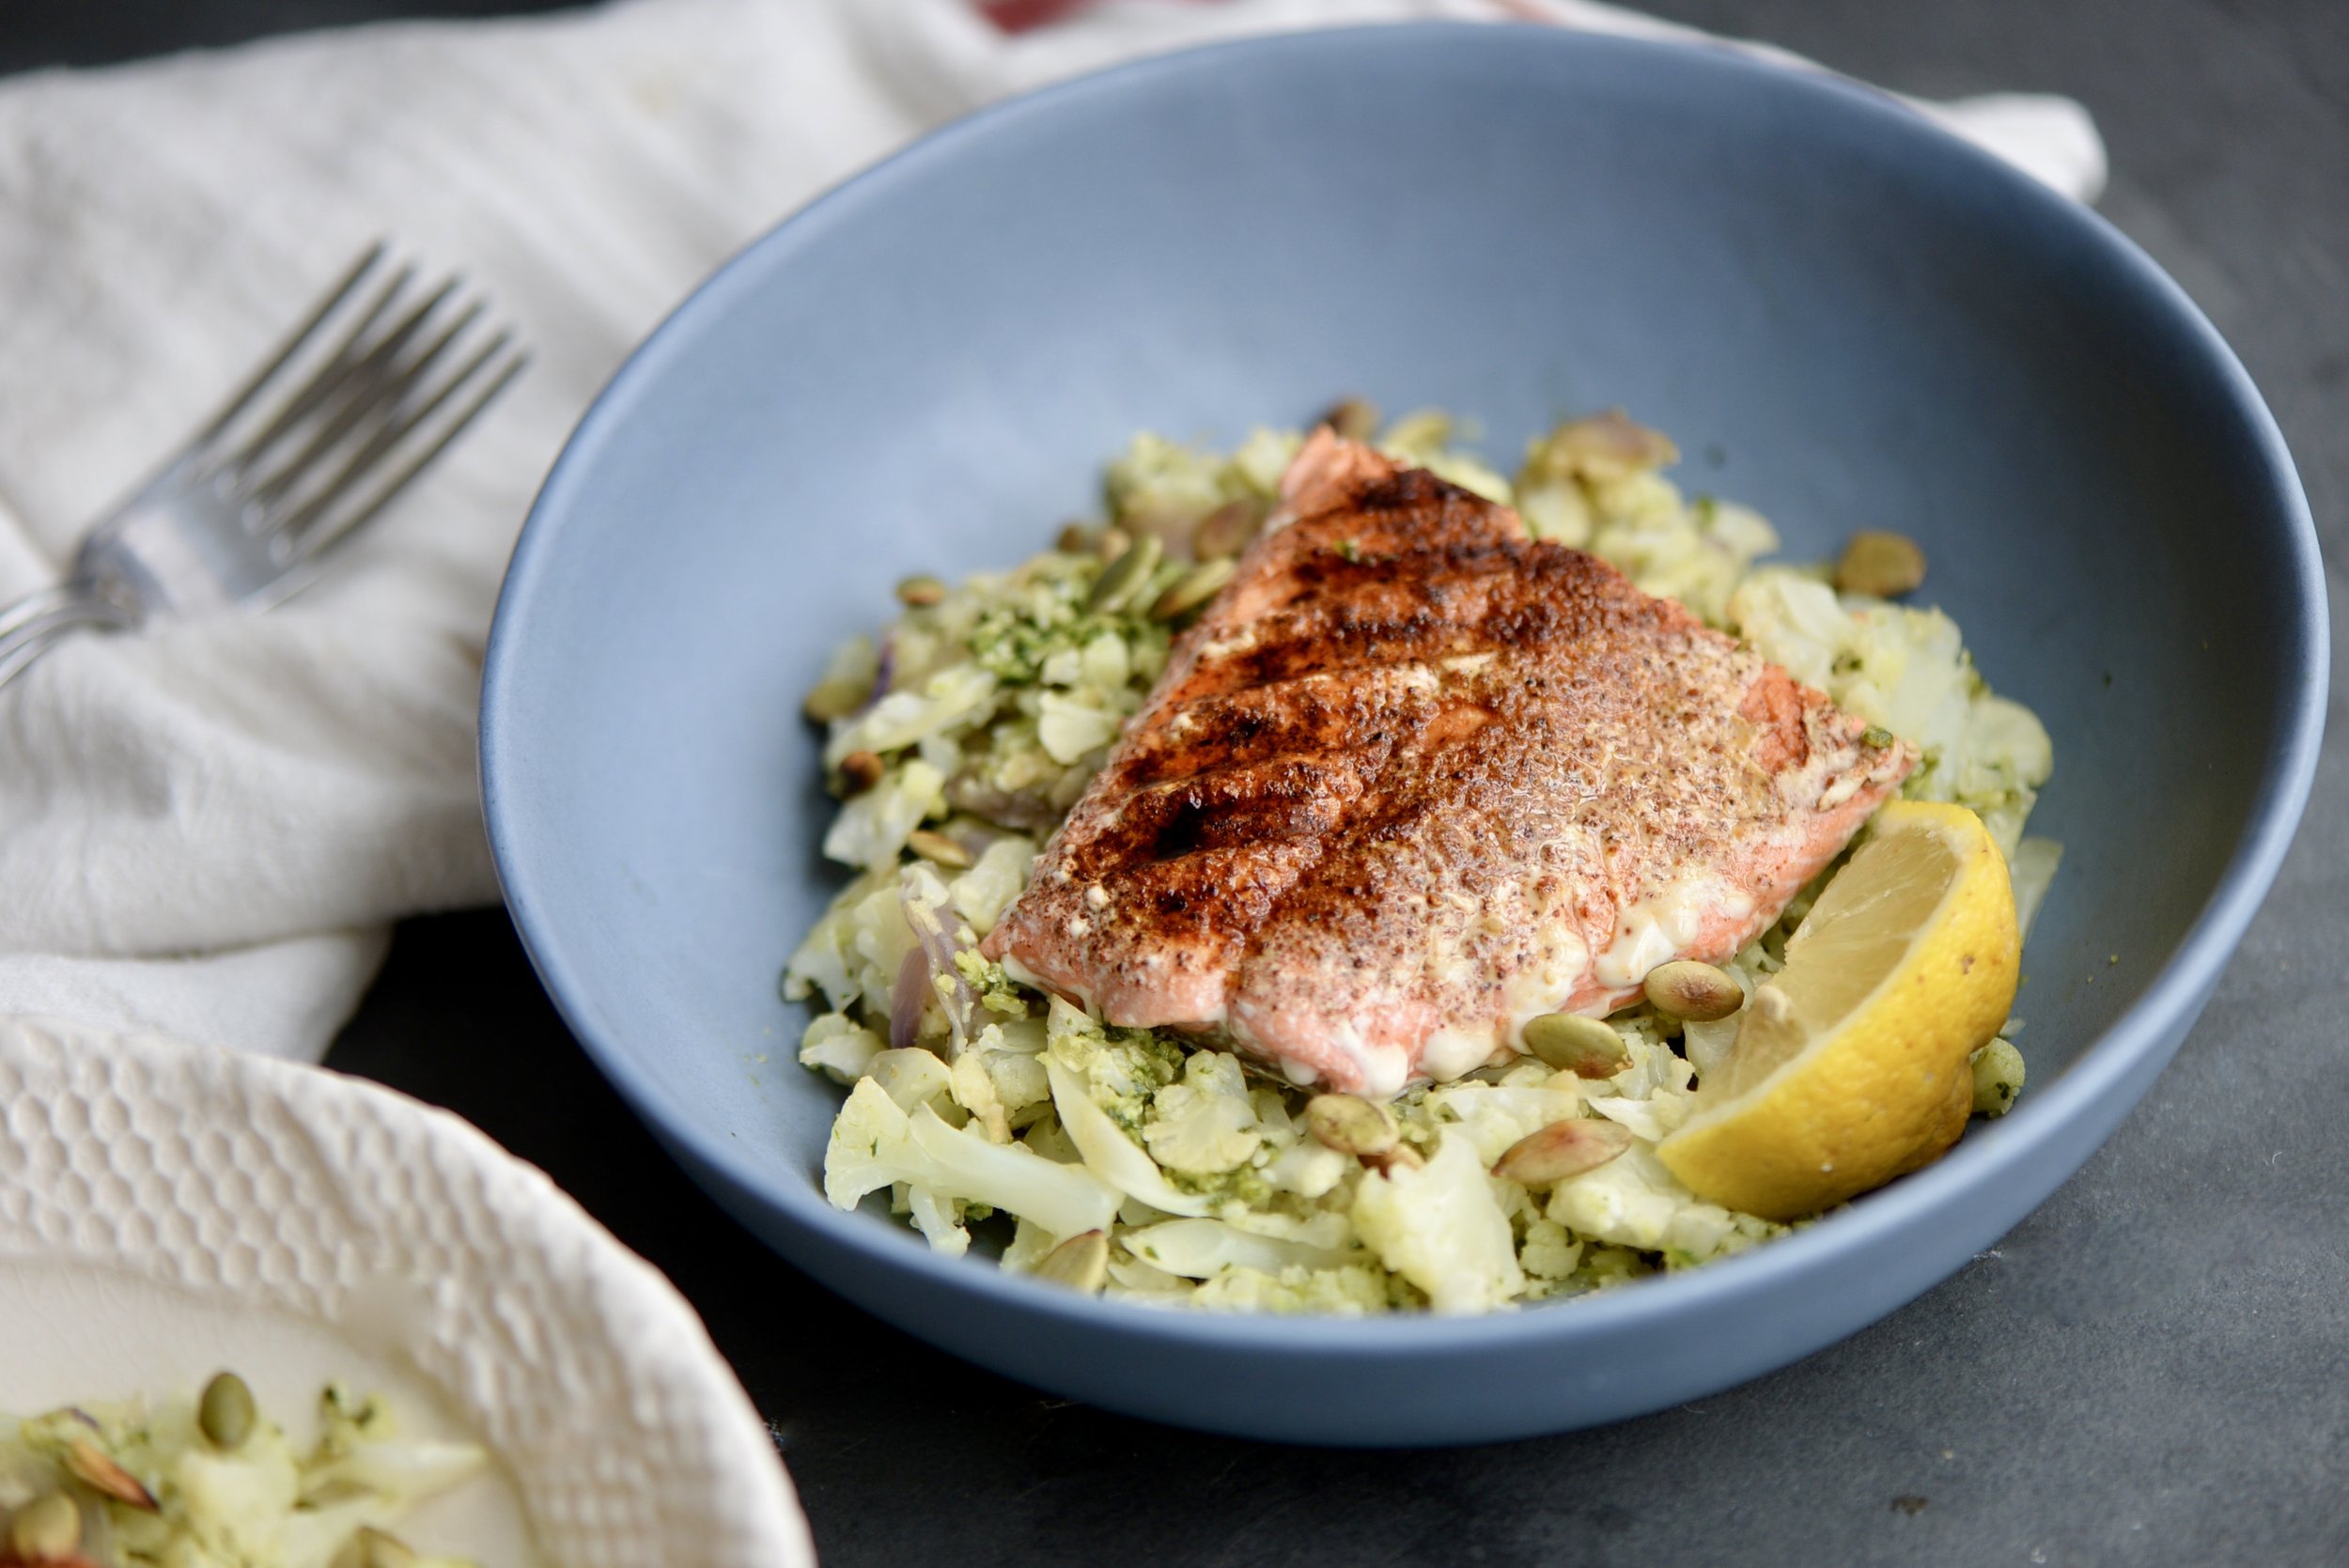
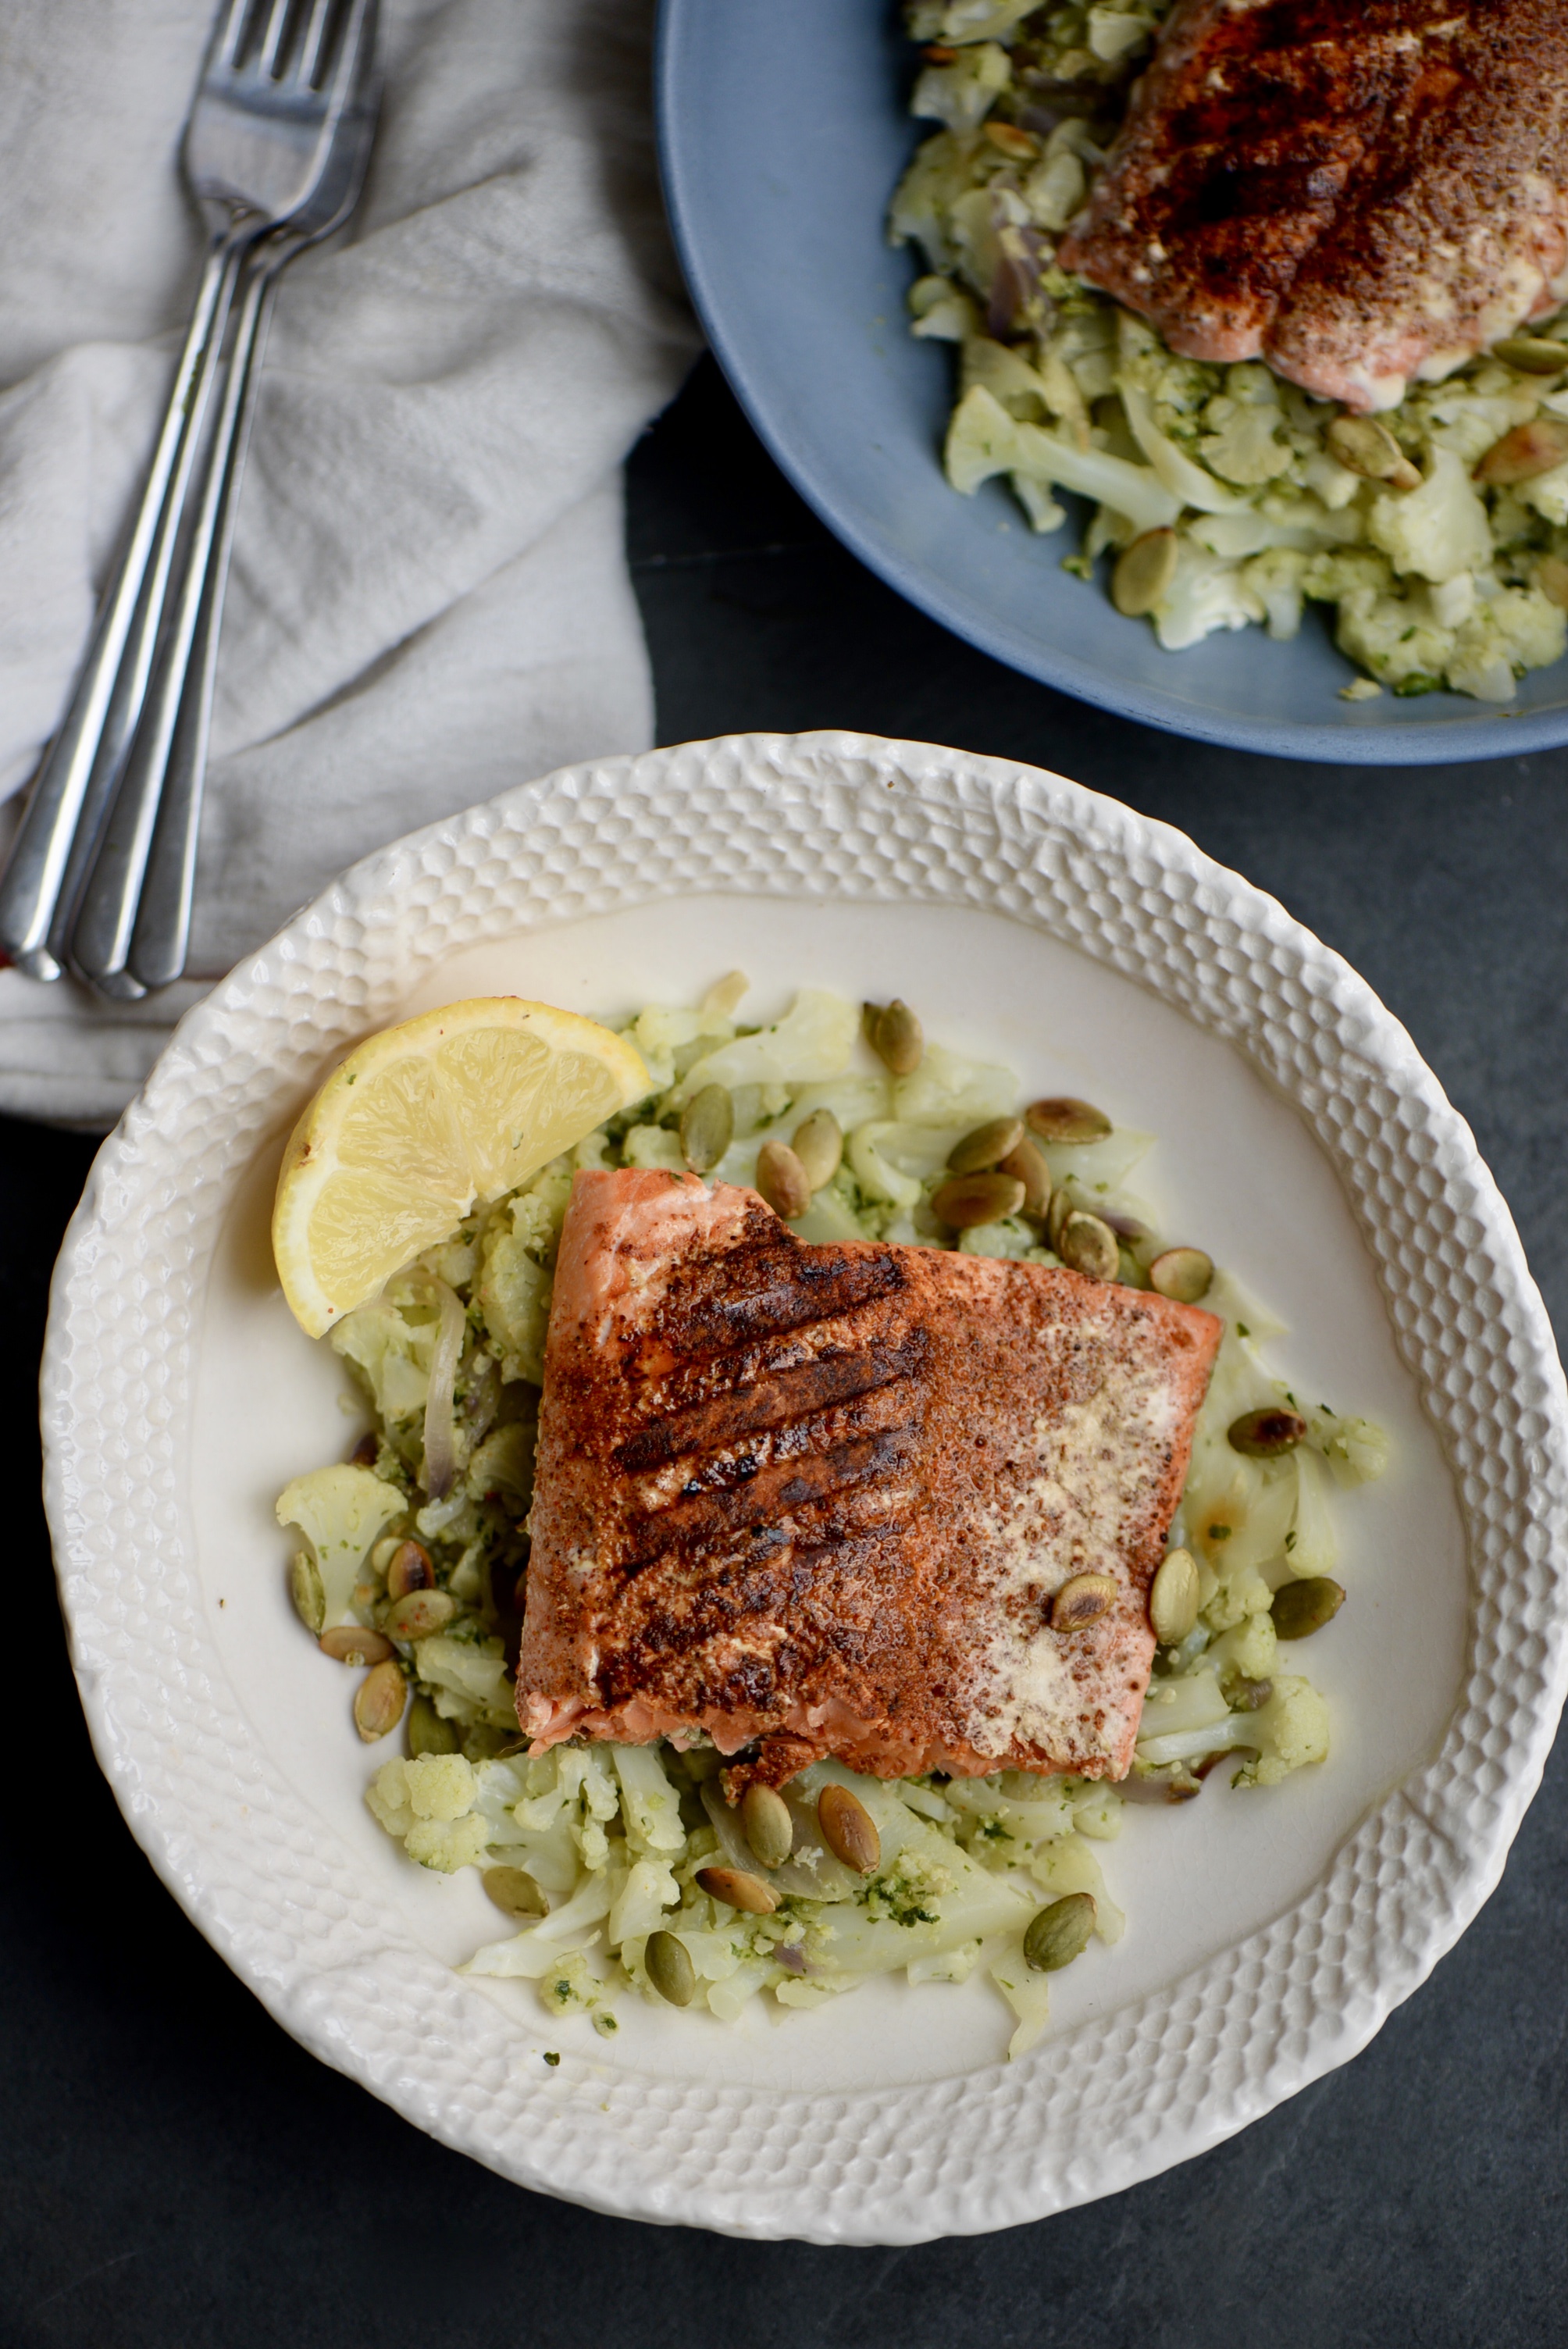
The cilantro pepita pesto is a beauty itself. I've drizzled it on a slew of other things, and I have it here on the blog on my Grilled Peach Bruschetta. (Really though, bookmark that one for beach season because it is amazing.). I saute onion, add cauliflower to cook until tender, and then brighten it all up with cilantro pesto. I served this with brown rice, but any grain will do.  

Smoky Chili Salmon with Cauliflower and Cilantro Pepita Pesto

4 sustainably caught salmon fillets
1 teaspoon chili powder
1 teaspoon ground cumin
½ teaspoon smoked paprika
2 teaspoons honey or maple syrup
1 teaspoon olive oil
generous pinch of sea salt

1 tablespoon olive oil
1 red onion, halved and thinly sliced
1 medium head cauliflower
¼ cup water
Cilantro Pepita Pesto, recipe follows
Salt and pepper, to taste

¼ cup pumpkin seeds, toasted for serving
1 lemon, cut into wedges for serving
Cooked brown rice or other grain for serving

Preheat grill to medium high. Make salmon rub. Mix spices, honey, olive oil, and salt in small bowl until combined. Lay salmon skin side down and generously rub top of each with mixture, pressing into salmon to adhere. When grill is ready, place salmon skin side down and grill, covered, for 8-10 minutes depending on your grill and hot spots. When you think salmon is almost done, flip and allow to cook for just a minute or so to get nice grill marks on the salmon. If using a George Foreman, the salmon will take about 5 minutes and will not need to be flipped since it's cooking from both sides. Remove from heat and allow to rest 5 minutes.

To cook cauliflower, heat 1 tablespoon olive oil in large skillet over medium high heat. Add onion and sauté until just softened and golden on the edges, 5-7 minutes. Add cauliflower, a generous pinch of salt, and 1/4 cup water, stirring to combine. Cover and allow cauliflower to steam for 7-8 minutes or until cauliflower is tender. Remove cover and cook until cauliflower begins to caramelize and liquid has evaporated. Remove from heat, dollop in 1/3 cup of pesto to start and stirring to distribute. Season to taste with salt and pepper and add more pesto if desired.

To serve, place salmon atop rice and cauliflower, adding toasted pumpkin seeds, a lemon slice and passing extra pesto if desired. Serves 4.

Cilantro Pepita Pesto:
½ jalapeño, seeds removed for less spicy variation
Generous 2 cups loosely packed fresh cilantro
3 tablespoons pepitas (pumpkin seeds), lightly toasted
2 garlic cloves
1 lime, juiced and zest of ½ lime
¼ cup extra-virgin olive oil (for a richer pesto, you can add a little pumpkin seed oil instead of olive oil)
Salt and pepper, to taste

Add everything to a food processor or blender, and blend until smooth, scraping down sides as necessary. Add salt and pepper, to taste. Makes about ½ cup.

fullsizeoutput_31ff.jpeg
In Mains Tags salmon, fish, cauliflower, cilantro, summer, spring, recipe, gluten-free
1 Comment

Strawberry Overnight Bread Pudding

April 26, 2017 Emily Watson

Guess what?! We just booked tickets to Europe for later this summer. Our plan: explore Barcelona, eat as many tapas as our bellies can hold and then drive across the border to France to eat as many French-everything we can. Oh, and to see the sights. I just can’t help it as our vacations revolve around food. Isn’t that best (um, only) way to experience a culture?

In celebration of our summer trip and Mother’s Day, I’m incorporating a French classic into a perfect breakfast for serving in bed to Mom (or in all honesty, to yourself). Strawberries are a sign that spring is in full force, so I used Bonne Maman Strawberry Preserves and juicy strawberries to flavor an irresistible bread pudding that’s sweet and fruity but not too sweet it leans more dessert. Although I won’t tell if you top it with ice cream and call it dessert. But the best part about this whole thing? It can be made the night before and baked in the morning for a fuss-free breakfast. While it’s baking, you can slice fruit, make coffee, arrange flowers, and write that Mother’s Day card you remembered to get...

What I love about Bonne Maman is that they preserve fruits at their peak, so the natural sweetness and fruit flavors really come out. They are also non-GMO project verified, use no high fructose corn syrup, no artificial coloring, and no preservatives. That's a lot of wins in my book. In this bread pudding, to make sure every single bite has a punch of strawberry, I make strawberry preserve sandwiches and cut them into cubes. Those cubes get tossed with fresh strawberries and bathed in an egg and almond milk mixture. After soaking overnight and baking in the morning, each slice is topped with toasted almonds, coconut, and coconut whip (or real whipped cream or Greek yogurt if dairy-free isn’t your thing) and drizzled with maple syrup.

What better way to celebrate spring and the best Mom in the world?

DSC_5791.jpg

Strawberry Overnight Bread Pudding

Coconut oil, for greasing the pan
10 slices whole grain sandwich bread (I used a seeded bread), preferably a little stale
5 tablespoons Bonne Maman Strawberry preserves
1 ¼ cups chopped fresh strawberries, plus more for serving
5 eggs
1 ½ cups unsweetened almond milk
2 tablespoons maple syrup, plus more for serving
½ teaspoon vanilla extract or vanilla powder
¼ teaspoon cinnamon
Pinch of salt

For serving:
½ cup toasted almonds, chopped (optional)

¼ cup toasted shredded unsweetened coconut (optional)
Coconut whipped cream, whipped cream, or Greek yogurt (optional)

Grease bottom and sides of 1 ½ quart baking dish. Make preserves sandwiches. Spread 5 slices with 1 tablespoon each of Bonne Maman Strawberry Preserves. Top with another slice to make a sandwich, pressing gently to adhere. Slice each sandwich into 16 cubes. Spread half of cubes in bottom of baking dish. Scatter with half of chopped strawberries. Top with remaining sandwich cubes and strawberries.

Whisk eggs until no longer stringy. Add almond milk, maple syrup, vanilla, cinnamon, and salt and whisk to combine. Pour mixture over bread and strawberries and press gently to submerge as best you can. Not everything will be covered, but you want each piece to be in some of liquid. Cover with foil and allow to sit in fridge for 8 hours or overnight.**

Preheat oven to 350 degrees. Place pan in oven and bake, covered, for 55-65 minutes. After 40 minutes, remove foil cover to allow top to brown. Pudding will be done when it is no longer jiggly, the top is golden, and it feels just firm to touch. Remove from oven and allow to rest 10 minutes before slicing. Resting will allow you to get the cleanest slices. Top with almonds, coconut, freh strawberries, and whipped topping of choice. Drizzle with additional maple syrup, if desired. Serves 6

**Pudding can be baked immediately and the flavor will still be delicious, but the texture improves with an overnight soak as the bread softens in the egg mixture.

DSC_5771.jpg

This post was sponsored by Bonne Maman but opinions expressed are entirely my own. P.S. They are running an awesome giveway. Click below to enter!

In Breakfast Tags dairy-free, strawberries, brunch, breakfast, vegetarian, spring
2 Comments

Snow Pea and Mint Salad

June 12, 2016 Emily Watson

The crispy crunch of snow pea is so satisfying when the weather starts to warm. I buy them by the quart at the farmers’ market- a mix of vivid green and deep, dark purple ones if I'm lucky- popping them in my mouth just from the fridge when I need a refreshing, hydrating snack. As much as I could eat all of them raw, unadulterated, a snap pea salad my sister and her boyfriend brought to our house for a potluck showed me new potential for spring's bounty, that snow peas could taste even better tossed with a handful of ingredients.

Their recipe came via the blog, Kosher Camembert, which made their own riff off of NYC’s Union Square Cafe’s Sugar Snap Pea Salad. I made a few changes to their recipe and quite a few to the original, based on what I had on hand. Snow peas worked as a beautiful substitute for sugar snap pea. Lemony, bright, and minty, this salad is addicting. It is just as good right after tossing together as it is a few days in the fridge as the flavors have had time to mingle and the snap peas to marinate. My only recommendation? Make it with the best snap peas you can find- young and sprightly as later in the season they get tough and stringy.  

Snow Pea and Mint Salad

1 lb. snow peas, ends trimmed
1 small shallot, finely minced

½ lemon, zested and juiced
2 tablespoons white wine vinegar
¼ cup extra-virgin olive oil
¼ cup fresh mint, finely chopped
⅓ cup finely grated Parmigiano Reggiano
salt and pepper, to taste

Blanch snow peas. Prepare an ice bath, filling a bowl with ice and water. Bring medium pot of water to a boil. Add a generous pinch of salt and 1 lb. snow peas. Cook for 20 seconds and immediately remove, plunging into an ice bath to stop the cooking process.

Make dressing. In a small bowl, whisk together shallot, lemon zest and juice, vinegar, olive oil, mint, cheese, and salt and pepper to taste. Allow flavors to meld 10 minutes. Drain snow peas from ice bath and chop three-quarters of them in ½-inch pieces. Toss chopped snow peas with whole snow peas and drizzle with dressing, coating evenly. Season to taste with additional salt and pepper. Enjoy immediately or in a few days. Serves 4-6.

DSC_4002.jpg
In Salads, Side Dishes Tags snow pea, salad, summer, spring, mint, recipe, vegetarian, gluten-free
Comment

Spring Asparagus Frittata

June 5, 2016 Emily Watson

I thought that once I started a 9-5 job, my schedule would feel easier. As a student, I woke up, went to class all day, and studied all night when I got home. I was preoccupied with school nearly every waking hour, but I still seemed to find time for making dinner, running errands, and even completing a yoga teacher training (!). I felt like there were more hours in a day then than now. How does that even work?

But I think I’m figuring out what it is. Despite me having more hours of free time, energetically speaking, I am a bit frazzled and a bit less focused. In school, I had one purpose- to study. I had a strict list of to-do’s and became an expert at checking them off. Now, I come home and without a clear agenda, my energy just flows everywhere, making it difficult for me to focus, difficult for me to be efficient. As frustrating as it is to feel myself being inefficient, I’m glad that I’m finally figuring out the source of my squandering-the-hours-away attitude. I’m also not saying that it is important that I be maximizing productivity at all times, but I realize that for me, being productive makes me happy. I relish in the feeling that I’ve done something, created something, and grown just a little bit.

So how does all of this relate to my frittata here? With my evenings feeling a bit truncated because of this scattered energy, I’ve struggled getting a well-composed dinner on the table. Avocado toast, fried eggs, clean-out-the-fridge grain bowls have always been my healthy go-to’s for hectic times, but I also wanted something more composed, a dish that felt more purposeful and intentional. Frittatas have been one of my favorite dishes ever since living abroad in Spain where I ate more than my fair share of tortilla española, a Spanish frittata of sorts. Rich with olive oil-sauteed onions and potatoes, and sometimes even zucchini, they were a daily mid-morning habit when my belly would start to grumble around 11am and lunch wasn’t until 2pm.

The beautiful thing about a frittata is that you can throw almost any vegetable in it (and a little cheese if you’re feeling it) and call it a meal. Because it’s spring, I’ve been using asparagus and local feta, sometimes tossing in a handful of cooked broccoli or sauteed chard. It may seem a little intimidating at first-- my #1 worry was that the whole thing would stick to the skillet. To be honest, I did screw up my first one, but not in the way I anticipated. The top seemed beautifully golden and perfectly done, and the whole thing slipped right out of the pan for me- success!--, but the inside was still jiggly, runny egg began to ooze everywhere, causing me to hastily slide it back into the skillet and under the broiler until it firmed up. After another try, I got the timing right, and now, no more undercooked eggs. I promise, if you give this a go, that’s pretty much the worst thing that can happen to you. If your frittata does end up sticking to the pan- which it shouldn’t with my tips- just eat the darn thing out of the skillet.
 

Asparagus and Feta Frittata

2 eggs
2 teaspoons extra-virgin olive oil, divided
5 asparagus spears, tough ends removed and chopped in 1-inch lengths
¼ cup grated cheese (I used ½ grated extra-sharp cheddar and ½ crumbled feta)
salt and pepper, to taste

Preheat broiler on high. Place rack 8-10 inches from the broiler. Heat 1 teaspoon olive oil over medium heat in a 6-inch cast iron pan. Add asparagus pieces and a sprinkling of salt and saute for 2 minutes or until asparagus are bright green and tender. Remove asparagus from heat.

Add 1 teaspoon olive oil to same pan and allow to heat over medium-low heat while you prepare the rest of the ingredients. In another bowl, beat eggs with a pinch of salt and sprinkling of pepper. Add all but a few pieces of asparagus and all but 1 tablespoon of cheese. Mix well. When skillet is hot and oil shimmers, swirl oil to coat bottom and sides of pan well. This will ensure your frittata has a nice golden edge and won't stick to the pan.

Pour egg mixture into skillet and gently distribute vegetables evenly. Sprinkle with reserved asparagus pieces and cheese. Allow to cook on stovetop for about 1 minute over medium-low heat. Place skillet under broiler and allow to cook for 4-5 minutes or until puffed and golden on the sides. To check for doneness, press the top of frittata just at the center. It should be firm with a slight give. There will be some carryover cooking after removing from the oven, so keep that in mind. If it gives too much, leave under broiler for another minute. Sometimes, I poke a few holes in the center with a fork and tilt the pan, letting the runny egg ooze out to the top so that it cooks faster.

To remove from skillet, place a plate or cutting board on top of pan. Invert skillet and cutting board. Frittata will release from the pan upside down, so gently flip right side up to serve. If you find the eggs are not quite ready after flipping, just slide the frittata back into the skillet and return to the oven until done. You'll get better with the timing each go-around. Allow the frittata to rest a few minutes before cutting into to allow it to settle. Enjoy! Serves 1.

DSC_3982.jpg
DSC_3993.jpg
In Mains Tags eggs, vegetarian, asparagus, spring, gluten-free, recipe
Comment

Spring Goddess Bowl

April 6, 2016 Emily Watson

Someone stole spring, and I want it back. I have been awaiting that glorious moment when I can unburden my coat rack of winter coats and scarves and tuck away my gloves and boots. Just when I thought we were almost there, the mercury falls and the wind gives a raucous helloooooo. Sigh. I wish I had a spring dance of sorts, you know, to call upon those warmer temperatures and get them to linger for just a little longer, but I think any type of dancing of mine just may scare spring away. Again.

Despite these cooler temperatures, I am loving what I am finding at the farmers' markets right now -zippy radishes, tender, earthy greens, eggs from happy spring chickens, and tangy cheeses and yogurt from sprightly goats. When the ingredients, especially vegetables, are at their peak, so fresh and bright, I like celebrating them in simple preparations, and sometimes a few different ways in the same dish- cooked and raw, pickled and sauteed, roasted and blanched, pureed and left whole. In this recipe, sauteed red radishes are topped with raw, julienned watermelon radishes. You may have never sauteed a radish before, but I promise you, you'll never see a radish the same way once you do. Heated with olive oil and a sprinkling of salt, the harsh radish mellows with just a teensy sweetness while still staying crisp and light.

This spring bowl came together one evening when a foodie friend of mine and I decided to meld minds...and pantries and fridges. (Side note: This foodie friend is also an amazing photographer...who just so happens to be shooting our wedding in just over two weeks and who shot our engagement photos!!!). We had both been in a bit of a recipe funk, so we decided to make it interesting by each contributing two different ingredients to the mix and then coming up with a dish. I chose radishes and beluga lentils, and she chose avocado and black rice (side note: I used a short-grain brown rice when I re-made the recipe, but black rice is both beautiful and delicious if you have never had it). We made things up as we went, tasting here and there for any additions to make it all really sing. I had some spring chickweed, a dainty and slightly bitter green, and fresh mint in my fridge, and we assembled a bright lemon and olive oil dressing to drizzle over top of everything. It really does taste as good as it looks. It was so good, in fact, I made it again after restocking my radish supply.

DSC_3820.jpg
DSC_3815.jpg

Like most bowl recipes, this is a template. The amounts of each component will vary depending on your preferences, but the ingredient combo here is spot-on. If you are craving a little more crunch, go ahead and toss in some toasted nuts or seeds. Feta or a tangy goat cheese will be beautiful on here as will a hard-boiled egg if you want to make it even more robust. Either way, this bowl is fit for a spring goddess- or god!

Spring Goddess Bowl

1 cup short-grain brown rice
1 1/2 cups water
1/2 cup beluga lentils
1 small bunch of radishes (about 6-7 radishes), greens removed (or a mix of red and watermelon radishes)
1 avocado, sliced
2 handfuls of greens (examples are chickweed, arugula, mache, or even sprouts!)
a few mint leaves, finely chopped
1 small garlic clove, finely minced
1 lemon, zest and juice
1 tablespoon extra-virgin olive oil, plus more for sauteeing radishes
fancy salt, to taste...also known as Himalayan salt or flaky sea salt;)

Cook rice. Bring water to a boil. Add rice, return to boil, then reduce heat to low. Cover pot and cook 45 minutes. Remove from heat and let rest 10 minutes. Reserve 2 cups of cooked rice for the bowl, and save the rest for another meal.

Cook lentils. Add lentils to pot and cover with water by 1-2 inches. Heat water to boiling, then reduce heat to simmer. Cook for 15-18 minutes or until tender. Test often to check doneness- you want a slight bite, but no mushiness. Drain and set aside.

Prepare radishes. Reserve one radish for raw garnish. Cut the remaining radishes into small wedges for sauteing. Heat 2 teaspoons olive oil over medium-high heat. Add radishes, sprinkle generously with salt, and saute about 5-8 minutes, stirring often. Remove radishes when just golden brown on both sides and tender.

Thinly slice reserved radish (or use watermelon radish here) and then julienne slices for the raw radish garnish.

Make dressing. In small bowl, whisk together minced garlic, zest of 1 lemon, juice of 1 lemon, 1 tablespoon extra-virgin olive oil, and salt to taste.

Assemble bowls. Divide rice, lentils, sauteed radishes, and greens among two bowls. Top each with 1/2 of avocado, garnish with raw radish and mint, and drizzle with lemon vinaigrette. I like to finish mine with a sprinkling of fancy salt or whatever salt I have on hand. Enjoy! Makes 2 servings.   

DSC_3844.jpg
DSC_3849.jpg
In Mains, Salads Tags recipe, spring, lentils, brown rice, avocado, vegan, vegetarian, gluten-free, mint, radish, bowl, lemon
Comment
Older Posts →
Hi! I'm Emily. I love to cook whole, nourishing foods, and this is where I share my kitchen experiments and sometimes a little bit of life.

Hi! I'm Emily. I love to cook whole, nourishing foods, and this is where I share my kitchen experiments and sometimes a little bit of life.

Featured
  • July 2017
  • May 2017
  • April 2017
  • March 2017
  • February 2017
  • January 2017
  • December 2016
  • November 2016
  • October 2016
  • September 2016
  • August 2016
  • July 2016
  • June 2016
  • May 2016
  • April 2016
  • March 2016
  • February 2016
  • January 2016
  • December 2015
  • November 2015
  • October 2015
  • September 2015
  • August 2015
  • July 2015
  • June 2015
  • May 2015
  • April 2015
  • March 2015
  • February 2015

  • Appetizers 18
  • Breakfast 18
  • Life 4
  • Mains 39
  • Miscellaneous 2
  • Salads 21
  • Sandwiches 6
  • Side Dishes 8
  • Smoothies 4
  • Snacks 10
  • Soups 14
  • Spreads Dips Sauces 5
  • Sweets 6
  • Vegetarian 1

  • almonds
  • appetizers
  • autumn
  • avocado
  • breakfast
  • brown rice
  • chickpeas
  • chocolate
  • cilantro
  • coconut
  • coconut milk
  • fall
  • gluten-free
  • kale
  • lentils
  • make ahead
  • mint
  • oatmeal
  • recipe
  • salad
  • snack
  • soup
  • spring
  • summer
  • sweet potatoes
  • tahini
  • vegan
  • vegetarian
  • walnuts
  • winter

subscribe

Sign up with your email address to receive new posts directly

We respect your privacy.

Thank you!

All photographs, recipes and content are property of Nourishing Matters, unless otherwise noted. Please do not redistribute without my permission. Thank you!

Powered by Squarespace