• Home
    • About Nourishing Matters
    • About Emily
    • Frequently Asked Questions
  • Recipes
    • Offerings
    • Past Programs and Events
    • Experience and Teaching Style
    • Articles and Features
    • Travel
Menu

nourishing matters

Street Address
City, State, Zip
Phone Number
where wholesome meets delicious

Your Custom Text Here

nourishing matters

  • Home
  • About
    • About Nourishing Matters
    • About Emily
    • Frequently Asked Questions
  • Recipes
  • Work with Me
    • Offerings
    • Past Programs and Events
  • Yoga
    • Experience and Teaching Style
  • Press
    • Articles and Features
  • Adventures
    • Travel

Shishito and Avocado Breakfast Toast

September 26, 2016 Emily Watson

I have felt compelled to put fried green peppers on just about everything since a dinner earlier this summer at my food blogger friend's house. Linda (of Wild Greens and Sardines) and her husband invited my husband an I over for some delicious pasta, and while we sipped wine and waited for the water to boil, they fried up pan after pan of padrón peppers. Padrón peppers are a staple in Spain, a most-welcome nibble in the late afternoon when you know dinner is still hours away. Sprinkled with crunchy grains of salt, they are mostly mild, but occasionally you get a real hot sucker that makes you reaching for bread, cheese, anything to make the heat go away, even another pepper-just hope that it's a mild one. If you're like me, you somehow manage to grab only the hot ones.

I'll take a minute here and clue you in to a little thing about going to a food blogger's house for dinner. When a bloggers says she's just going to make pasta for dinner, don't believe that she's just going to toss some dried noodles in some water and call it a day. Nope. Linda made the most beautiful homemade pasta in these circular stamp shapes and tossed them with a nutty and herbaceous pesto. Pan fried padrón peppers started off the meal, but roasted maitakes, Green Zebras doused in extra-virgin olive oil and sumac, and specialty chocolate rounded it out. And what in the world did I bring to this feast? I came with a dinky grilled zucchini salad that I swear shrunk even more by the time we got to Linda's. My cup of zucchini and me pretty much wanted to disappear when I saw the spread she had prepared. Yeah, we very much owe she and her husband a dinner. Or wait, a feast.

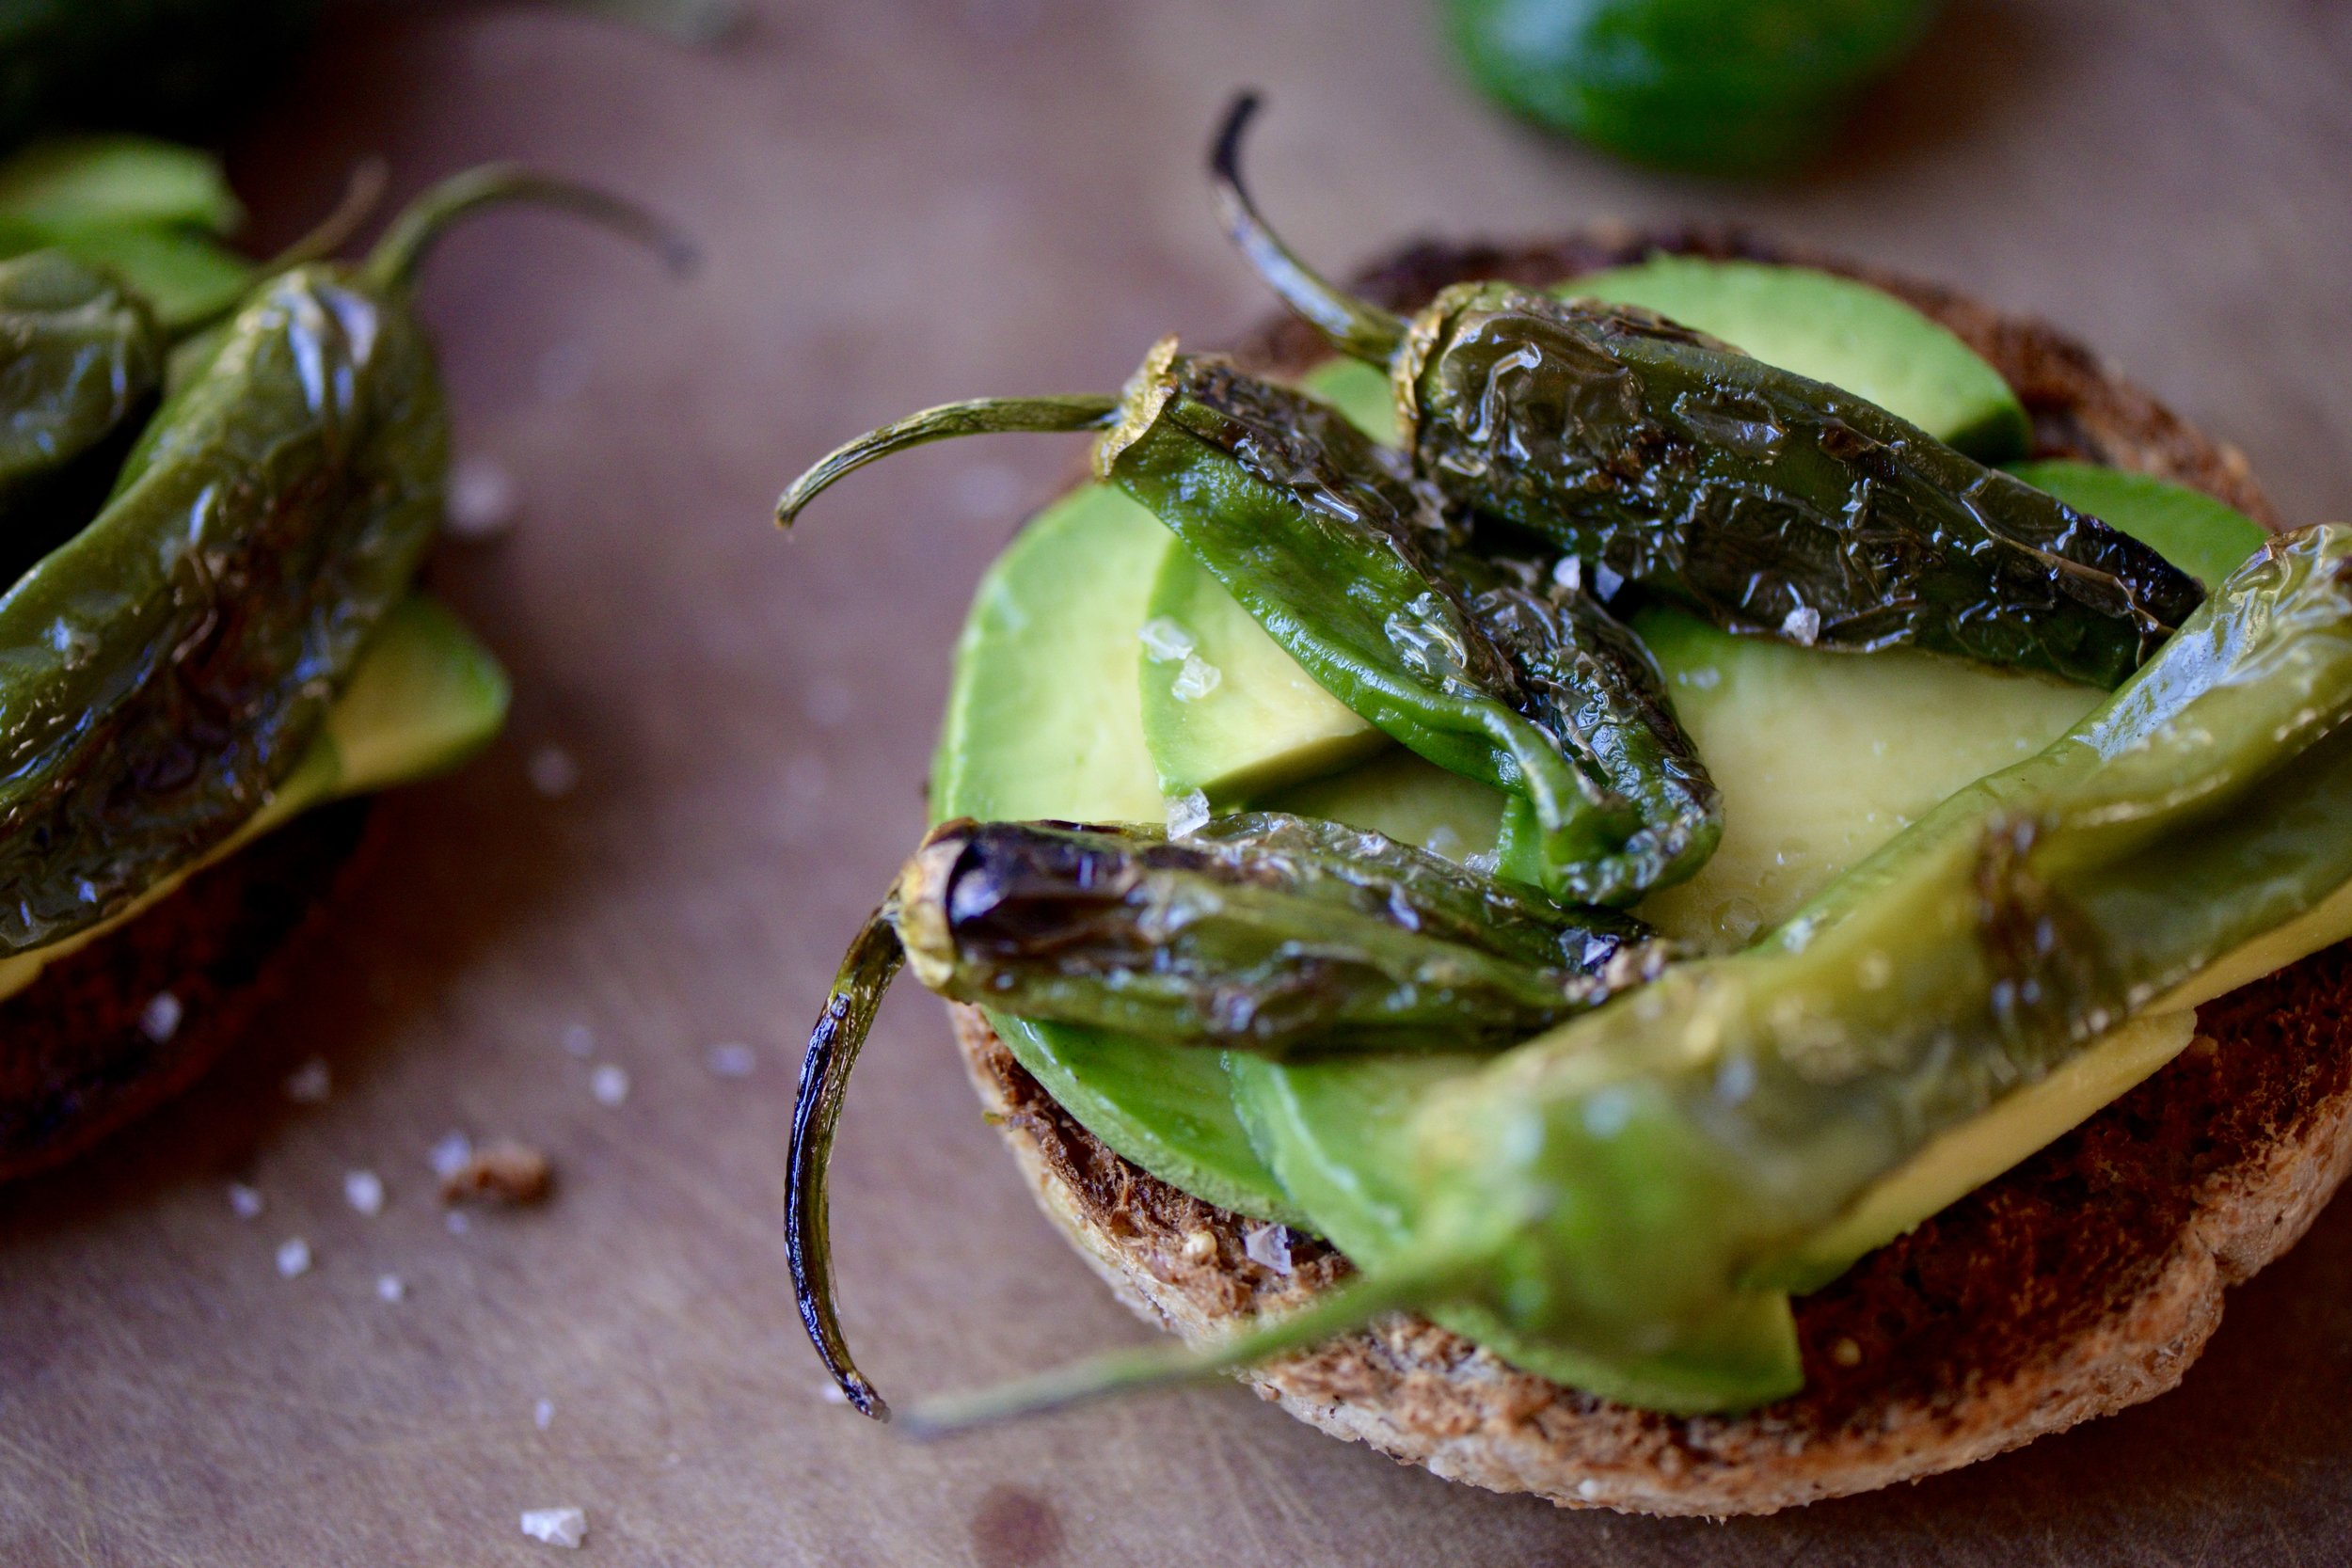
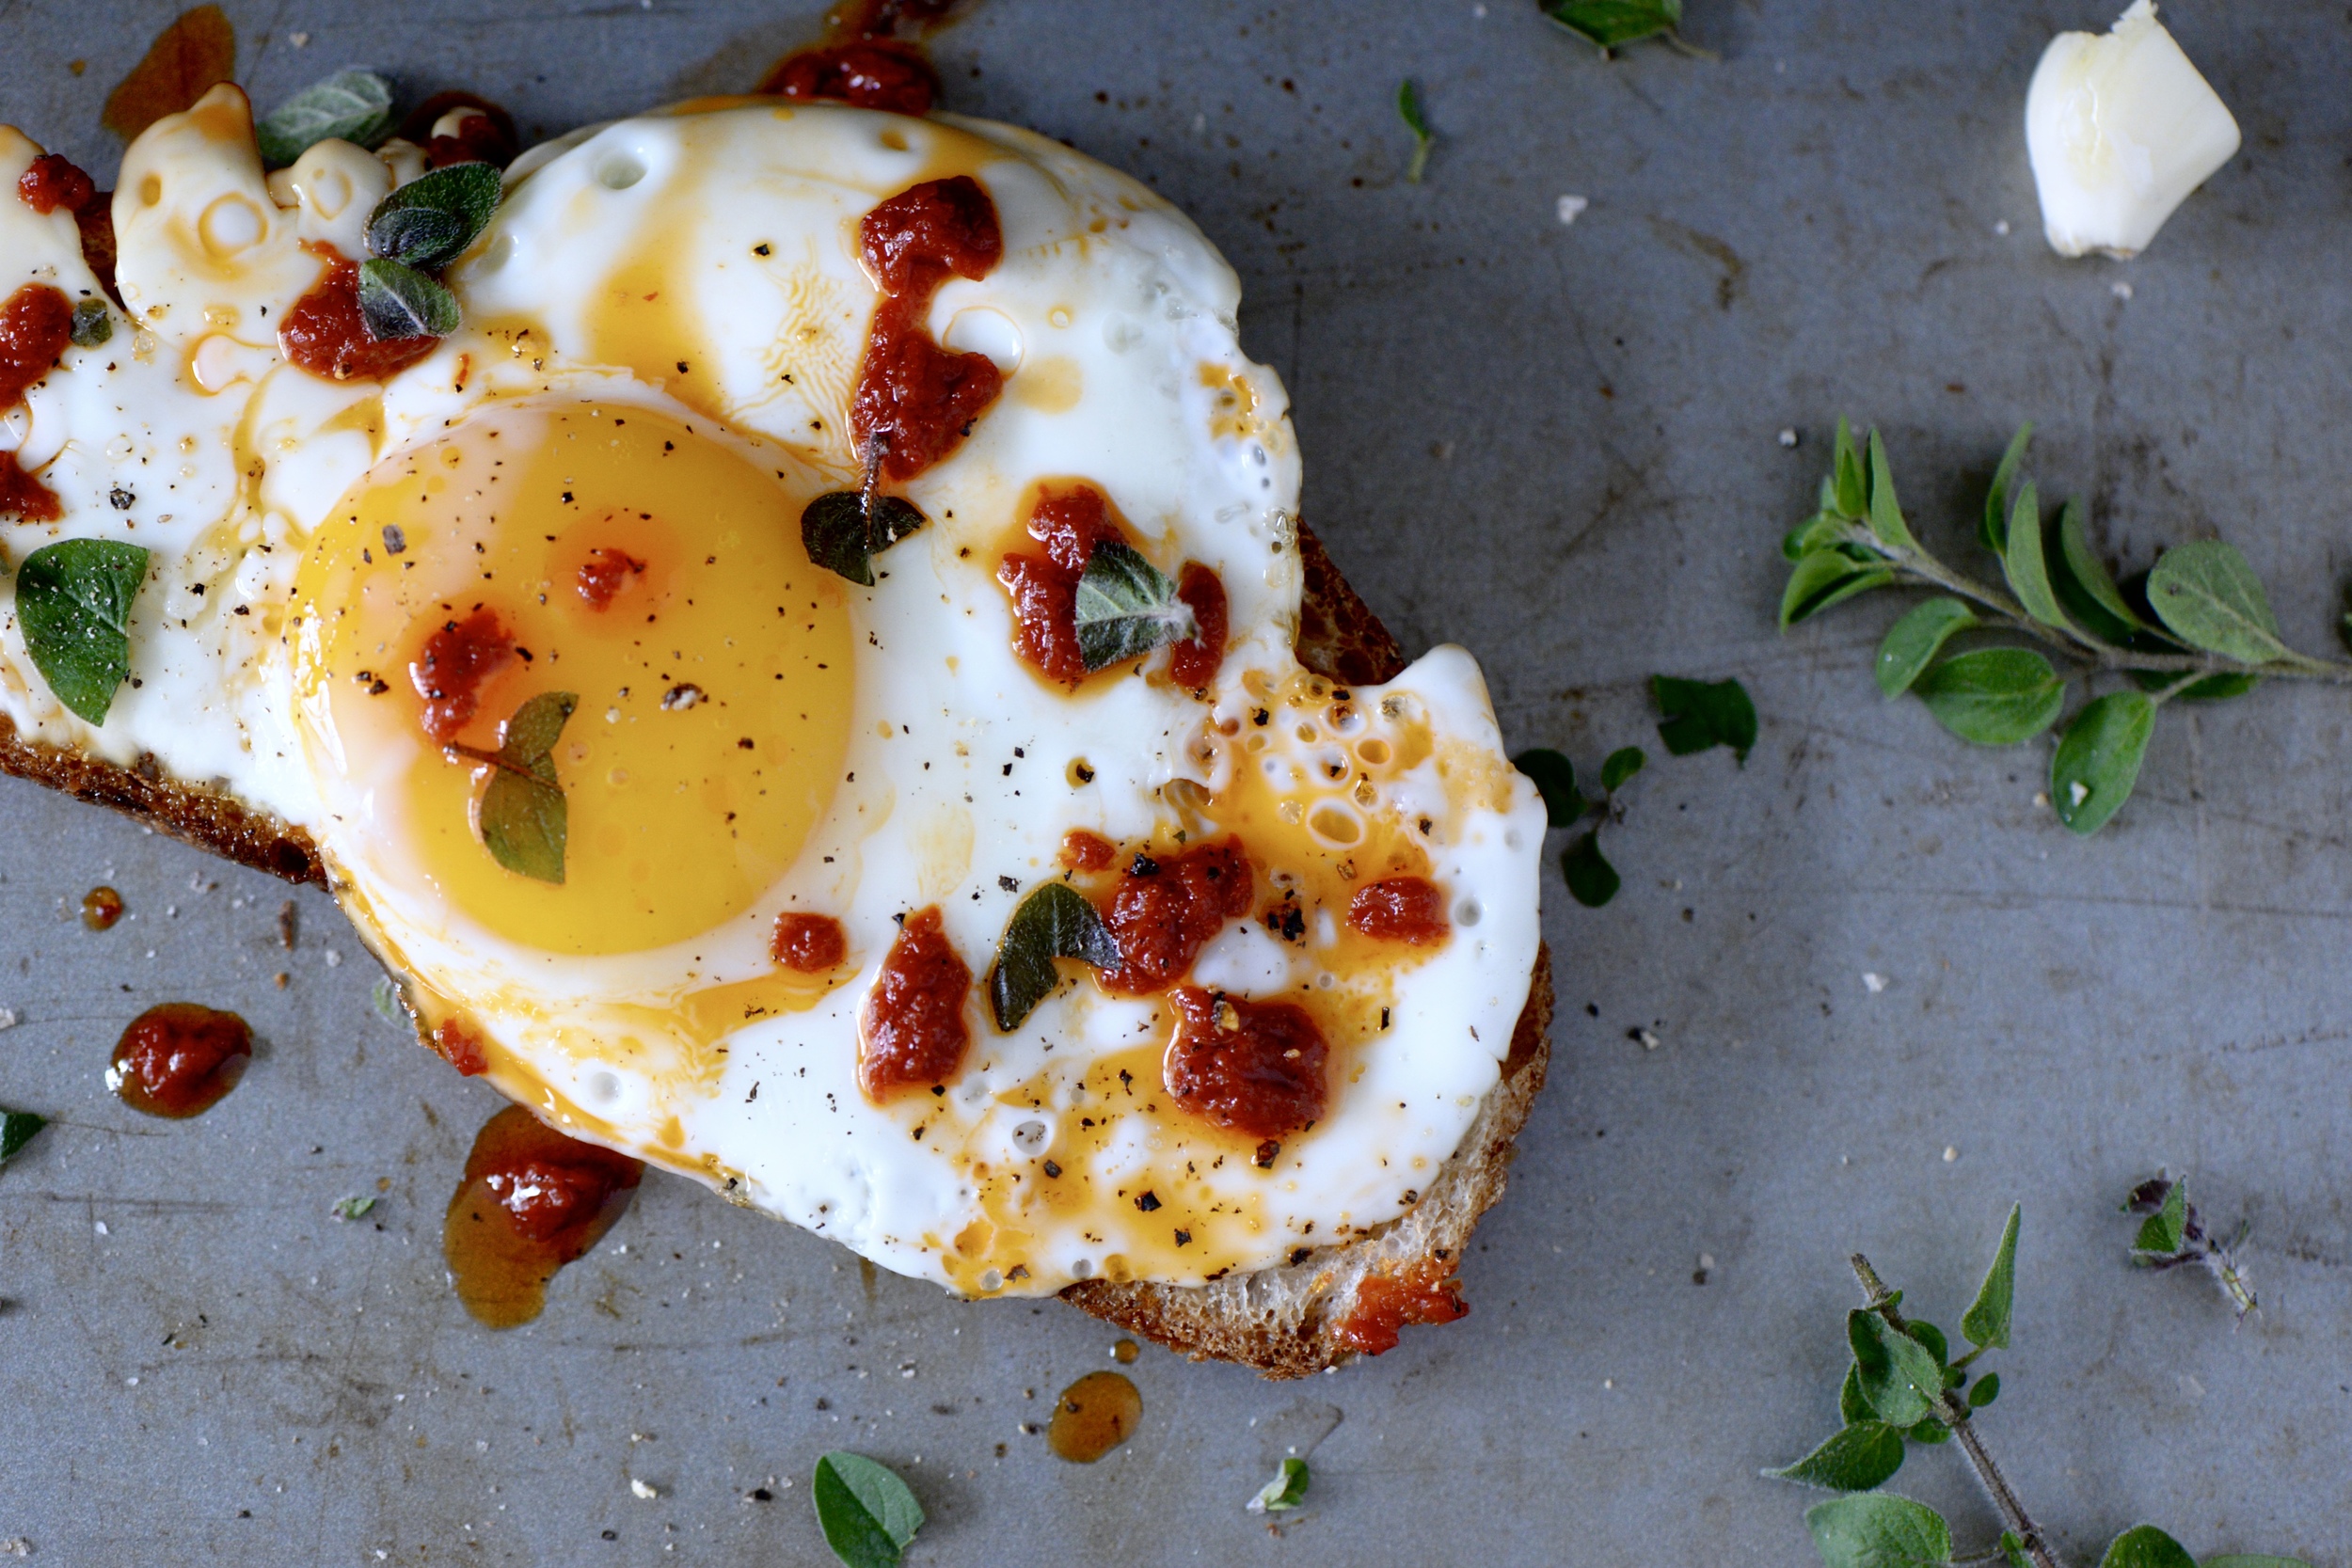
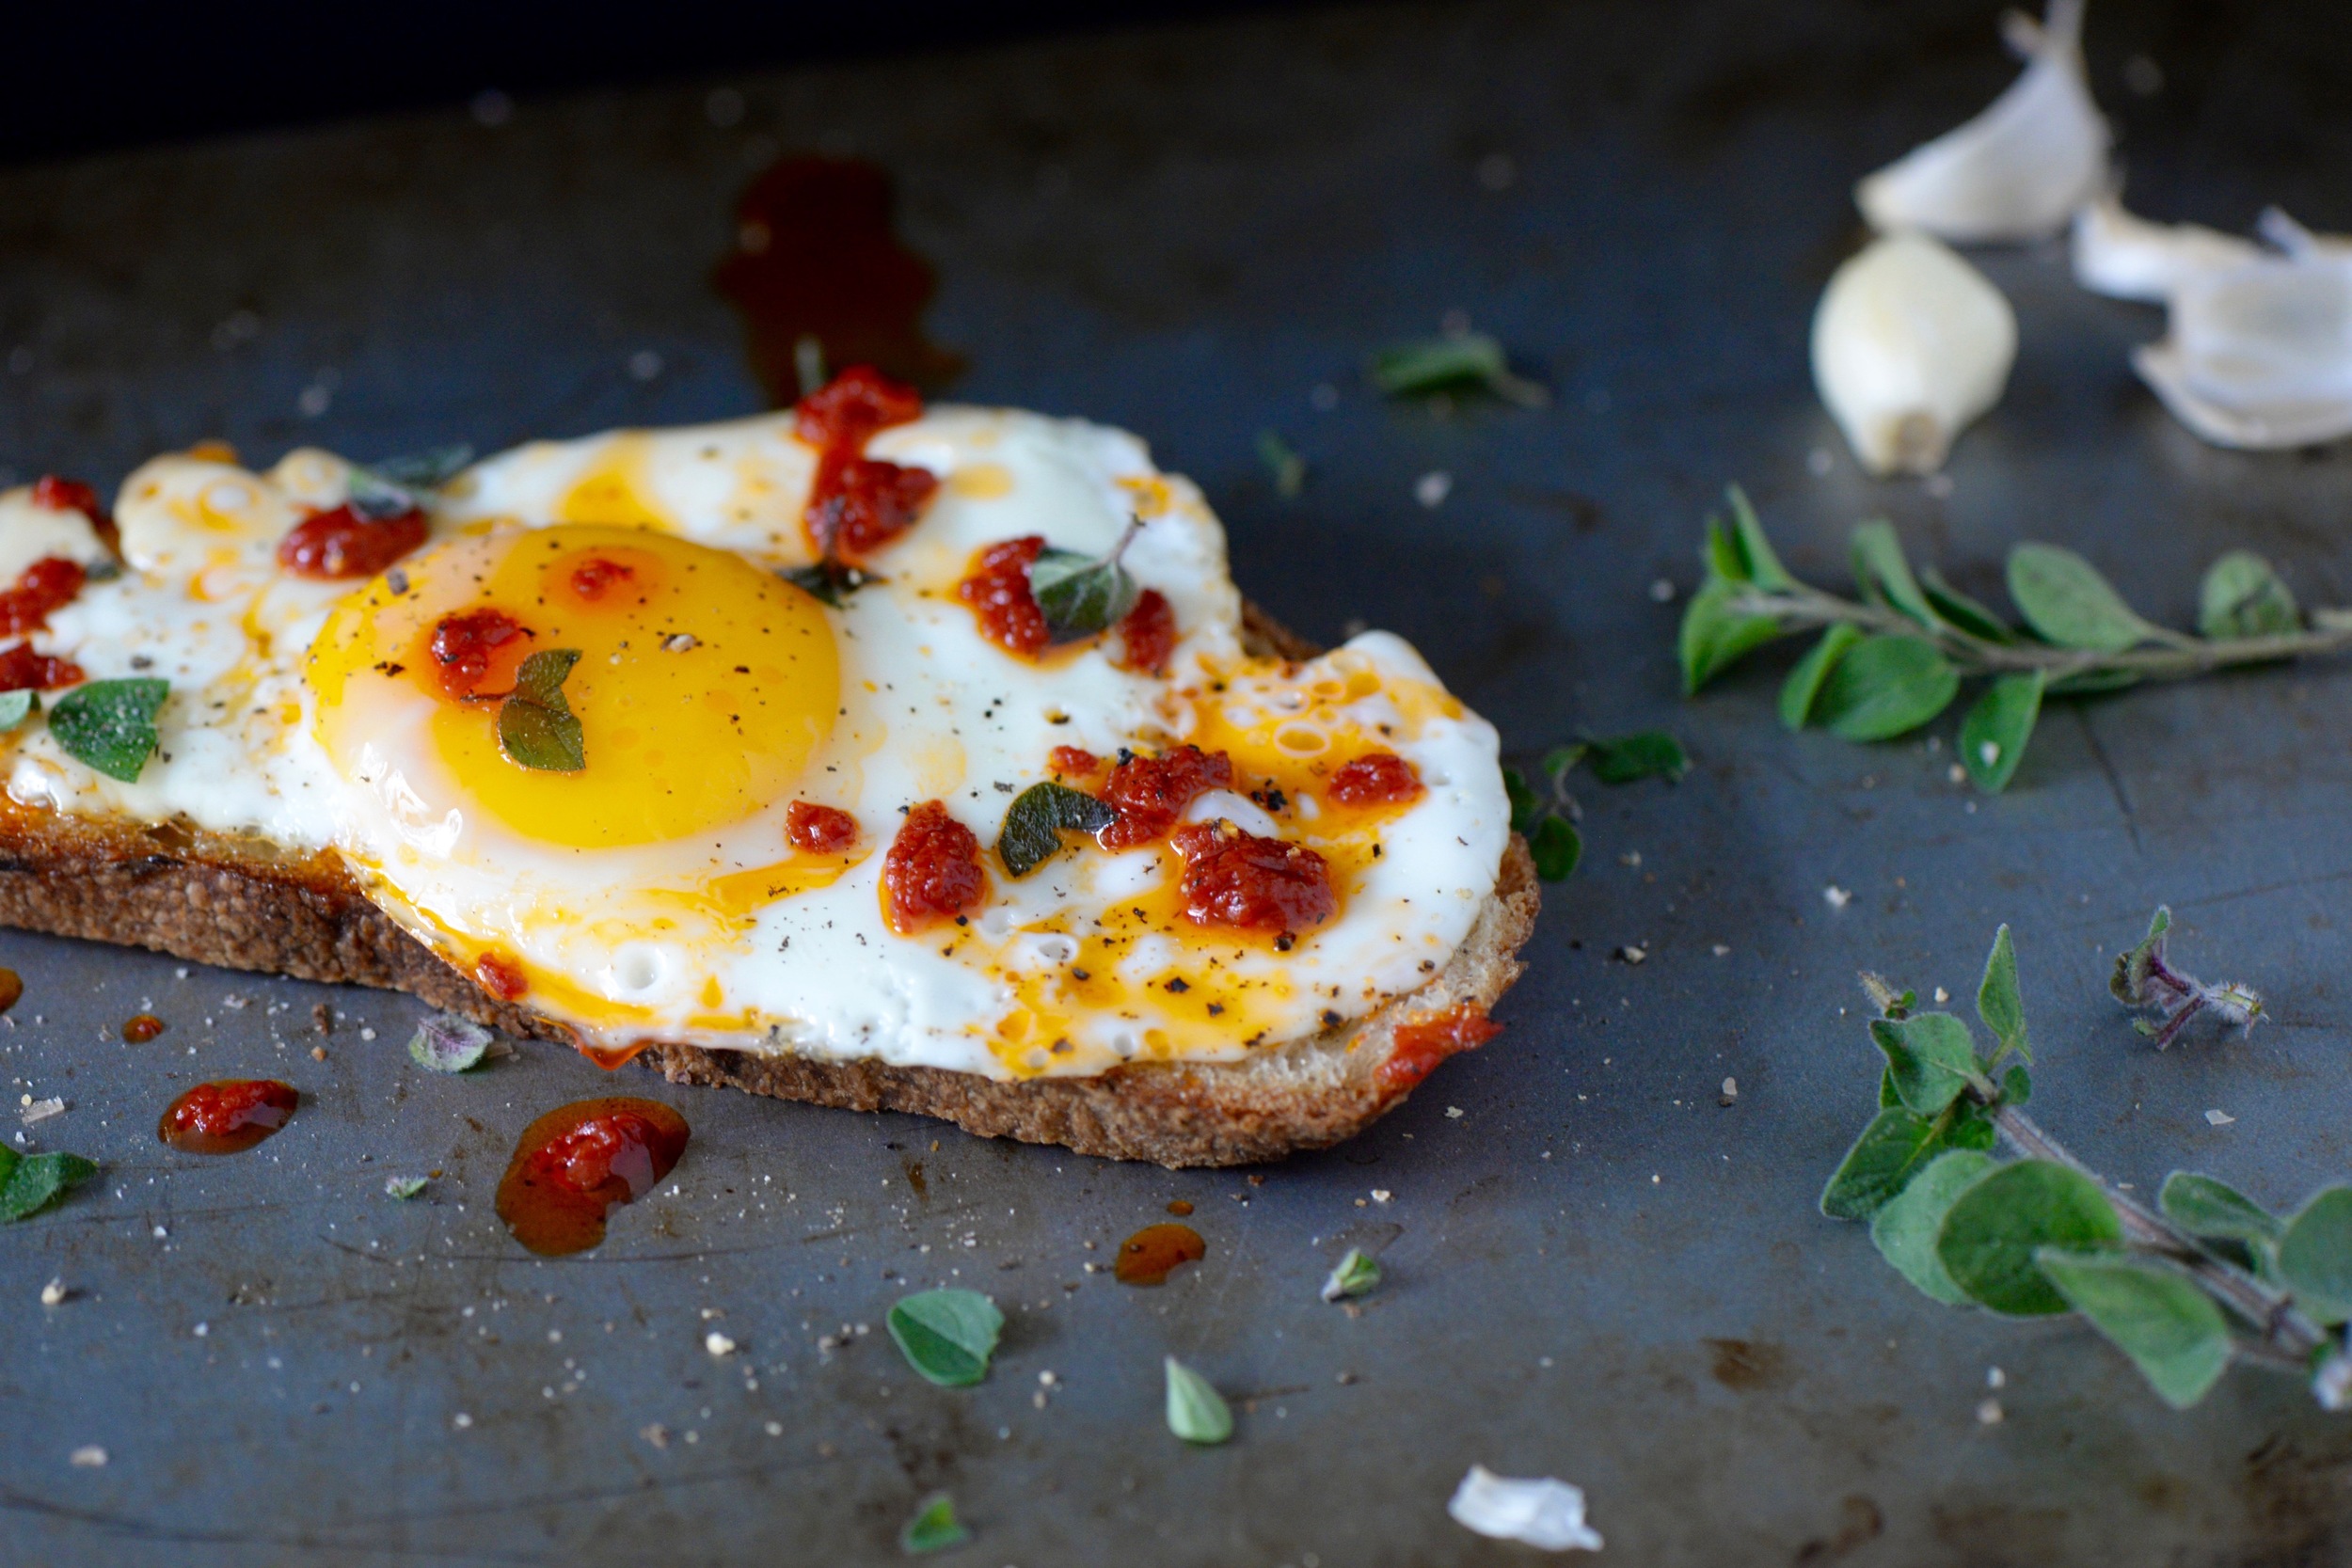
Back to the peppers. Padrón peppers are deliciously tender and a far cry from rigid (and always hot!) jalapenos and very pungent and vegetal green peppers. Heat makes their thin skin melt, their few sugars just beginning to caramelize. The problem is that they can be a little hard to find. Shishitos, on the other hand, seemed to be everywhere at our farmers' market. While I would be hard-pressed to tell you the exact difference in taste, padrón peppers are a little more petite. I pretty much treat both them the same way. Fry them in a little oil until nice and blistered, sprinkle with some sea salt, and eat, seeds (not stems) included. As much as I love them plain, I thought they could add a little texture and subtle earthy heat to a breakfast favorite of mine, the egg and avocado sandwich.

I feel like I'm cheating calling this a recipe, but I thought the combo was worthy of a share. I tossed on a little fresh basil for a hint of summer freshness. Tomato would be a welcome addition, but as it's breakfast, I didn't want to get too complicated.

Shishito Avocado Breakfast Toast

1 whole wheat English muffin or 2 slices whole wheat bread, toasted
Handful of shishito peppers (or Padrón peppers, if you can find them)
3 teaspoons olive oil, divided
2 eggs
1/2 large avocado
A few basil leaves, cut into chiffonade
Sea salt and pepper, for sprinkling (or a little Parmigiano reggiano is delicious!)

Heat 1 teaspoon olive oil over medium heat. Add peppers, and cook for 7-10 minutes, tossing occasionally. Peppers should be blistered and starting to wilt. Remove from heat, remove stems from peppers, and sprinkle with sea salt.

Meanwhile, heat 2 teaspoons olive oil over medium heat. Crack two eggs into pan, and allow to cook for 5-7 minutes or until desired doneness. You can flip the egg for over easy or I sometimes place a lid over the pan to allow the white to cook and just allow the yolk to set.

Mash 1/4 of avocado on each slice of bread. Top with basil, shishitos, and fried eggs. Sprinkle with salt and pepper (and a little Parmigiano reggiano), if desired. Serves 1.

DSC_4265.jpg
In Breakfast Tags breakfast, eggs, summer, avocado, recipe, vegetarian
Comment

Spring Asparagus Frittata

June 5, 2016 Emily Watson

I thought that once I started a 9-5 job, my schedule would feel easier. As a student, I woke up, went to class all day, and studied all night when I got home. I was preoccupied with school nearly every waking hour, but I still seemed to find time for making dinner, running errands, and even completing a yoga teacher training (!). I felt like there were more hours in a day then than now. How does that even work?

But I think I’m figuring out what it is. Despite me having more hours of free time, energetically speaking, I am a bit frazzled and a bit less focused. In school, I had one purpose- to study. I had a strict list of to-do’s and became an expert at checking them off. Now, I come home and without a clear agenda, my energy just flows everywhere, making it difficult for me to focus, difficult for me to be efficient. As frustrating as it is to feel myself being inefficient, I’m glad that I’m finally figuring out the source of my squandering-the-hours-away attitude. I’m also not saying that it is important that I be maximizing productivity at all times, but I realize that for me, being productive makes me happy. I relish in the feeling that I’ve done something, created something, and grown just a little bit.

So how does all of this relate to my frittata here? With my evenings feeling a bit truncated because of this scattered energy, I’ve struggled getting a well-composed dinner on the table. Avocado toast, fried eggs, clean-out-the-fridge grain bowls have always been my healthy go-to’s for hectic times, but I also wanted something more composed, a dish that felt more purposeful and intentional. Frittatas have been one of my favorite dishes ever since living abroad in Spain where I ate more than my fair share of tortilla española, a Spanish frittata of sorts. Rich with olive oil-sauteed onions and potatoes, and sometimes even zucchini, they were a daily mid-morning habit when my belly would start to grumble around 11am and lunch wasn’t until 2pm.

The beautiful thing about a frittata is that you can throw almost any vegetable in it (and a little cheese if you’re feeling it) and call it a meal. Because it’s spring, I’ve been using asparagus and local feta, sometimes tossing in a handful of cooked broccoli or sauteed chard. It may seem a little intimidating at first-- my #1 worry was that the whole thing would stick to the skillet. To be honest, I did screw up my first one, but not in the way I anticipated. The top seemed beautifully golden and perfectly done, and the whole thing slipped right out of the pan for me- success!--, but the inside was still jiggly, runny egg began to ooze everywhere, causing me to hastily slide it back into the skillet and under the broiler until it firmed up. After another try, I got the timing right, and now, no more undercooked eggs. I promise, if you give this a go, that’s pretty much the worst thing that can happen to you. If your frittata does end up sticking to the pan- which it shouldn’t with my tips- just eat the darn thing out of the skillet.
 

Asparagus and Feta Frittata

2 eggs
2 teaspoons extra-virgin olive oil, divided
5 asparagus spears, tough ends removed and chopped in 1-inch lengths
¼ cup grated cheese (I used ½ grated extra-sharp cheddar and ½ crumbled feta)
salt and pepper, to taste

Preheat broiler on high. Place rack 8-10 inches from the broiler. Heat 1 teaspoon olive oil over medium heat in a 6-inch cast iron pan. Add asparagus pieces and a sprinkling of salt and saute for 2 minutes or until asparagus are bright green and tender. Remove asparagus from heat.

Add 1 teaspoon olive oil to same pan and allow to heat over medium-low heat while you prepare the rest of the ingredients. In another bowl, beat eggs with a pinch of salt and sprinkling of pepper. Add all but a few pieces of asparagus and all but 1 tablespoon of cheese. Mix well. When skillet is hot and oil shimmers, swirl oil to coat bottom and sides of pan well. This will ensure your frittata has a nice golden edge and won't stick to the pan.

Pour egg mixture into skillet and gently distribute vegetables evenly. Sprinkle with reserved asparagus pieces and cheese. Allow to cook on stovetop for about 1 minute over medium-low heat. Place skillet under broiler and allow to cook for 4-5 minutes or until puffed and golden on the sides. To check for doneness, press the top of frittata just at the center. It should be firm with a slight give. There will be some carryover cooking after removing from the oven, so keep that in mind. If it gives too much, leave under broiler for another minute. Sometimes, I poke a few holes in the center with a fork and tilt the pan, letting the runny egg ooze out to the top so that it cooks faster.

To remove from skillet, place a plate or cutting board on top of pan. Invert skillet and cutting board. Frittata will release from the pan upside down, so gently flip right side up to serve. If you find the eggs are not quite ready after flipping, just slide the frittata back into the skillet and return to the oven until done. You'll get better with the timing each go-around. Allow the frittata to rest a few minutes before cutting into to allow it to settle. Enjoy! Serves 1.

DSC_3982.jpg
DSC_3993.jpg
In Mains Tags eggs, vegetarian, asparagus, spring, gluten-free, recipe
Comment

Spring Tea Party Bites + My Bridal Shower

March 22, 2016 Emily Watson

My whole heart is so full, it is just about to burst. I am getting married in almost a month, and some of my favorite people got together this weekend to help me celebrate with my bridal shower. We had the BEST time. I will preface this by saying one of my favorite things to do is going to high tea. Hoity-toity it may be, but I relish in the excuse to get all dolled up, sip tea with our pinkies (awkwardly) raised, and nibble on dainty sweet and savory bites with people who just make me smile. I am not one of those people who had ever imagined what my wedding dress would look like or the type of wedding cake I would have, but I knew that I wanted a tea party to make an appearance somewhere in the wedding planning process. 

I was all set to gather around with my close friends and family for tea and bridal shower games, until I stumbled upon Maddie from Madalynne Studios on Instagram. Maddie, a seamstress extraordinaire (among many other awesome things), makes beautiful sporty, modern lingerie and hosts day-long sewing and bra-making workshops which attract people from all over the country. I reached out, asking her about hosting a little sewing workshop in her beautiful studio space for my bridal shower. I was thrilled when she said yes. The plan was that we would all bring homemade tea-party bites, sip tea, and learn to sew something. She had the idea of doing a little "Panty Party" in which we would all sew cute panties while we mingled around. 

The most fantastic thing was that none of us had any real sewing machine experience, and ALL of us made a pair of fancy underpants by the end of the shower. They were bright red, high-waisted in the best possible way, and incredibly comfortable. Maddie warned us that we would all be wearing them by the end of the event, and right she was! Maddie was the perfect hostess and instructor. She was patient with the more perfectionist types and easy-going with those who got a little distracted with the delicious treats we all made. She also was a master troubleshooter when I got myself into a sewing hole...which happened quite a few times. As an added DIY, I brought materials for simple hand-sewn heart-shaped tea bags that looked beautiful floating in their tea cups. 

I must give a huge shout-out to all of my friends and family who brought the most beautiful and delicious tea party treats. We hardly had enough table space for all of the goodies! My Mom and little sister made super-cute avocado and egg sandwiches on pumpernickel, miso-yogurt and radish toasts, and cucumber and cream cheese sandwiches. My bridesmaids and friends made savory frittatas, brie-stuffed puff pasty nibbles, chocolate and red wine strawberry cakes, mini lemon cupcakes, and cookies galore. My future sister-in-law brought the juiciest strawberries from Carlos Bakery, and my future mother-in-law brought tasty Filipino empanadas fresh from the bakery. The photos below do these treats more justice than any words, so take a look for yourself. Maddie snapped the gorgeous event photos in between wearing her sewing teacher hat.

emily-bridal-shower-13.jpg
emily-bridal-shower-16.jpg
emily-bridal-shower-31.jpg
emily-bridal-shower-33.jpg
emily-bridal-shower-43.jpg
emily-bridal-shower-47.jpg
emily-bridal-shower-48.jpg
emily-bridal-shower-49.jpg
emily-bridal-shower-21.jpg
emily-bridal-shower-54.jpg
emily-bridal-shower-23.jpg
emily-bridal-shower-99.jpg
emily-bridal-shower-107.jpg

Food and tea aside, It was so special for me to have many of the important, supportive, and loving women in my life all together for the afternoon. Many of them come from different periods in my life, so to have that shared sewing experience was just the cherry on top. I cannot wait to have them all together again in just 32 days when I walk down the aisle (!).

As many times as I was told I should not have to do anything for my shower, I could not resist. I love making things look beautiful, and that most certainly means I wanted to make some beautiful food. Nothing fancy, but something certainly bright, fresh, and oh-so-spring. I made four types of tea nibbles leading up to the event as practice and loved them all!

  • Egg and Avocado Salad with Radish on Whole Grain
  • Roasted Beet and Tahini with Lemon and Dill on Pumpkernickel
  • Cucumber with Edamame Goat Cheese on Whole Wheat
  • Curried Chickpea Radicchio Cups

I could not even name a favorite for you- they work so well together. I ultimately decided to take just two of them to the shower given the amount of food others were bringing, and I am glad I did because there was not a smidgen of space left on the tables... or in anyone's bellies!

DSC_3728.jpg

Without further ado, here they are!

Egg and Avocado Salad with Radish on Whole Grain

4 hard-boiled eggs, peeled and finely diced
2 avocados, peeled, pitted and finely diced
1/2 lemon, juiced
salt and pepper, to taste
2 radishes, very finely julienned
8 slices whole grain bread, preferably sandwich bread

Mash 1 avocado with lemon juice and generous sprinkling of salt and pepper. Stir in chopped eggs. Add remaining diced avocado and mix gently so as to not break up the diced avocado too much. Season to taste with salt and pepper. Spread on 4 slices of bread. Sprinkle with julienned radishes. Slice pieces into squares or into slender thirds. Enjoy!

DSC_3725.jpg

Beet and Tahini with Lemon and Dill on Pumpernickel

3 medium to large beets, greens removed and roots scrubbed clean (no need to peel yet)
1/2-3/4 cup tahini
1 lemon, zested
1 handful dill, finely chopped (or another microgreen of choice, for garnish)
1/3 cup sunflower seeds, toasted
sea salt and pepper, for sprinkling
7 thin slices German Pumpernickel bread, toasted or other thin, sturdy bread

Prepare beets. Place clean beets in a steamer basket in a pot with water just to bottom of basket. Steam beets for 40-50 minutes, or until butter knife inserted to beet slips through easily. Be sure to add more water about half way through to prevent pot from scorching. Alternatively, beets can be wrapped in foil and roasted in oven at 400 degrees for 45-50 minutes. Remove beets from heat and allow to cool before slipping skins from beet. Using a mandoline or very carefully with a knife, thinly slice beets into paper-thin sheets. Set sheets aside.

Spread about 1 to 1 1/2 tablespoons tahini on one side of each of toasted bread slices. Be careful not to go over the edge or the become a little messy. Layer beet slices in thin layer atop tahini. Sprinkle with lemon zest, chopped dill (or microgreen), toasted sunflower seeds, and sea salt and pepper. Slice bread into thirds and then leave in rectangles or slice into squares. Makes 21 rectangular slices or 42 squares.

DSC_3696.jpg
DSC_3765.jpg

Cucumber with Edamame Goat Cheese on Whole Wheat

1 large English (seedless) cucumber
1 recipe Edamame Goat Cheese Spread
1/2 loaf of soft whole wheat bread
handful of chives, finely chopped
sea salt, to taste

Slice cucumber width-wise into thirds. Thinly slice cucumbers thirds lengthwise into paper-tin strips. Divide edamame spread amongst bread slices. Layer cucumber slices diagonally atop spread. Some cucumber will hang over the edges. This website has a great visual tutorial. Carefully cut crusts from bread, and then cut slices into 4 small squares. Sprinkle with chives and a sprinkling of sea salt. Enjoy!

DSC_3718.jpg

Curried Chickpea Radicchio Cups

2 tablespoons olive oil
1 1/2 teaspoons curry powder
2 15-ounce cans chickpeas, drained (or 3 cups cooked chickpeas)
2 green onions, white and light green parts, minced
1/3 cup of dried apricots, minced
1 celery stalk, minced
1/2 lemon, juiced and zested
3 tablespoons Greek yogurt, 2% recommended
1/3 cup chopped almonds, toasted
handful of fresh cilantro, chopped
salt and pepper to taste
1 small head radicchio, leaves removed carefully and torn in half (alternatively, use lettuce leaves or endive)

Warm olive oil in a skillet over medium heat. Add curry powder and cook until fragrant, about 45 seconds. Add chickpeas to skillet and toss to coat. Remove chickpeas and residual oil to bowl. Add green onions, apricots, celery, and lemon zest and juice. Stir to combine. When mixture has cooled slightly, add yogurt, almonds, cilantro, and salt and pepper to taste. mix thoroughly. Divide mixture amongst radicchio cups, placing a few tablespoons in each cup, sprinkle with any extra cilantro and almonds, and serve. Makes about 12-16 radicchio cups, depending on the size.

DSC_3707.jpg
DSC_3739.jpg

**A huge THANK YOU to Maddie for also taking beautiful photographs at the event and to BHLDN for supplying some of the bridal shower-perfect decor and paper products. Maddie also blogged about the event here on her blog and posted more photos, so check it out!

In Life, Vegetarian, Sandwiches, Appetizers Tags snack, recipe, vegetarian, tea party, sandwiches, avocado, chickpeas, eggs, lunch
1 Comment

The Best 5 Minute Tomato and Egg Toast

January 24, 2016 Emily Watson

We have been hunkered down inside since Friday overtaken by a blizzard. Our final snow count? 16 inches. It was a doozy of a snowfall, and a fantastically beautiful one at that. As much as I love getting outside, exploring the city, I also love an excuse to stay inside and do basically nothing. Nothing is a bit relative, considering I am knee-deep in wedding invitations, workshop planning, and more wedding planning, but an excuse to just lounge in my pajamas all day is quite welcome. The cats are loving it.

My would-have-been-a-meteorolgist-in-a-second-life Dad called me on Friday to tell me- "Emily, make sure you have plenty of food in the house. At least 3 days worth. This storm is going to be a big one." I reassured him that we would not go hungry- especially since I had a giant batch of this heart-warming dal in the freezer and had stocked up on avocados, bananas, and nuts- you know, all of the essentials, but I also kind of thought he was over-reacting. Oops.

Now what does this recipe have to do with this blizzard and our 16 inches of fluff? Nothing really except for the fact that it most likely does not require a trip to the store and can be made comfortably in your pajamas while watching Youtube videos of James Corden and John Mulaney. I may or may not know this from personal experience.

It tastes a little like pizza but does not require an oven or a tip to the delivery guy. A sprinkling of cheese to take it to the next level is totally optional. Good quality extra-virgin olive oil, however, is not.

The Best 5 Minute Tomato and Egg Toast

1 thick slice of your favorite bread, toasted (I used a local rosemary and olive oil bread from Metropolitan Bakery)
1 garlic clove
1 tablespoon extra-virgin olive oil, divided
1 teaspoon tomato paste
1 egg
pinch of fresh oregano leaves, chopped, or dried oregano, crumbled
salt and pepper, to taste

Toast bread. While warm, rub with garlic clove sliced in half. Fry egg. Heat 1 teaspoon olive oil in pan over medium-high heat and. Add egg, turn heat to medium, and allow to cook until desired doneness. I cover mine with a domed lid to help the white steam a little and cook faster. Meanwhile, mix remaining 2 teaspoons olive oil and tomato paste in a small bowl until combined. Place egg on garlic toast, top with oil mixture, and sprinkle with oregano and salt and pepper. Enjoy. Makes 1 egg toast.

Optional toppings to spiff it up: sliced avocado, a shower of Parmigiano-Reggiano, basil instead of oregano, a sprinkling of cayenne or dash of hot sauce for some heat. Play around, have some fun, make something delicious.

DSC_3219.jpg
In Breakfast, Mains Tags breakfast, eggs
2 Comments

Pickled Deviled Eggs with Dill and Crispy Quinoa

May 1, 2015 Emily Watson

I grew up with deviled eggs making an appearance at least once a week in our house. They were always a little different, depending on the mood of our babysitter, Louise, that week. Sometimes the filling was a tad runny, sometimes it packed a bit more of a mustard punch, sometimes there was relish involved. Louise never really measured anything, but after watching her enough times, I figured out the basic idea of deviled egg-making. Hard-boil some eggs, mash the yolks with mayonnaise, mustard- she used yellow mustard, salt, pepper, maybe a little Mt. Olive relish. Taste and adjust. Fill the egg whites up and sprinkle with a healthy dose of paprika to make them pretty.

My version is a tad more refined and geared towards spring, but I promise the extra work is worth it. Maybe you do not choose to pickle the eggs or make the crispy quinoa topping, and that is absolutely okay. The filling is still bright and creamy, and you will still get a delicious deviled egg.

Pickling the eggs is optional, but it not only creates a beautiful color, but it also gives the egg a meatier texture and a zing. I use plain Greek yogurt in place of the more traditional mayo to fluff the filling. Fresh dill pairs nicely with the lemon and just makes me think of pickles, but leave it out if you wish. A sliver of avocado gives additional richness and toasted quinoa acts like a crunchy breadcrumb. These eggs can be made a day before, but if you are pickling them, be sure to start that process at least 8 hours before hand so that the pink color has a chance to penetrate the whites. These would make a fantastic spring party appetizer either for the Kentucky Derby or Mother's Day maybe?

The pickling of the eggs is based very loosely on the Beet Pickled Eggs at Cookistry. I used a few different spices and just one beet to get the hue because I know how one beet can give off a tremendous amount of color. Beet stains on hands for days, anyone? The crispy quinoa is adapted from a Real Simple magazine recipe.

Pickled Deviled Eggs with Dill and Crispy Quinoa

4 beet-pickled hard-boiled eggs, see recipe below, or just 4 hard-boiled eggs, peeled
3 tablespoons 2% plain Greek yogurt (Fage is my favorite brand)
2 teaspoons Dijon mustard
3 tablespoons fresh dill, finely chopped, divided
zest of 1/2 lemon
1 teaspoon sea salt + more for sprinkling on at very end
1/4 avocado, thinly sliced, for garnish
crispy quinoa, see recipe below (optional)

Slice the hard-boiled eggs in half length-wise. If using beet-pickled eggs, have a towel nearby so you do not stain your hands. Carefully spoon out the yolks and place in a small bowl. Add the yogurt, mustard, 2 tablespoons of fresh dill, lemon zest, and salt. Mash everything together with a fork until smooth and creamy.

Fill the egg whites up with heaping spoonfuls of the yolk mixture. Place a sliver of avocado on top of each half, sprinkle with remaining fresh dill, crispy quinoa, if using, and a little sprinkle of sea salt. Enjoy! Makes 8 deviled egg halves.

IMG_5928.JPG
IMG_5933.JPG
IMG_5943.JPG
IMG_5951.JPG
IMG_6068.JPG

Beet-Pickled Eggs

4 eggs
1 beet, peeled and chopped into 1-inch pieces
1 cup water
3/4 cup apple cider vinegar
1 bay leaf
1 inch piece of ginger, peeled and sliced into 3 pieces
1/4 teaspoon mustard seeds
3/4 teaspoon salt

Hard-boil the eggs. Place the eggs in a pot and add water to cover by 2 inches. Bring the water to a boil, cover with a lid, and remove pot from the heat. Allow eggs to sit 9 minutes. Immediately drain and rinse with cold water. Place eggs in a bowl of ice water and allow to cool. Peel the eggs carefully. I use a spoon to slip under the thin skin just beneath the shell to slide the shell off. Set eggs aside.

Cook the beet. Add the beet to a small pan with about an inch of water. Cover the pot and allow beet to steam on medium-high heat for about 15-20 minutes or until beet is tender. Drain and place the beets in a clean glass jar that is large enough to hold the eggs. Add the eggs on top of the beets.

Make the pickling mixture. Add the water, vinegar, bay leaf, ginger, mustard seeds, and salt to a pot. Bring to boil and then turn off heat and allow to cool to room temperature.

Add the pickling mixture to the beets and eggs in the glass jar. If the eggs are not covered with liquid, add a little water to the jar or stir to rearrange the eggs so that they are covered. Place in the refrigerator and allow to pickle for at least eight hours. Remove from mixture and allow to drain prior to making deviled eggs.

IMG_5792.JPG
IMG_5791.JPG
IMG_5793.JPG
IMG_5797.JPG
IMG_5789.JPG
IMG_5802.JPG

Crispy Quinoa

1/4 cup quinoa
1/4 cup water
1 tablespoon olive oil
1/4 teaspoon salt

Add all ingredients to a non-stick skillet. Heat over medium heat and cook until water evaporates and quinoa begins to toast. Stir often until quinoa is golden brown. Mine took 15 minutes. Remove to drain on a paper towel. Make about 1/3 cup of toasted quinoa which can be used in numerous recipes.

IMG_5825.jpg
In Appetizers Tags eggs, vegetarian, dill, spring, quinoa, recipe, appetizers, yogurt, gluten-free
1 Comment
Older Posts →
Hi! I'm Emily. I love to cook whole, nourishing foods, and this is where I share my kitchen experiments and sometimes a little bit of life.

Hi! I'm Emily. I love to cook whole, nourishing foods, and this is where I share my kitchen experiments and sometimes a little bit of life.

Featured
  • July 2017
  • May 2017
  • April 2017
  • March 2017
  • February 2017
  • January 2017
  • December 2016
  • November 2016
  • October 2016
  • September 2016
  • August 2016
  • July 2016
  • June 2016
  • May 2016
  • April 2016
  • March 2016
  • February 2016
  • January 2016
  • December 2015
  • November 2015
  • October 2015
  • September 2015
  • August 2015
  • July 2015
  • June 2015
  • May 2015
  • April 2015
  • March 2015
  • February 2015

  • Appetizers 18
  • Breakfast 18
  • Life 4
  • Mains 39
  • Miscellaneous 2
  • Salads 21
  • Sandwiches 6
  • Side Dishes 8
  • Smoothies 4
  • Snacks 10
  • Soups 14
  • Spreads Dips Sauces 5
  • Sweets 6
  • Vegetarian 1

  • almonds
  • appetizers
  • autumn
  • avocado
  • breakfast
  • brown rice
  • chickpeas
  • chocolate
  • cilantro
  • coconut
  • coconut milk
  • fall
  • gluten-free
  • kale
  • lentils
  • make ahead
  • mint
  • oatmeal
  • recipe
  • salad
  • snack
  • soup
  • spring
  • summer
  • sweet potatoes
  • tahini
  • vegan
  • vegetarian
  • walnuts
  • winter

subscribe

Sign up with your email address to receive new posts directly

We respect your privacy.

Thank you!

All photographs, recipes and content are property of Nourishing Matters, unless otherwise noted. Please do not redistribute without my permission. Thank you!

Powered by Squarespace