• Home
    • About Nourishing Matters
    • About Emily
    • Frequently Asked Questions
  • Recipes
    • Offerings
    • Past Programs and Events
    • Experience and Teaching Style
    • Articles and Features
    • Travel
Menu

nourishing matters

Street Address
City, State, Zip
Phone Number
where wholesome meets delicious

Your Custom Text Here

nourishing matters

  • Home
  • About
    • About Nourishing Matters
    • About Emily
    • Frequently Asked Questions
  • Recipes
  • Work with Me
    • Offerings
    • Past Programs and Events
  • Yoga
    • Experience and Teaching Style
  • Press
    • Articles and Features
  • Adventures
    • Travel

Vegetable Nori Rolls

June 1, 2015 Emily Watson

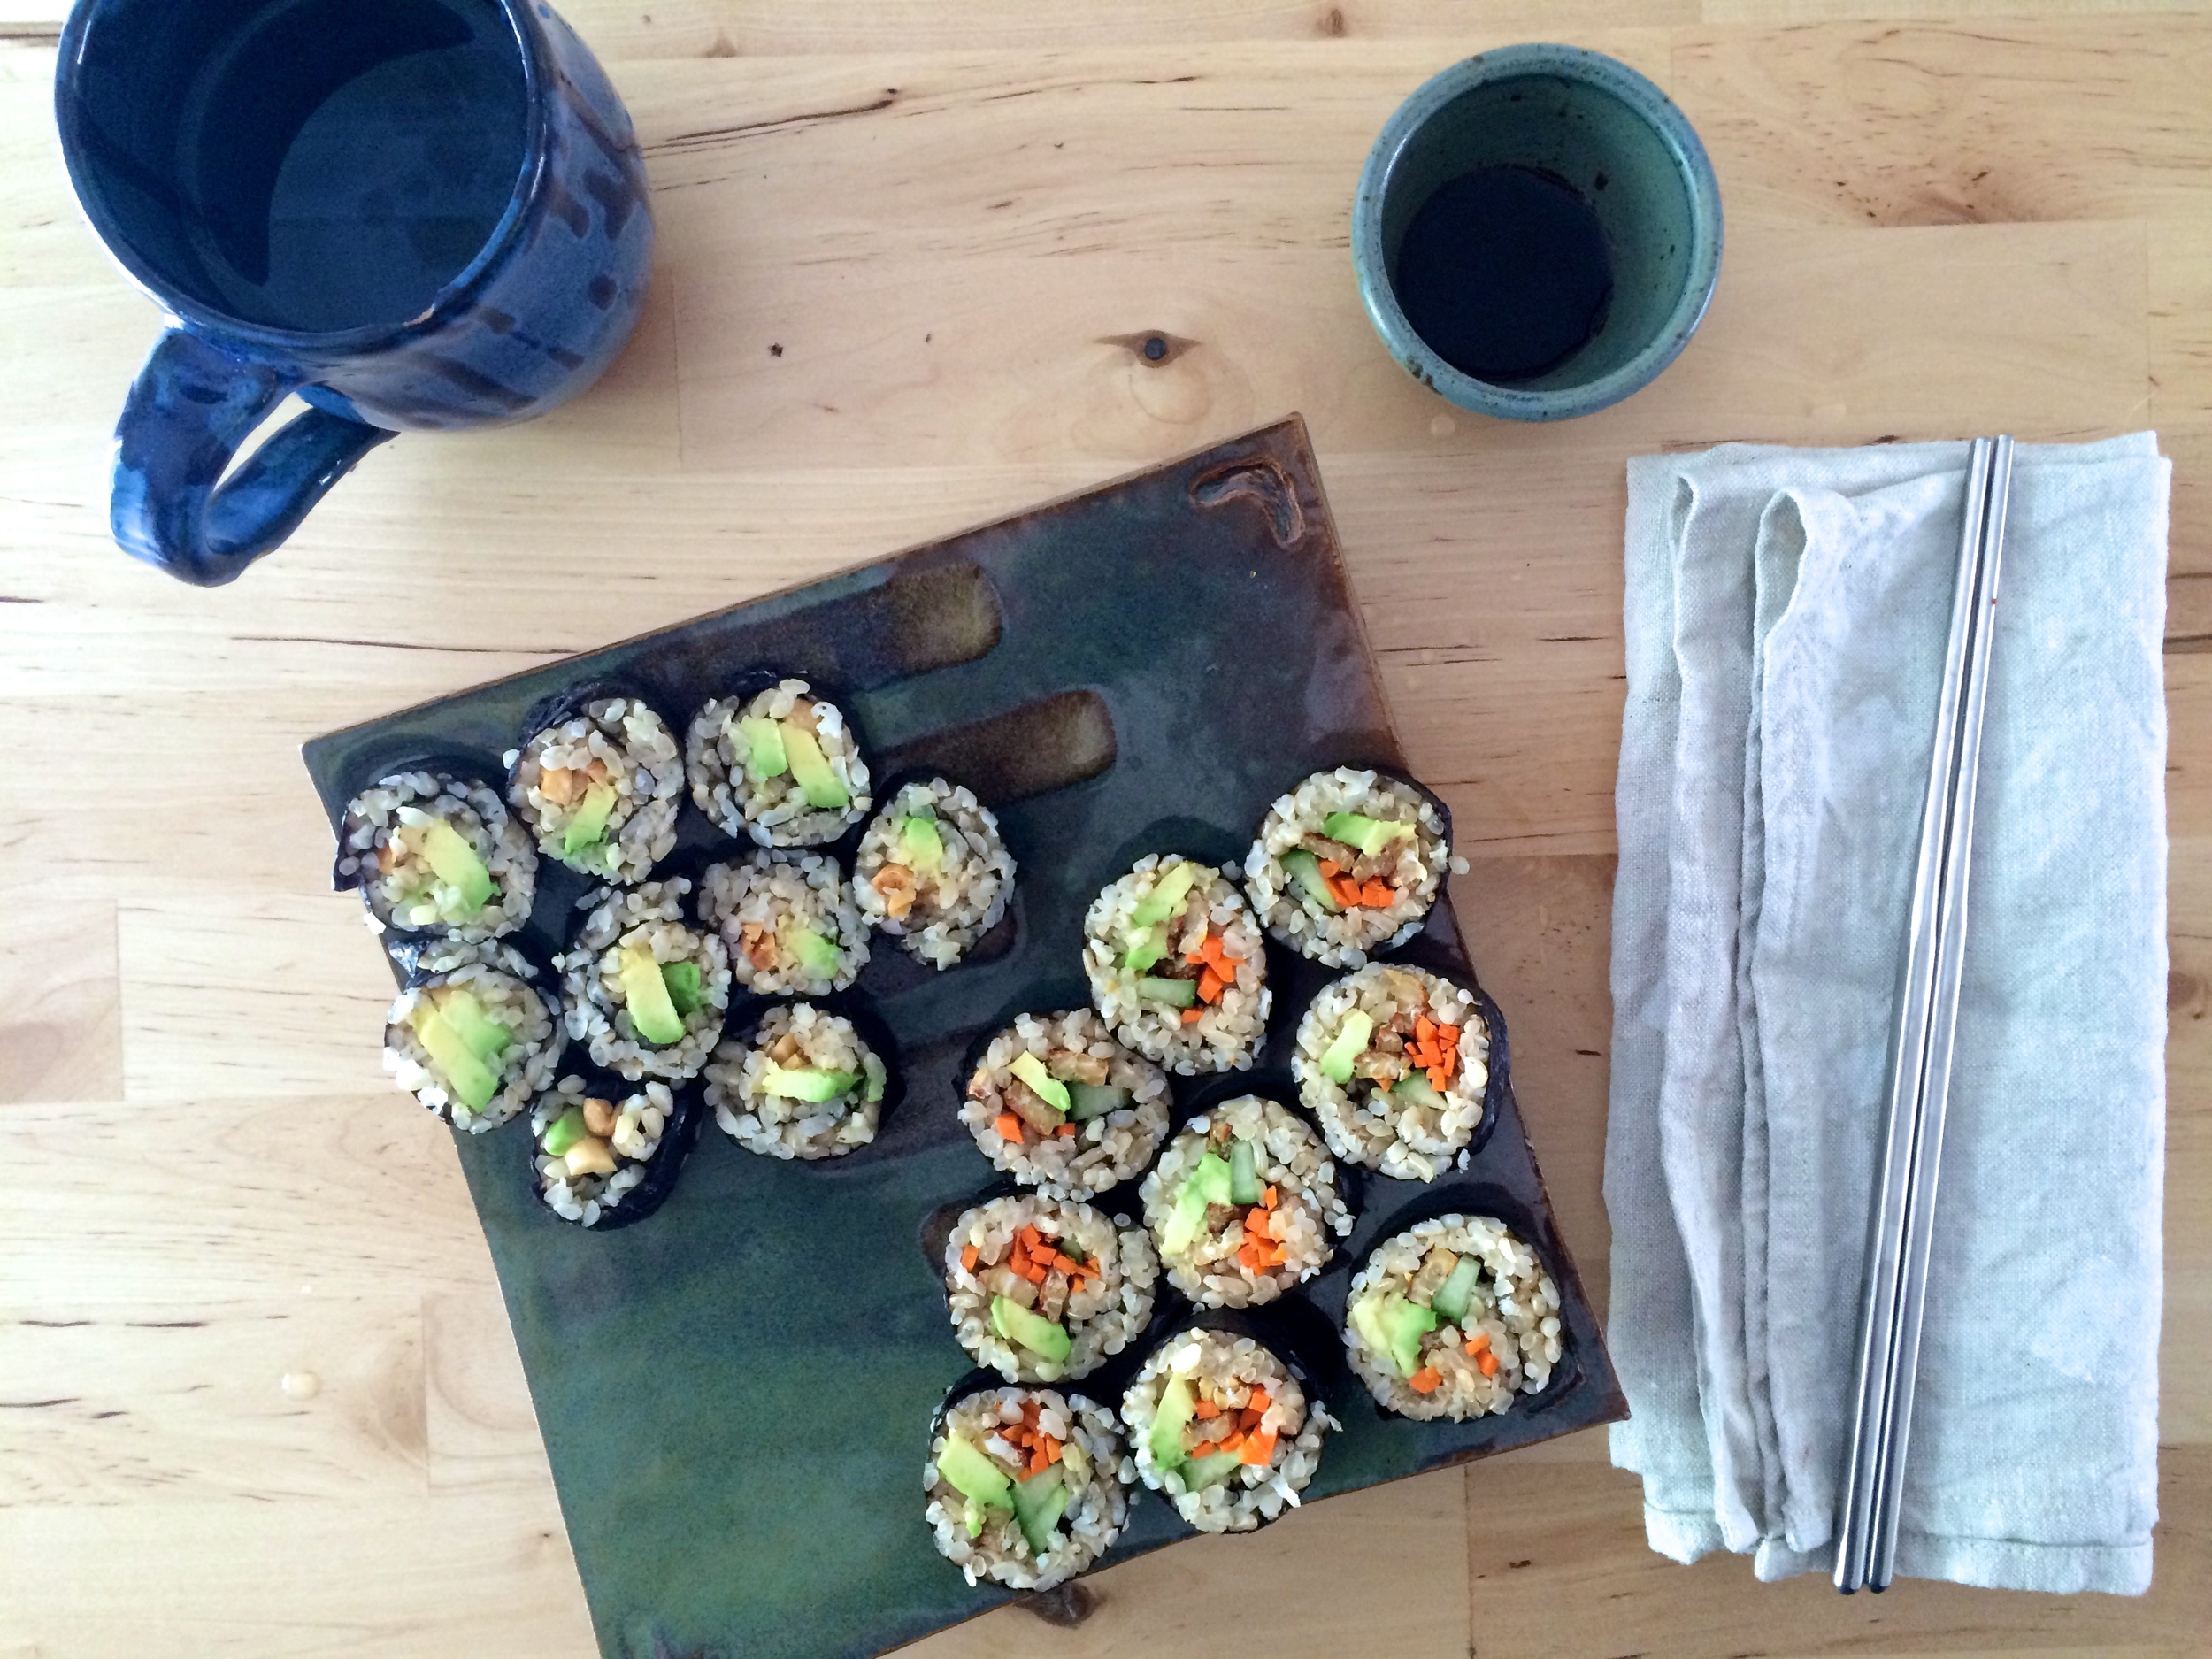
One of the most appealing things to me about sushi is just how neatly organized and beautiful it is. Fillings are bound in a nori and rice bundle, with all of their colors displayed. Little bundles of freshness they are. While I enjoy sushi with raw fish, it is often difficult to find high-quality sushi-grade fish that comes from sustainable sources. Vegetarian rolls are often a go-to for me when I am out with friends and not quite sure about the quality or sourcing of the fish, which is pretty often. Fillings can get extremely creative, and I love discovering new combinations that pair well with sushi rice and nori.

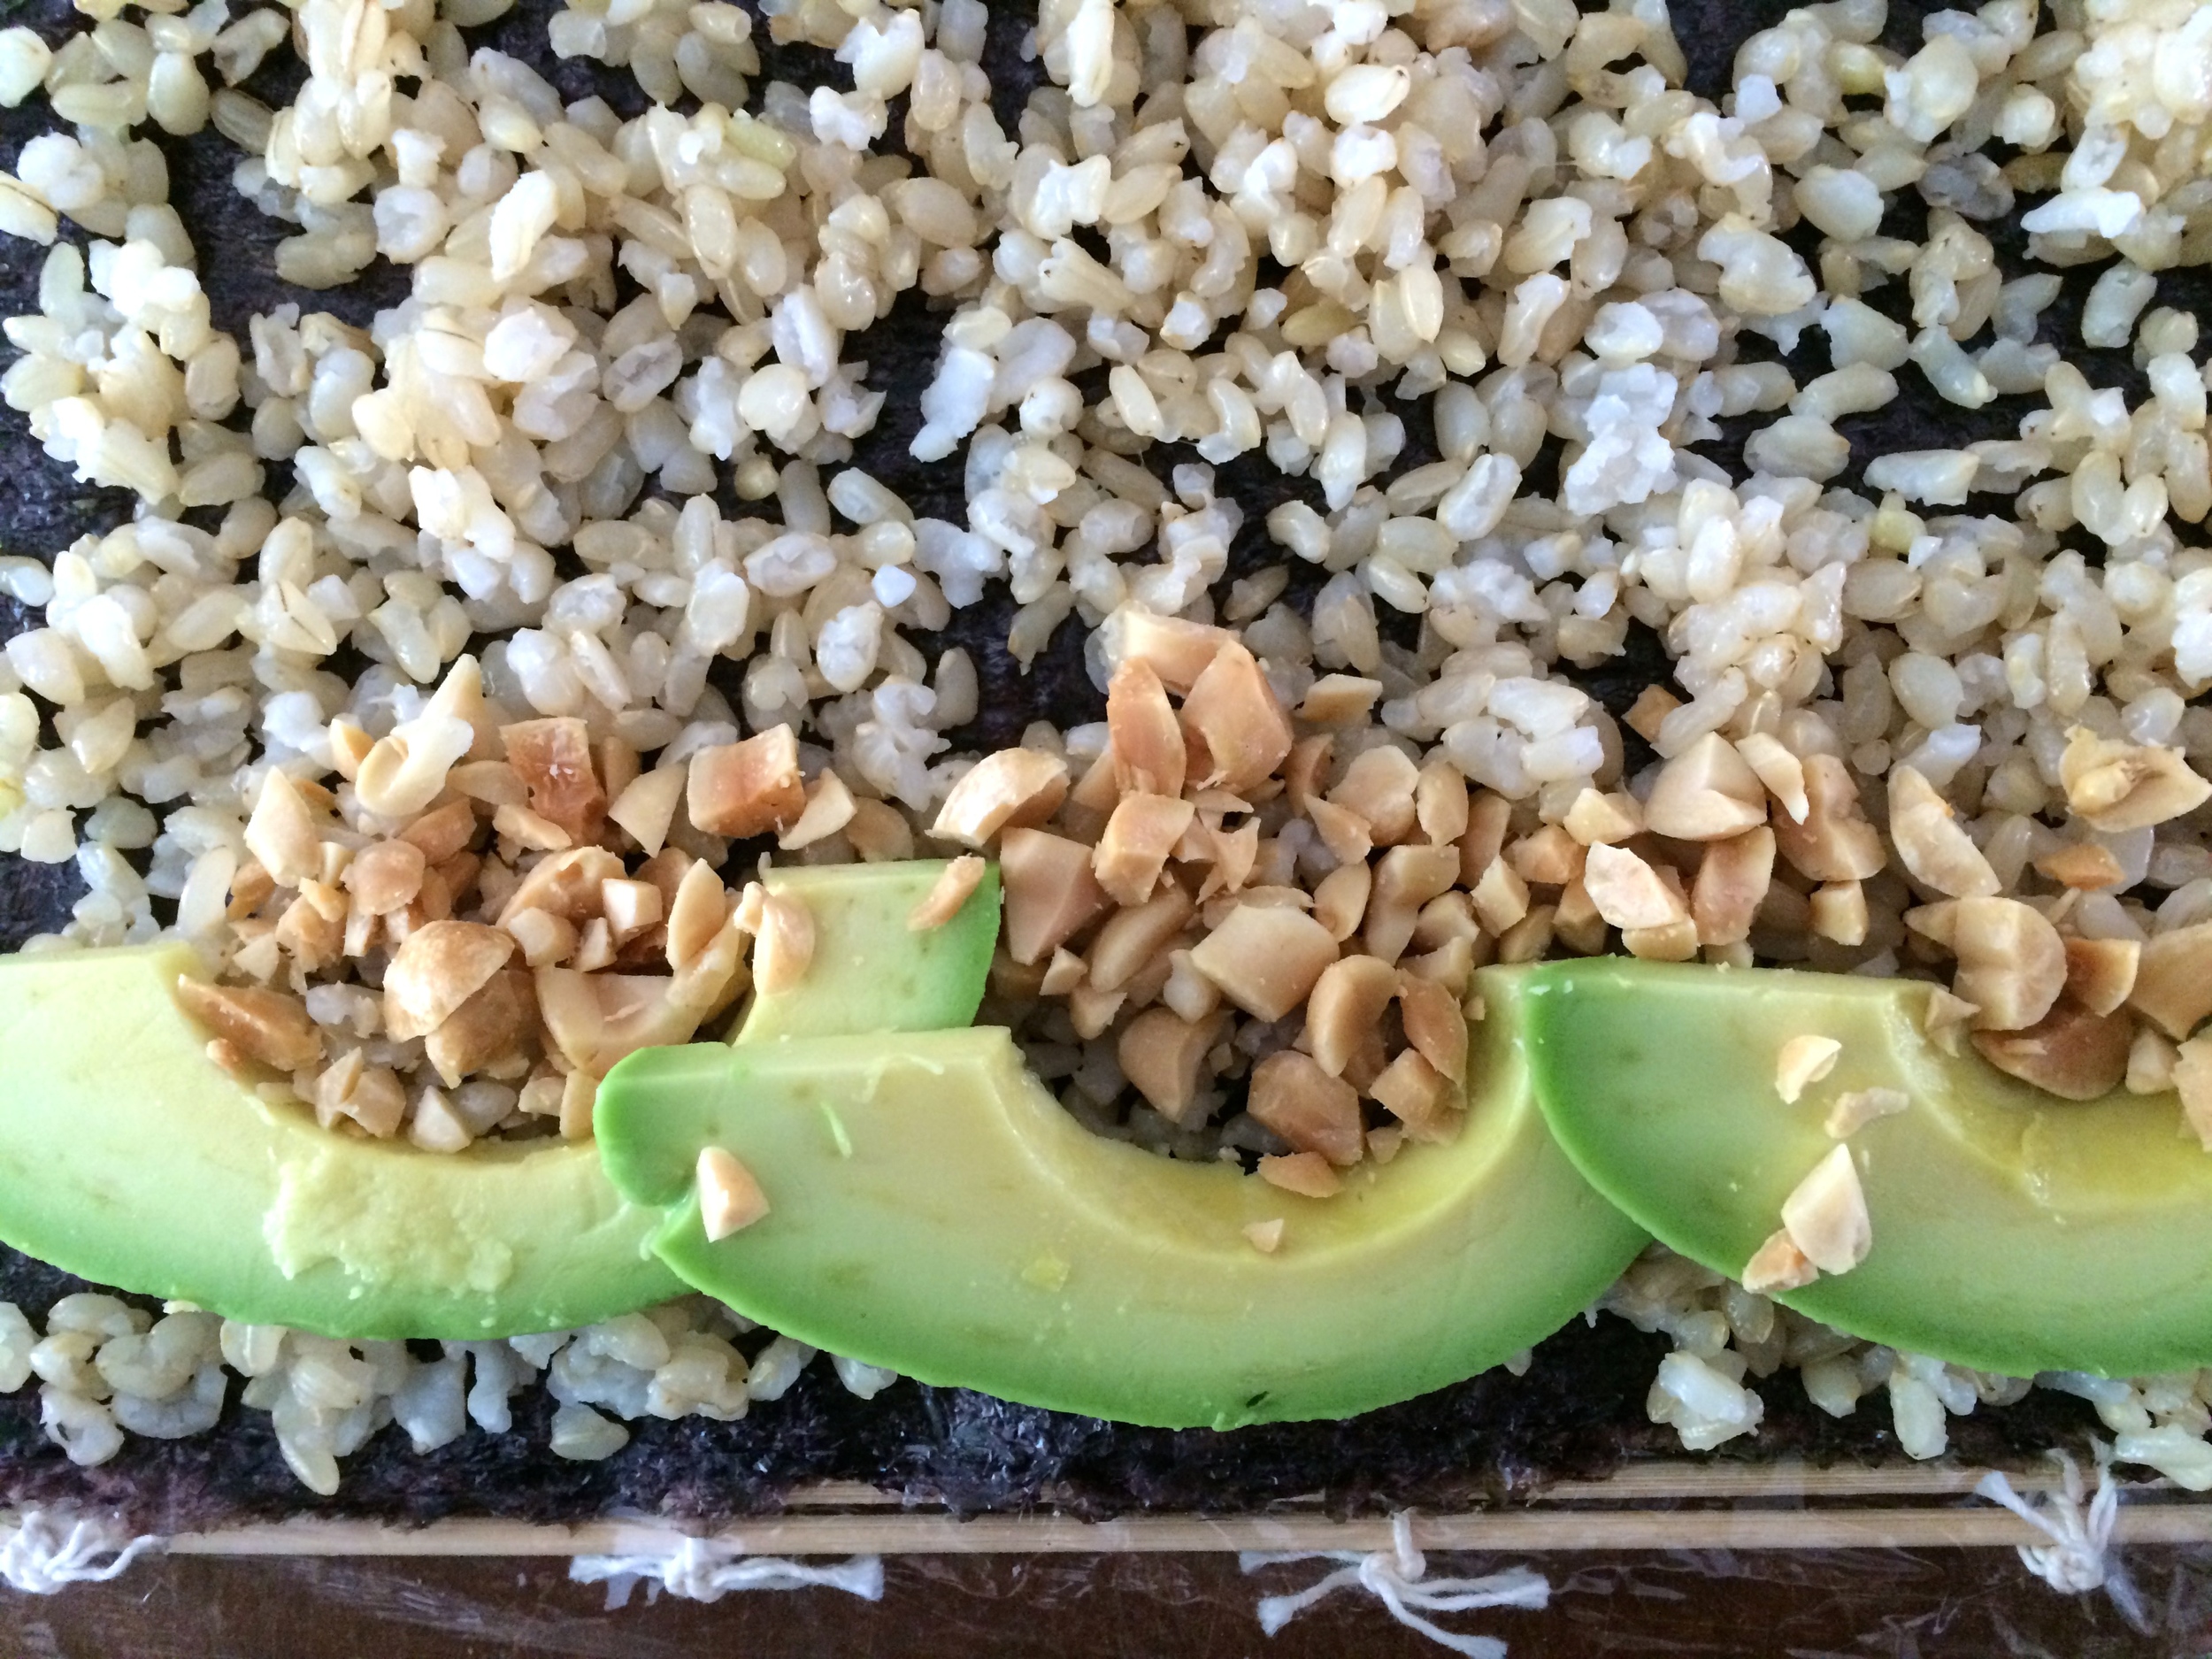
Peanut and avocado is a favorite combination of mine. When I first ordered it, others at the table were skeptical of my vegetarian roll, but there was something about the salty peanuts and creamy avocado that made them change their mind. You can really fill these rolls with whatever you like as the method will be pretty much the same for all sorts of rolls you would like to create. I purchased a sushi mat a long time ago, and it is a fun tool to have on hand if you want to make your own rolls regularly or host a sushi making party. I use brown rice here that I season with rice vinegar. Of course, you do not have to season the rice, but it really does make it taste more authentic.

The rolling technique can be a little tricky at first, but there are a few key tips that will make rolling a little easier.  You can also watch a video such as this one to get the idea.

  • Line your mat with plastic wrap to make clean-up easier.
  • Do not be tempted to over-stuff the roll. You will end up with a nori burrito that is not as sturdy and frankly does not look as cute.
  • Tightly squeeze the roll, firmly but gently, after each rotation to get the tightest, most secure roll.
  • Leave about 2 inches of one end of the nori free of rice so that you can wrap the roll securely.
  • When you cut the roll, use your sharpest knife and dip it in a cup of water between cuts.

The basic roll recipe is adapted from Kristy's Avocado, Mango, and Kimchi Sushi Rolls at Keepin' it Kind. I used honey instead of mirin to ever so lightly sweeten the rice because I always have it on hand.

Vegetable Nori Rolls

Rolls:
2 sheets nori, toasted*
2 cups cooked short grain brown rice, warm or at room temperature (I used a rice cooker)
1 tablespoon brown rice vinegar
1/2 teaspoon honey (agave, if vegan)
1/2 teaspoon salt
Reduced sodium soy sauce or tamari, for serving
Pickled ginger, for serving (optional)

Avocado and Peanut Filling:
1/4 avocado, peeled and thinly sliced
2 tablespoons chopped roasted and salted peanuts

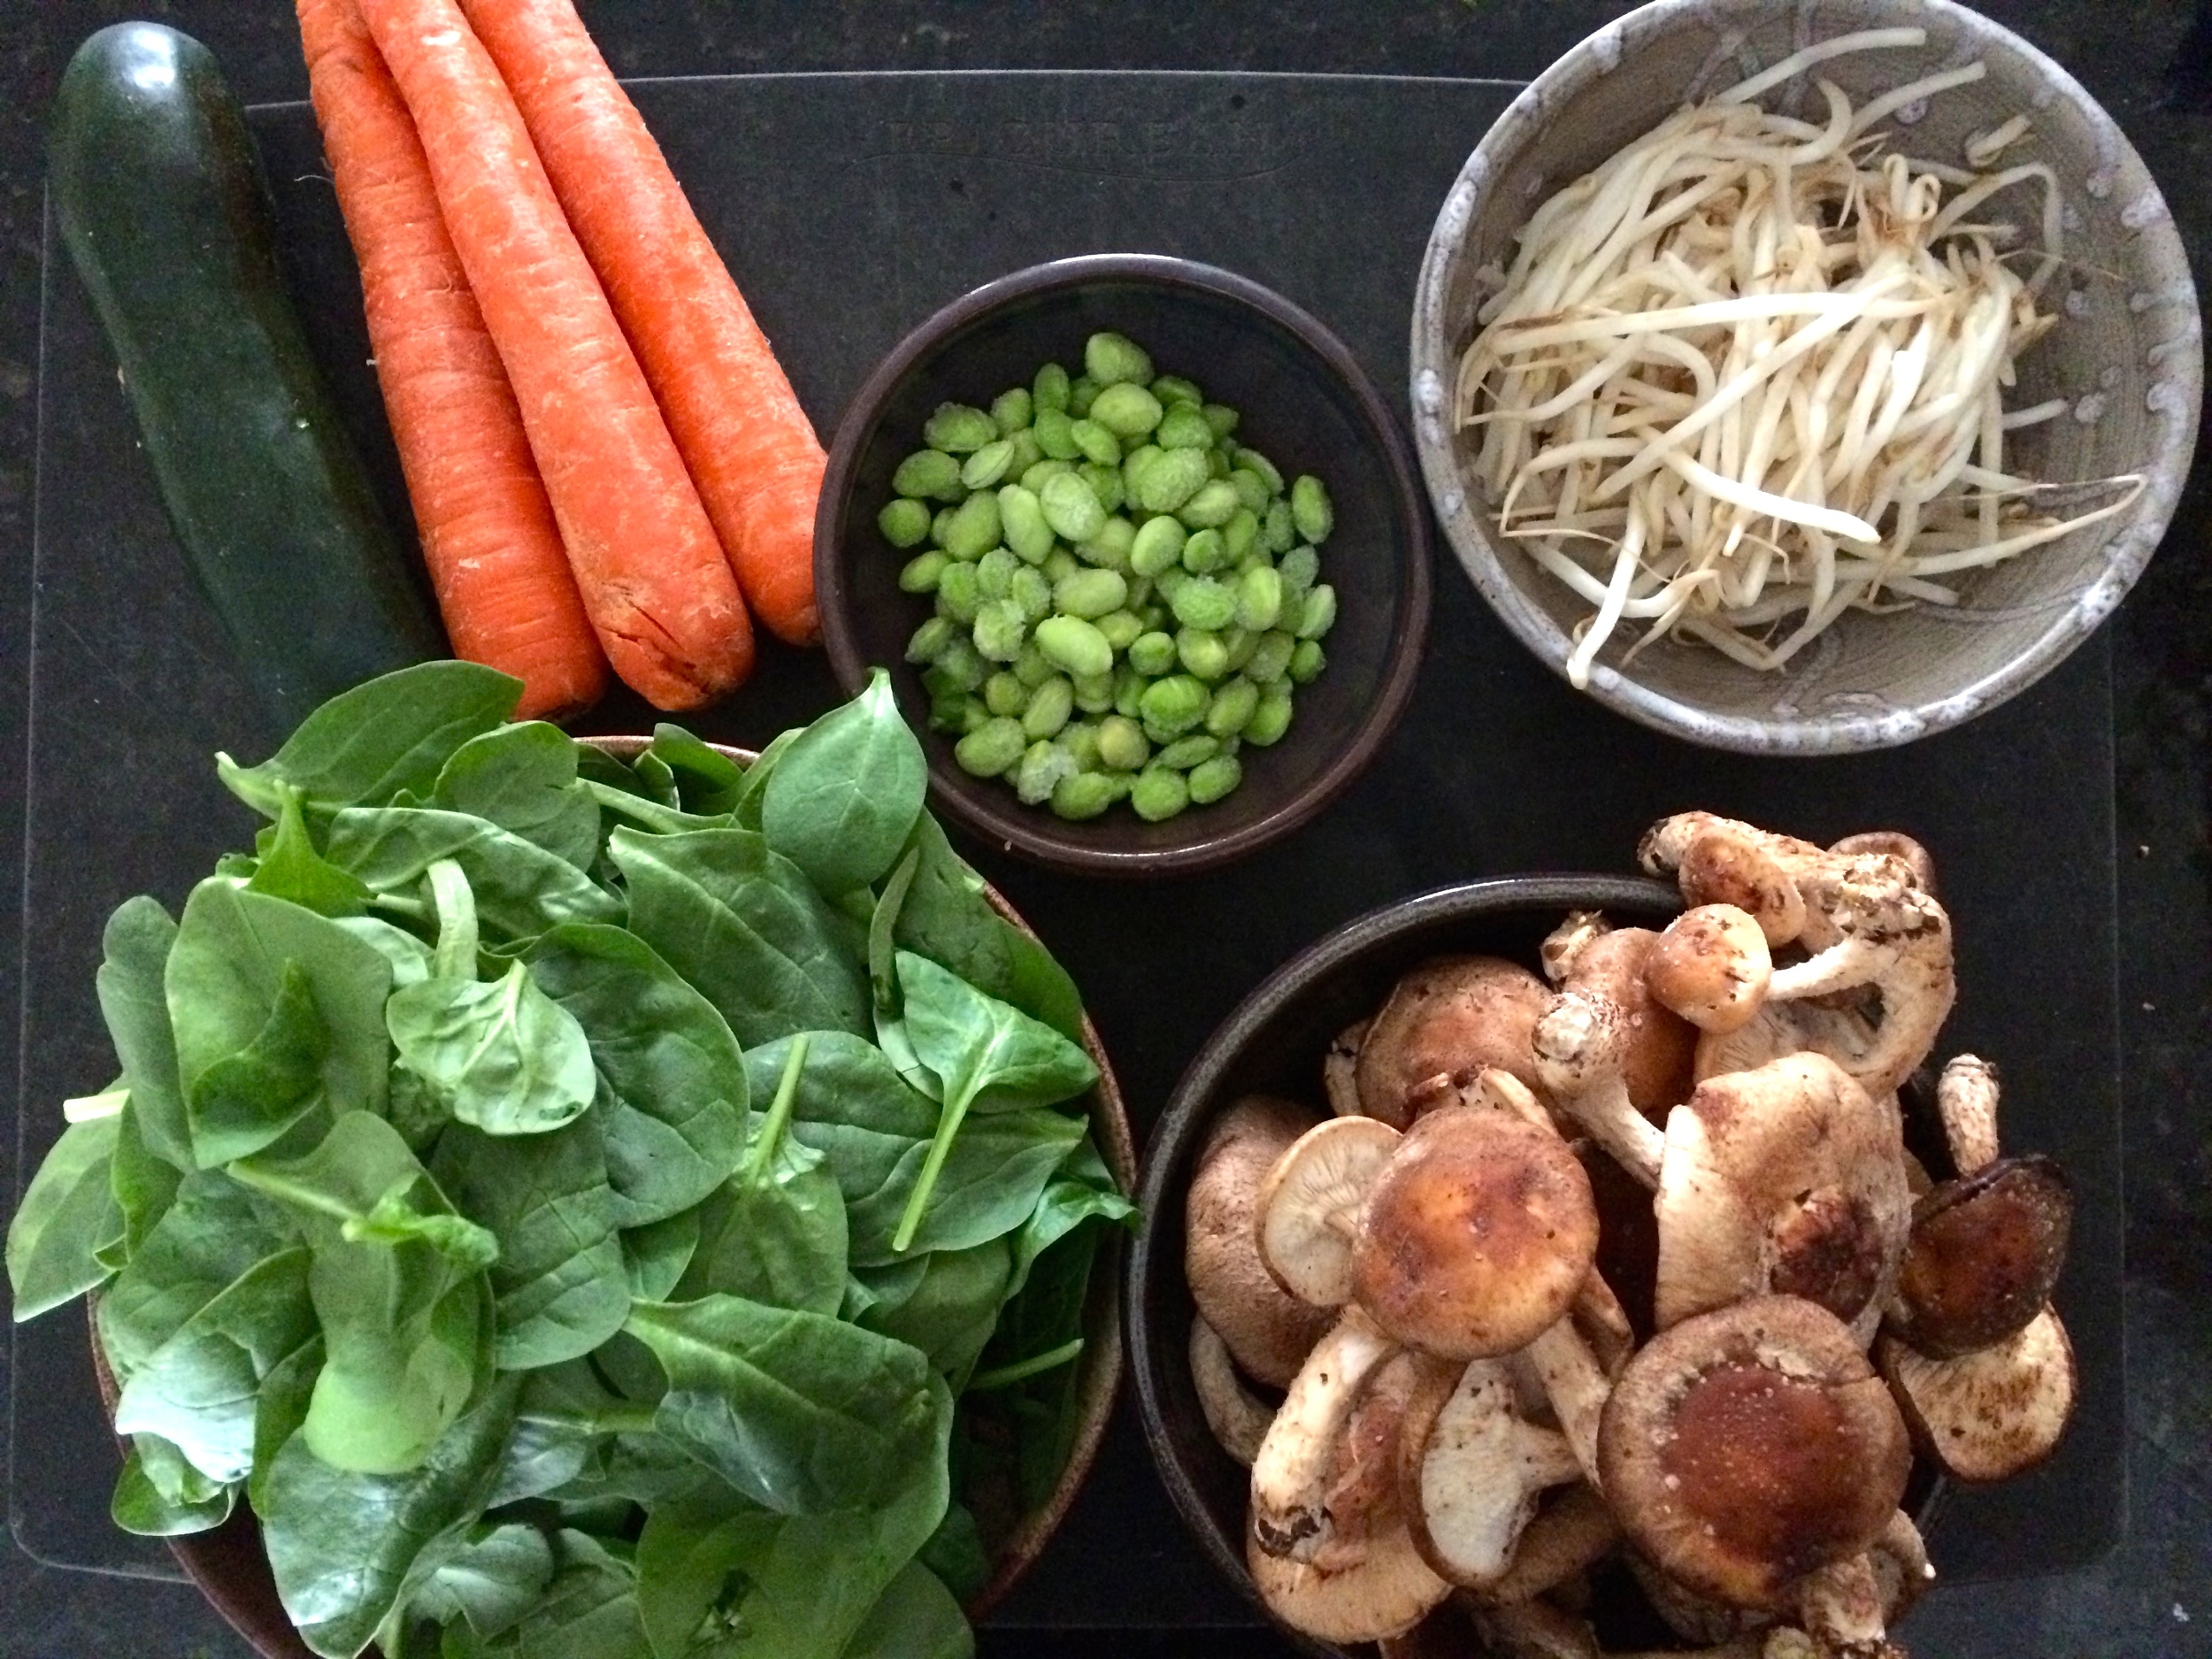
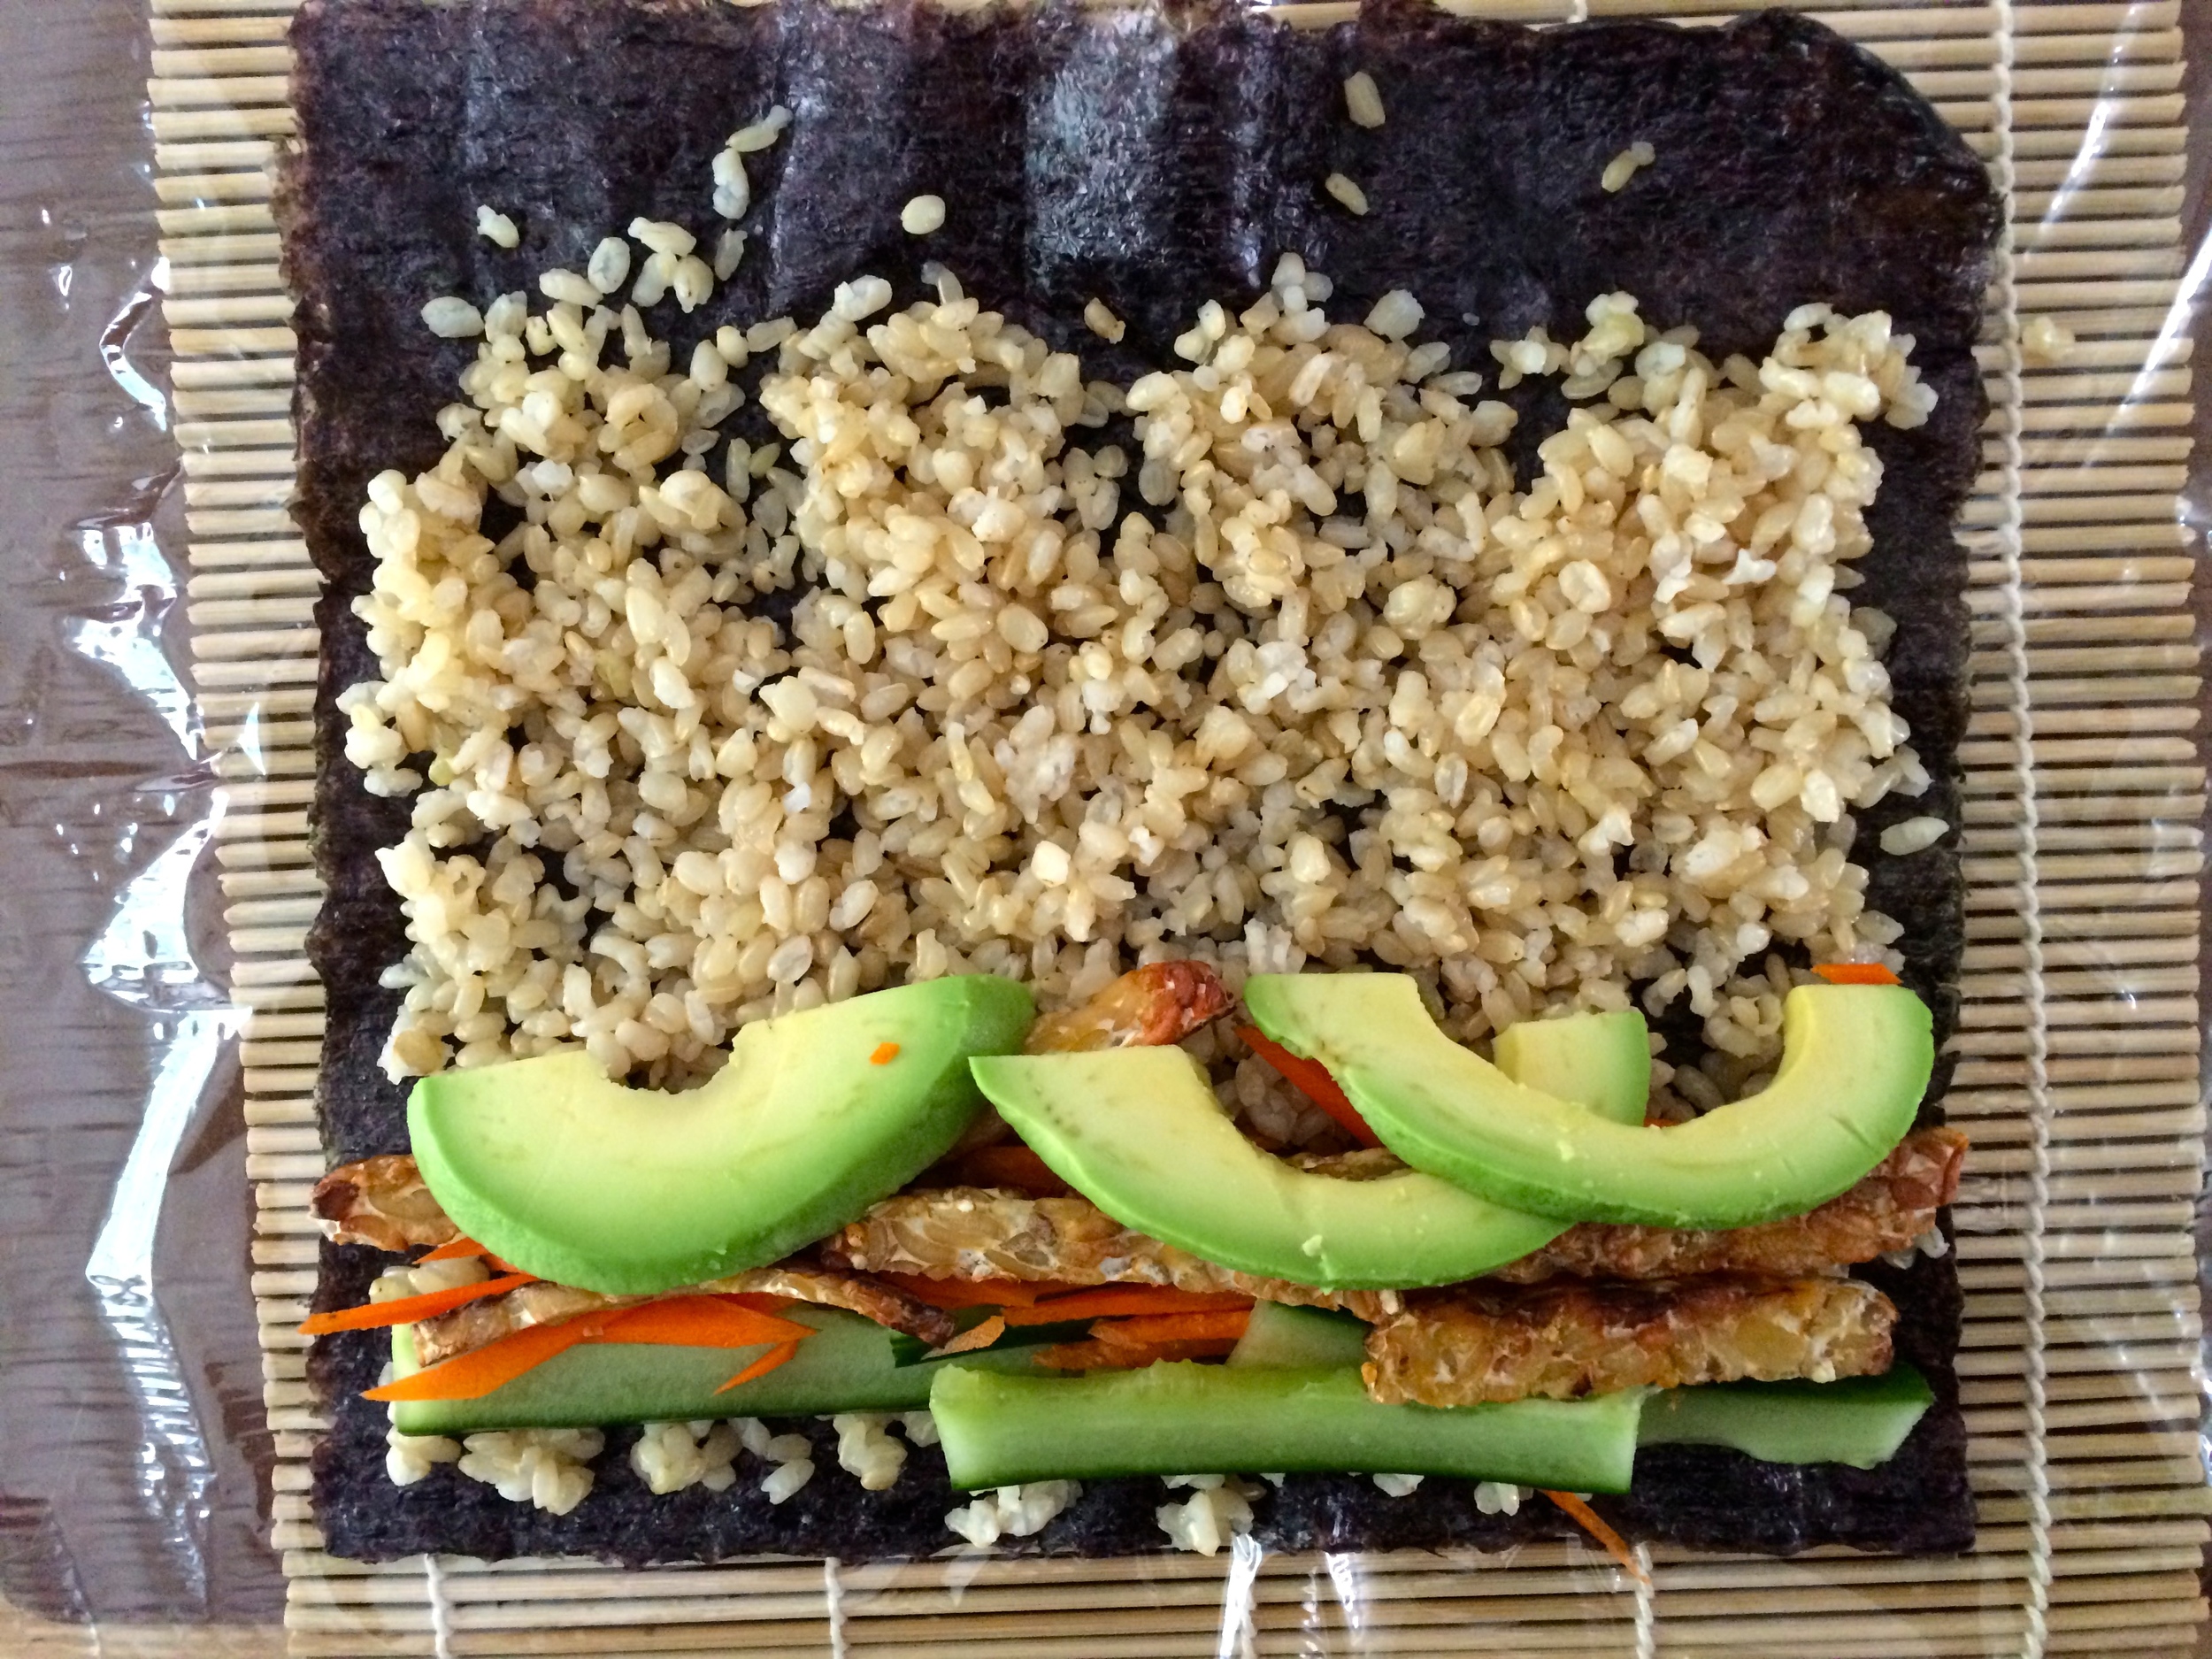
Cucumber, Carrot, Avocado and Tempeh Filling:
1/8th of a block of tempeh, sliced into 1/4-inch slices and browned in 2 teaspoons coconut oil over medium heat until golden
1/4 English cucumber, seeded and cut into 1/8-inch slices
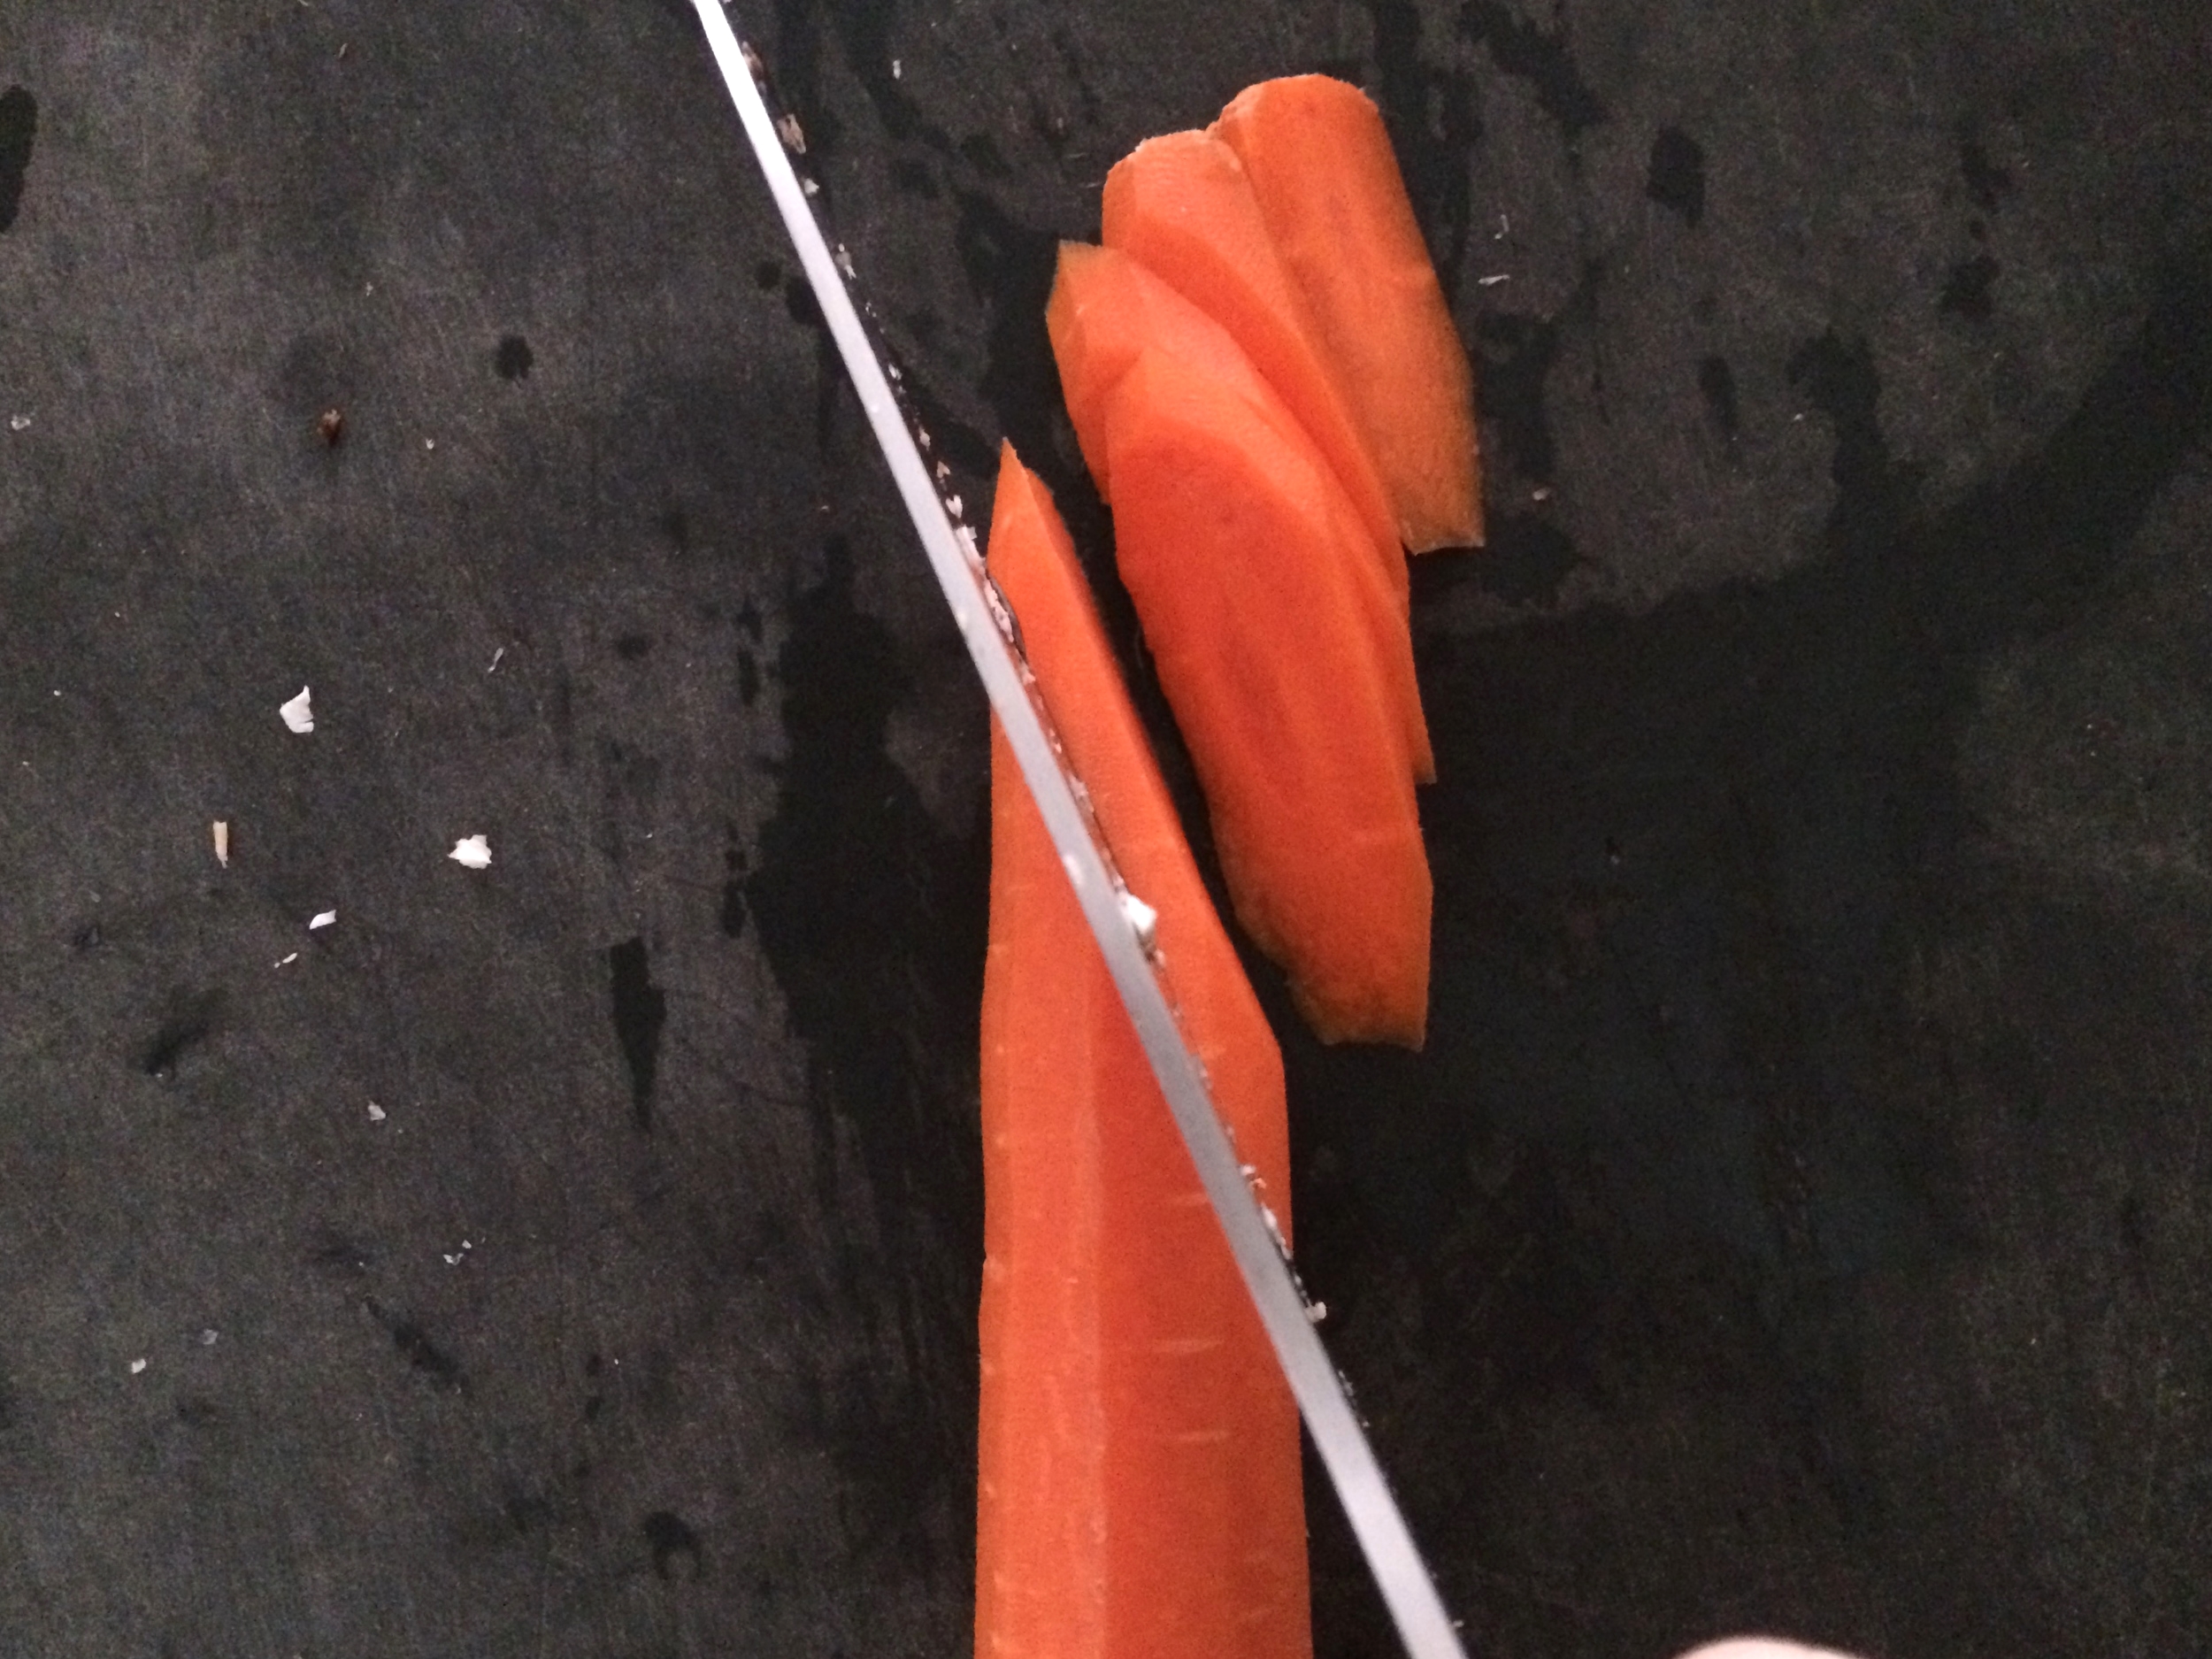
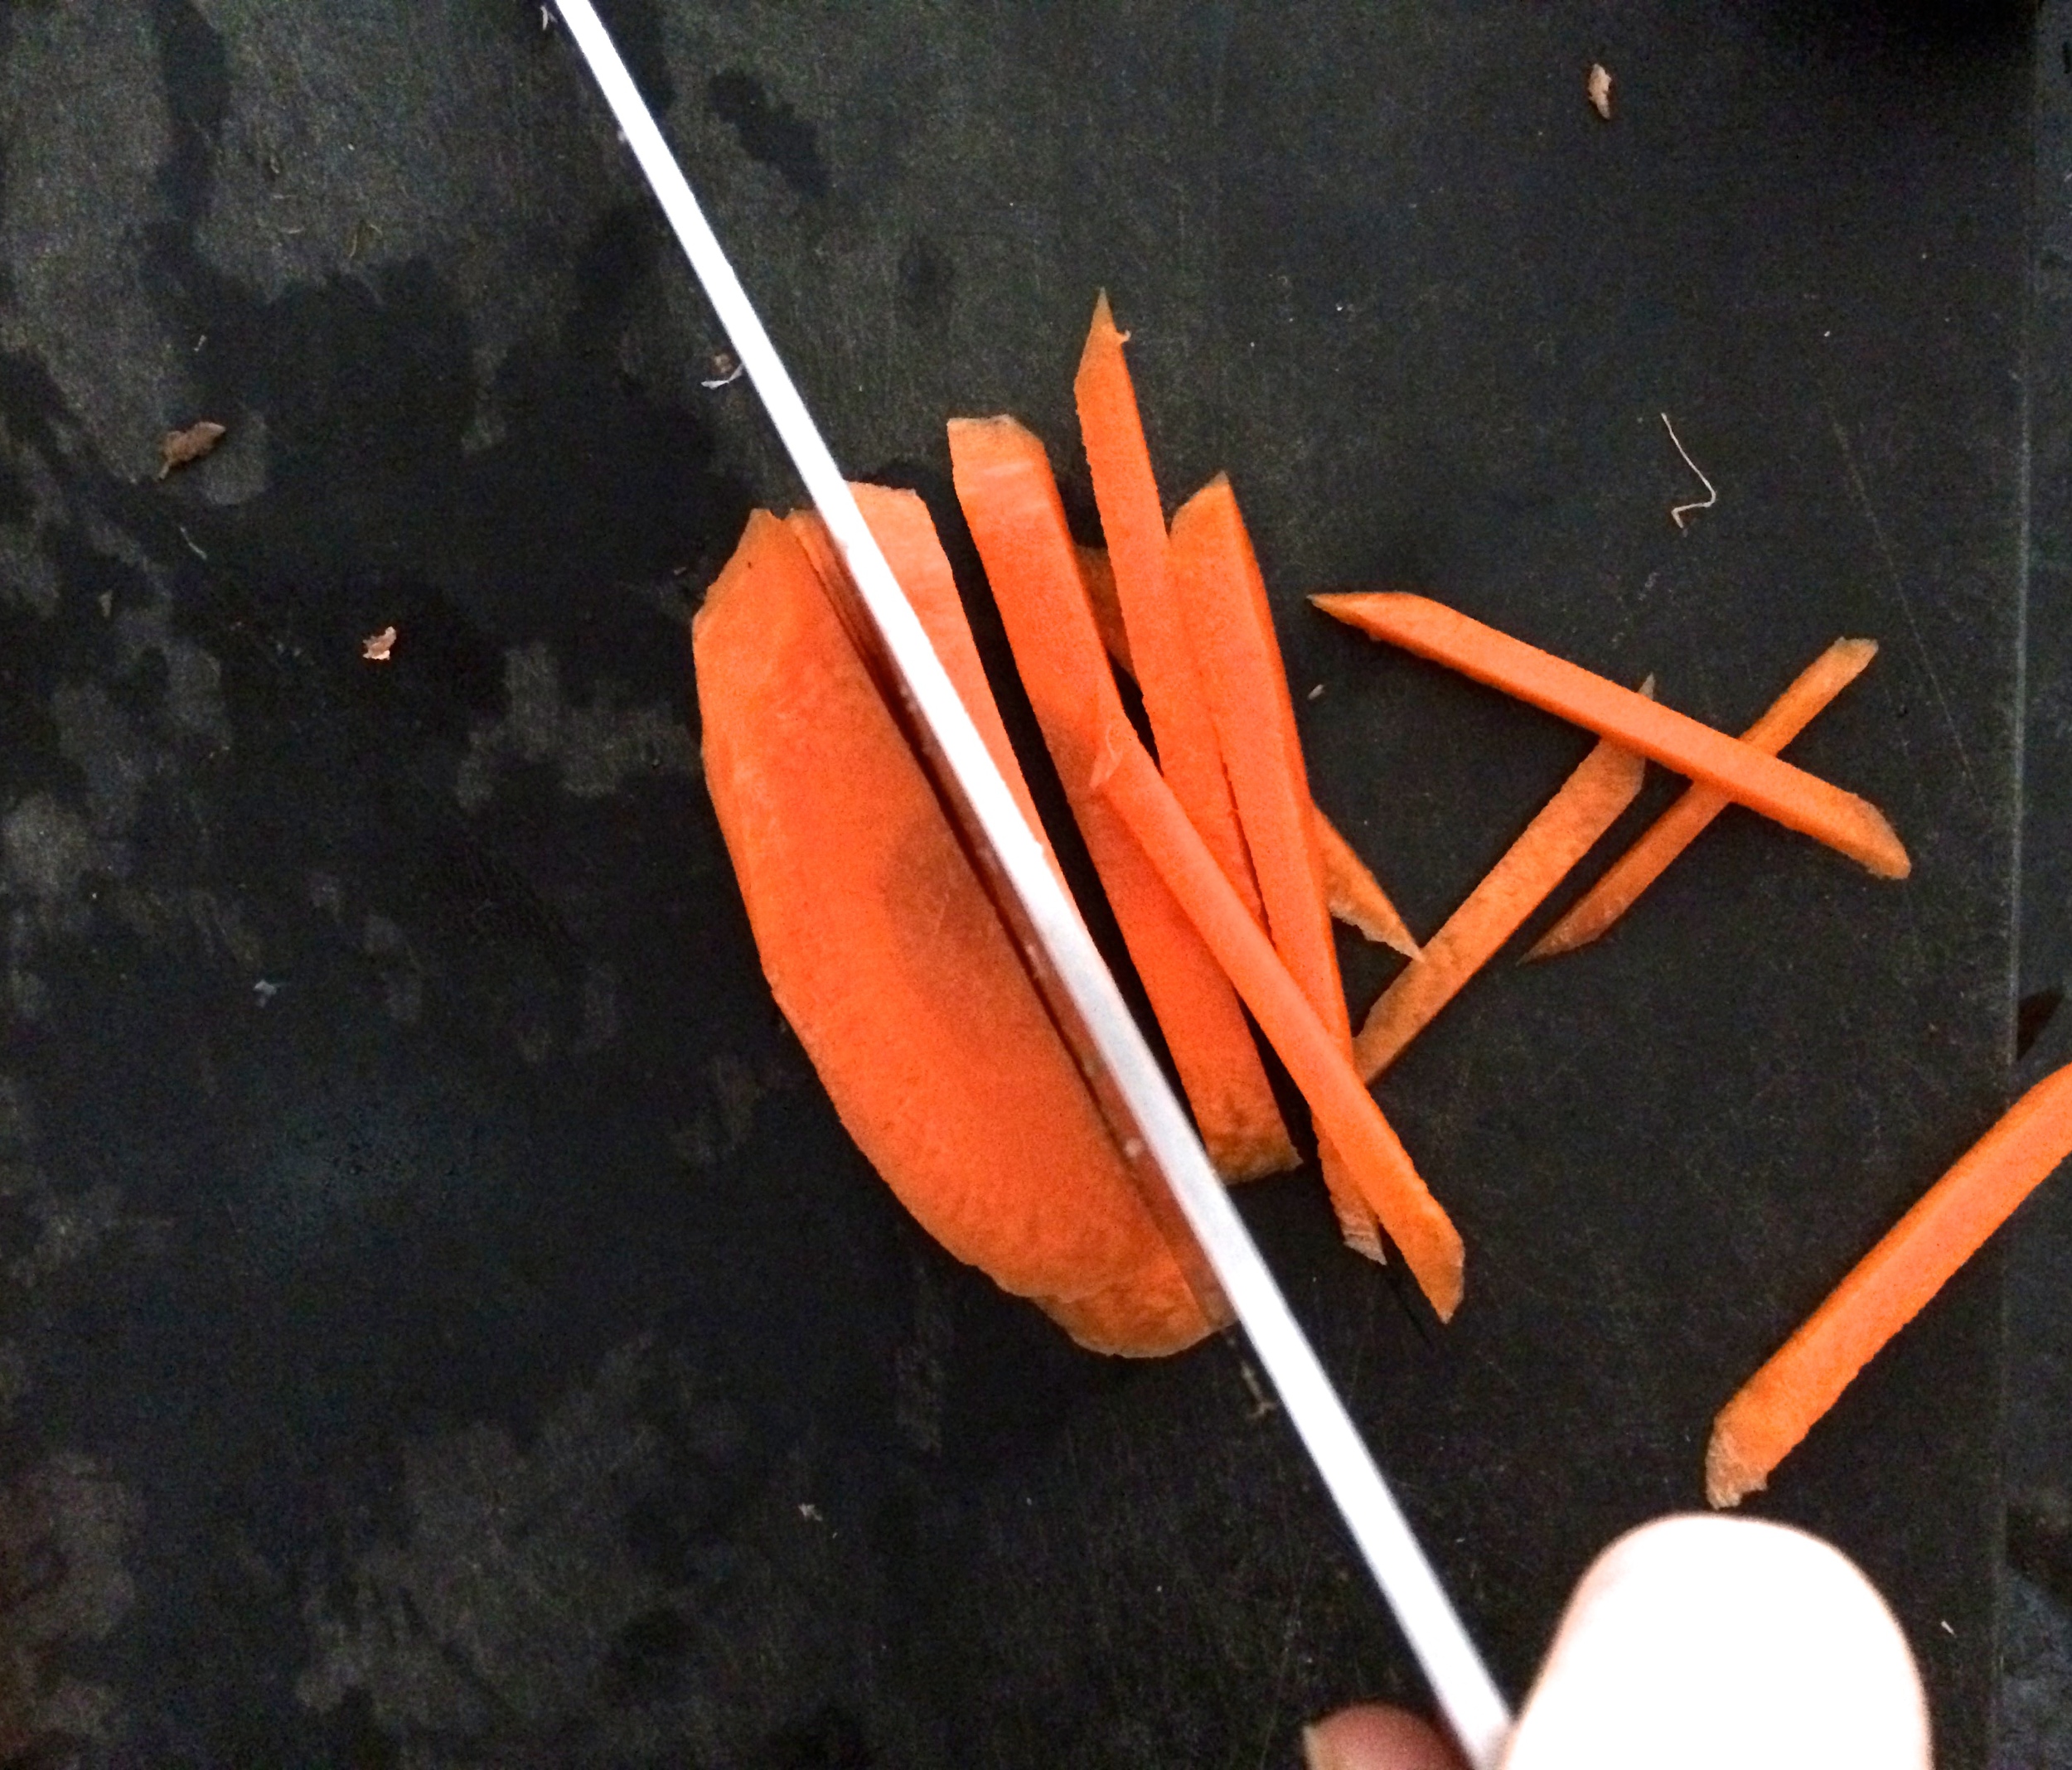
1/4 carrot, peeled and cut into 1/16-inch matchsticks
1/4 avocado, peeled and cut into 1/4 inch slices

Make the sushi rice. Mix the vinegar, honey, and salt together until combined. Stir mixture into warm to room-temperature cooked short-grain brown rice.

IMG_6559.JPG

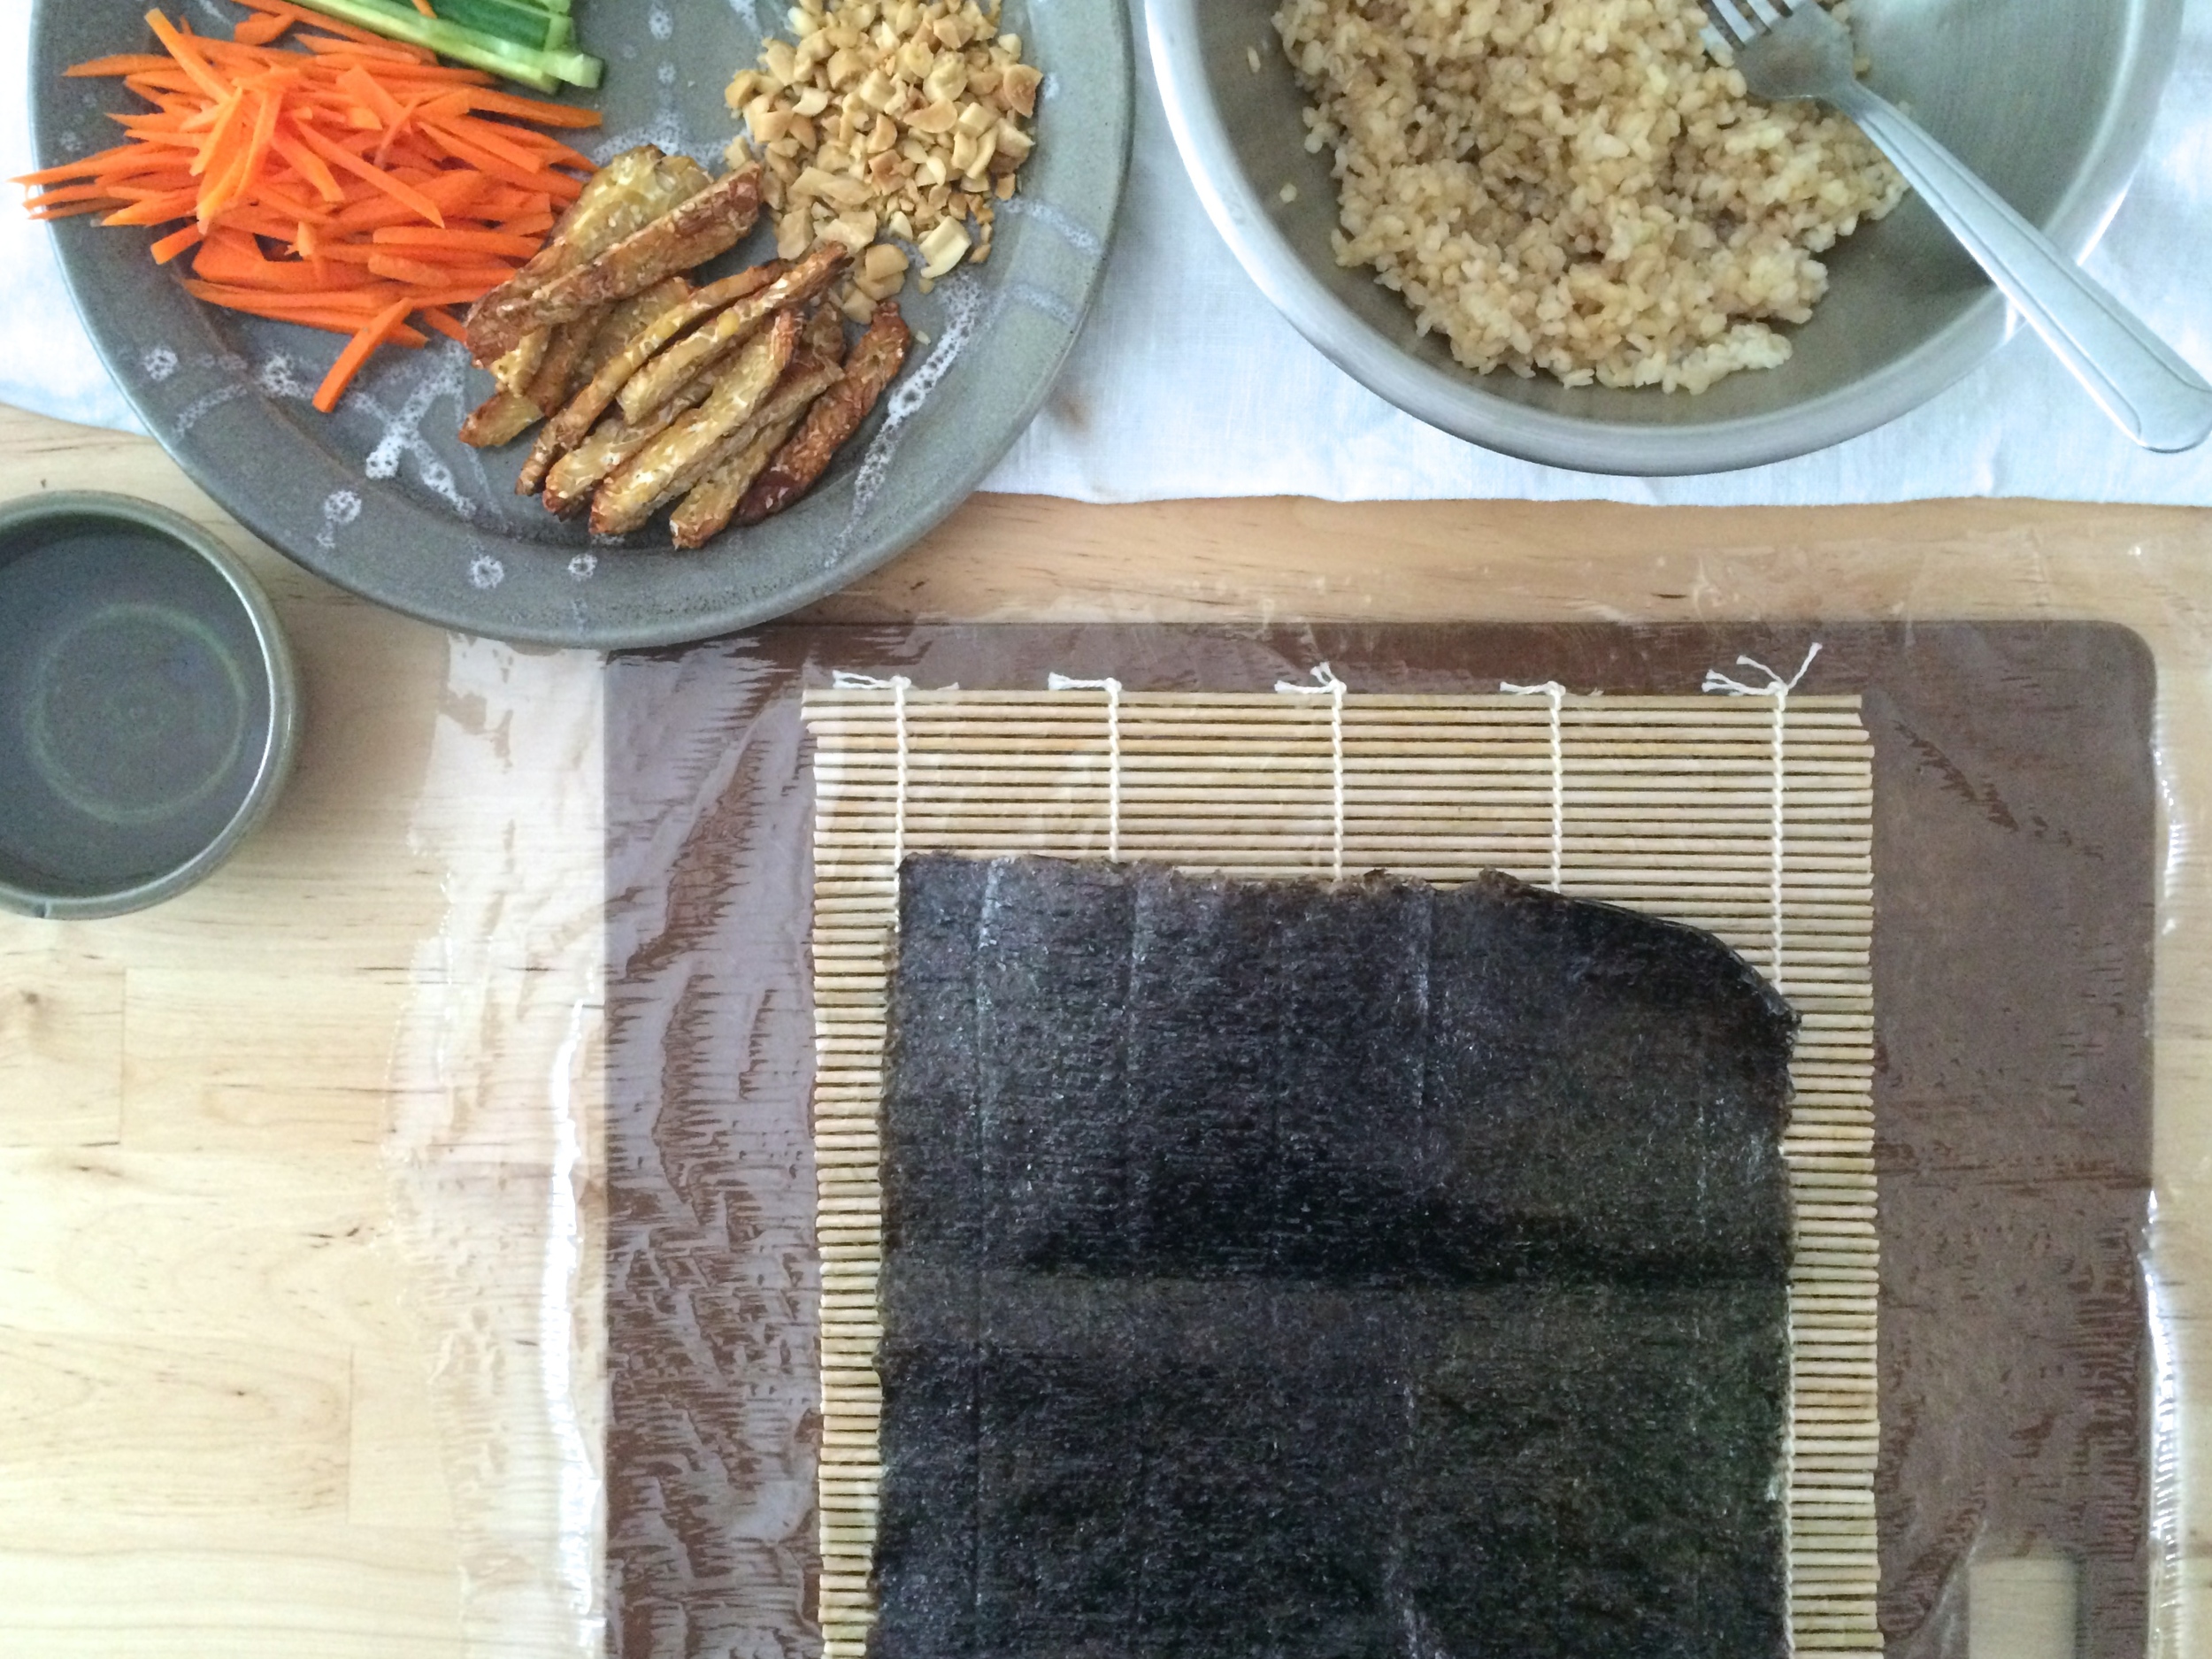
Assemble the sushi. Place plastic wrap on the bamboo mat to cover. Place a piece of toasted nori, shiny side down, atop the plastic wrap. Cover the nori with 1 cup of seasoned sushi rice, leaving the last 1 1/2 to 2 inches of nori furthest from you free of rice. Dip your fingers in water if the rice starts to stick to them. Line the fillings of choice alongside the closest end to you.

IMG_6563.jpg
IMG_6565.JPG
IMG_6569.jpg

Roll the sushi. Beginning with the edge closest to you, lift the mat up and over the filling. Squeeze mat gently along the length of the roll to secure the filling, then peel back the plastic wrap and mat once you feel the roll is secure. Roll again, squeeze firmly but gently, and peel back the mat and plastic wrap as necessary until you reach the end of the roll. Give the roll a final squeeze to make sure it is sealed. Remove the bamboo mat and plastic wrap.

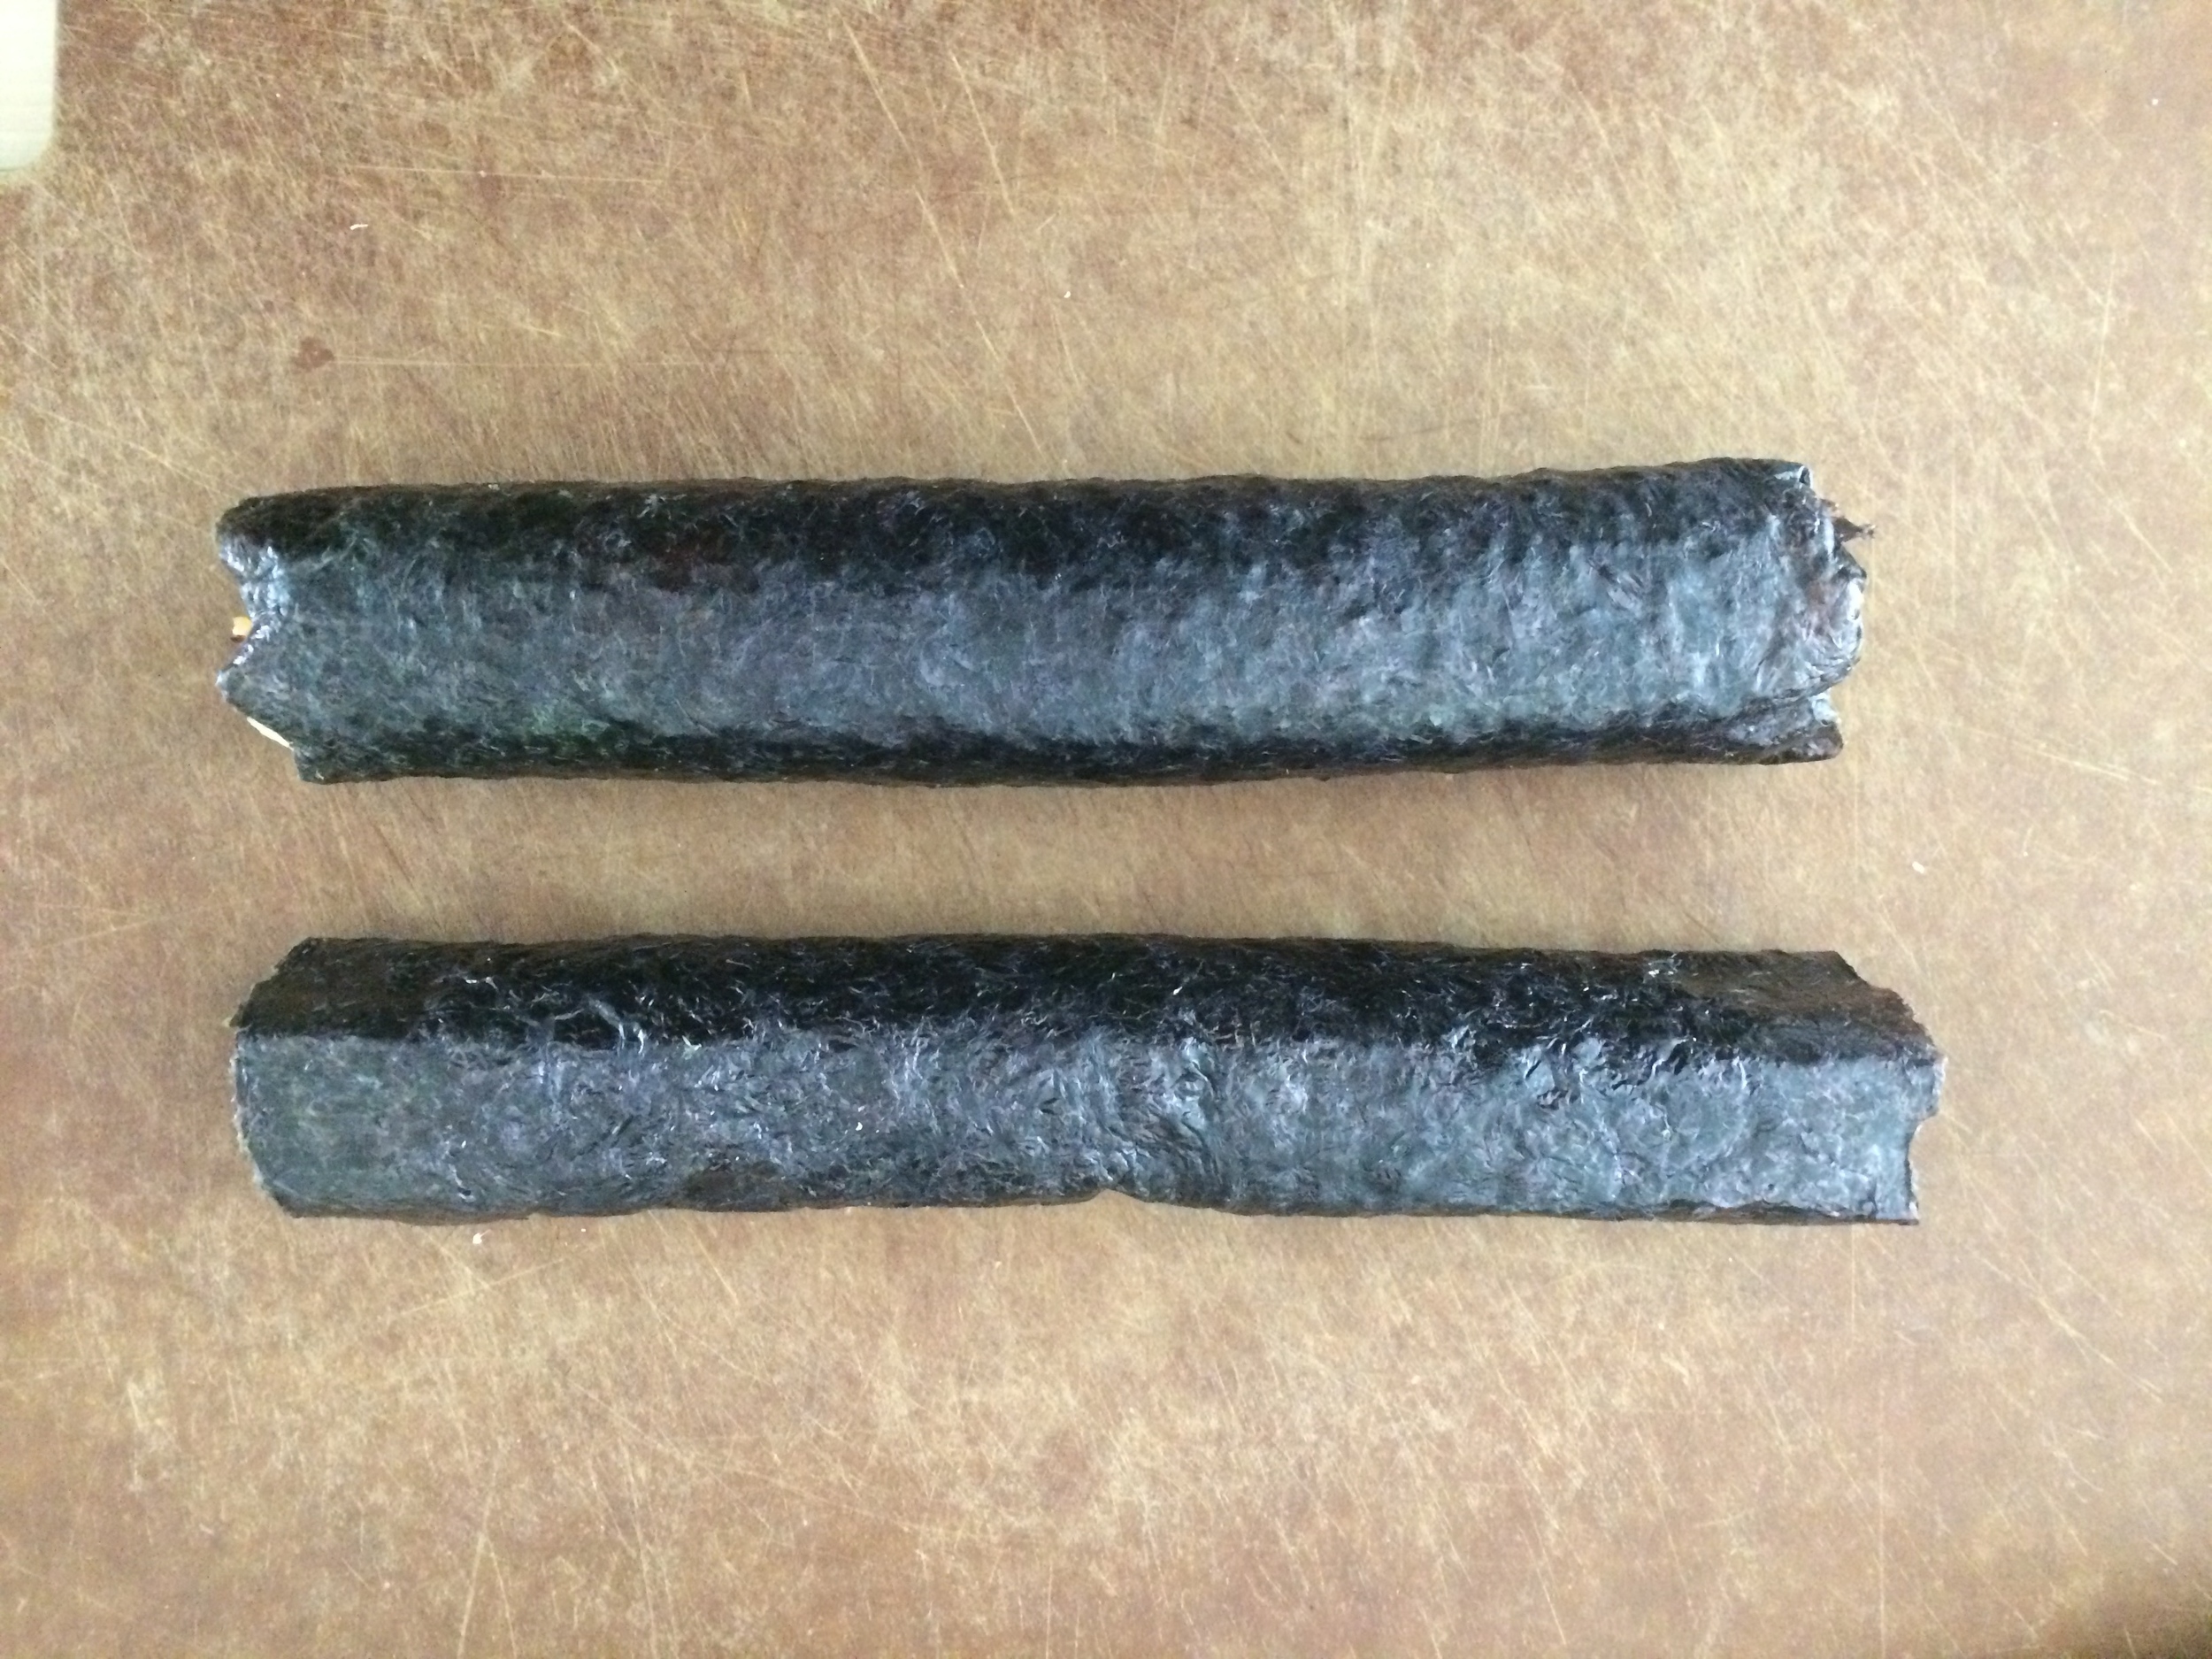
Cut the roll. Dip a very sharp knife (not serrated) into water, and slice the roll crosswise into 8 or 9 pieces.

Repeat with the other nori sheet and fillings of choice. Serve with wasabi, pickled ginger, and soy sauce, if using. Makes 2 rolls.

IMG_6568.jpg

*To toast nori, wave the nori about 4-5 inches over a gas flame for about 30 seconds or until the green becomes brighter.

IMG_6578.jpg
IMG_6593.jpg


In Mains Tags recipe, asian, vegetarian, tempeh, brown rice, vegan, avocado
1 Comment

Cast Iron Skillet Bibimbap

May 21, 2015 Emily Watson

At certain restaurants we go to, especially the ones where the menu stays nearly the same year-round, I order the same thing each and every time. If it is not broken, why fix it? I will still peruse the menu as if I am going to mix things up, but I invariably do not. I am like my grandfather who listens to all 32 ice cream flavors with immense enthusiasm only to order....vanilla. It is not that I am not an adventurous eater, it is just that I usually have chosen to eat at that restaurant because I have been craving that specific menu item.

In college, we ventured to our favorite local Korean/ sushi restaurant and I decided to really go wild and order not my usual order, the one I had ordered every few weeks for the past two years, but this noodle dish that I had spotted on the menu. One bite later, I was throwing a mini-tantrum because they were not at all good, terrible really, and I knew I should have stuck with my regular order of the stone-pot bibimbap.

Bibimbap is a Korean dish composed of a beautiful rainbow of gently cooked vegetables seasoned with sesame oil atop rice. Tofu or meat, with or without an egg, can be added. While it can be served cold or room temperature, my favorite way to eat it is hot, served in a stone pot called a dolsot. I love the way the rice turns golden and crispy on the bottom. It reminds me of that crispy layer you find on the bottom of a Spanish paella. Traditional bibimbap gets tossed with a generous dousing of gochujang, a red chili pepper paste, and I know my Korean friends would be disappointed to know that I do not really care for the paste and never put it on. My little sister once thought I had forgotten to put it on and dumped it all over my virgin bibimbap for me only to find out very quickly that I had not forgotten.

I had been wanting to try to make the dish at home for a while, but I always wondered how I would achieve that addictive crispiness without a dolsot. It was silly, really, that I did not think of using a cast iron skillet as a substitute before. And it works spectacularly. The pan is brushed with a generous film of sesame oil, brown rice is packed on top, and vegetables are arranged in neat little piles. More sesame oil is drizzled along the sides, and then the skillet cooks over medium high heat until the rice becomes toasty. I added a fried egg, sprinkled a little chopped toasted nori and toasted sesame seeds all over for extra goodness. I do not serve mine with gochujang because it is not something I care for, but feel free to serve it alongside or add another hot sauce.

For guidance in preparing the bibimbap, I referenced this recipe from Martine of Petit World Citizen and adapted it to suit my preferences and what I found worked best in the kitchen. It really is delicious.

Cast Iron Skillet Bibimbap

4 cups cooked short-grain brown (or white) rice (short-grain gives the best texture here )
1/2 pound shiitake mushrooms, stems removed and julienned
2 medium or 3 small carrots, peeled and julienned (see pic below on how to julienne carrots)
1 small zucchini, julienned
1/4 pound (about 1 cup) bean sprouts
3/4 cup shelled frozen edamame, thawed
5 ounces fresh baby spinach
1 garlic clove, minced
1 egg
vegetable oil or other neutral oil, divided
3-4 tablespoons sesame oil, divided
1-inch x 6-inch strip of nori, toasted and cut into 1/8-inch strips, optional for garnish
2 teaspoons toasted sesame seeds, optional for garnish
gojuchang paste or other hot sauce, optional for serving

IMG_6607.jpg
IMG_6610.jpg
IMG_6614.jpg
IMG_6616.jpg

Using one pan, cook the vegetables in stages. Heat 2 teaspoons neutral oil in pan over medium-high heat. Add mushrooms, a sprinkle of salt, and saute until cooked, about 4-5 minutes. Remove from heat, drizzle with 1 teaspoon sesame oil, and set aside.

Add another teaspoon of neutral oil to pan, add the carrots, a sprinkle of salt, and saute until crisp-tender, about 3-4 minutes. Set aside.

Add 1 teaspoon of neutral oil to pan, add zucchini and cook until crisp-tender, about 3-4 minutes. Set aside. Repeat with bean sprouts, adding 1 teaspoon of neutral oil to the pan and cooking until just wilted and some of water has been released, about 3-4 minutes. Remove from heat and set aside.

Add 1 teaspoon neutral oil to the pan, add the minced garlic clove, the fresh spinach, and a sprinkling of salt. Cook, stirring occasionally until spinach wilts. Remove from heat, pressing any extra water from the spinach, and toss the cooked spinach in a bowl with 1 1/2 teaspoons of sesame oil.

Assemble the bibimbap. Brush a cast-iron skillet (10 inches or larger) with 1 tablespoon of sesame oil. Add the cooked rice in an even layer. Create piles of vegetables atop the rice. Drizzle 1 1/2 tablespoons of sesame oil along the inner rim of the skillet. Heat the skillet over medium-high heat and allow to cook for 7-10 minutes or until you hear the rice start to crackle and crisp. It will smell a little toasty, too. You can always take a peak at the rice to check for crispiness, knowing that the center will be a tad toastier than the edges usually and there will be some residual cooking even when you remove the pan from the heat. Remove the skillet from the heat.

IMG_6638.jpg
IMG_6640.jpg
IMG_6641.jpg
IMG_6643.jpg
IMG_6645.jpg
IMG_6651.jpg

Add a fried egg or two or three or four. Sprinkle with nori pieces and toasted sesame seeds, and if desired, add gojuchang paste. Admire the rainbow of vegetables, then give it a good mix and enjoy! Serves 4.

IMG_6664.JPG


In Mains Tags recipe, vegetarian, gluten-free, asian
6 Comments

Spicy Udon Noodles

May 14, 2015 Emily Watson

I am sure you have all heard that carrots are good for your eyes. Or at least that is what your mother told you to get you to eat your carrot sticks. But it is true! They contain vitamin A and beta carotene which help with the maintenance of the retina. But do you know what else are good for your eye health? It turns out, a lot of things. It is undeniable that nutrition affects not only how your body feels, how your body appears, but more importantly, how your body functions. As we age, it becomes crucial to support and maintain some of those body parts and systems that start to fade with our diet. Eating consciously can help slow some of those natural processes.

One such natural process of aging is vision loss. For example, age-related macular degeneration (AMD) is the leading cause of vision loss for those aged 55 and older in the United States and affects more than 10 million Americans. AMD results from the breakdown of the macula of the retina which then causes loss of central vision. You probably know someone who has experienced this incurable disease. The only cure is prevention and prevention comes in the form of a diet rich in particular nutrients.

May is Healthy Vision Month and as a daughter and sister to two ophthalmologists who see how this disease debilitates so many patients, I feel compelled to share preventative measures you can take in the kitchen to help prevent eye diseases such as macular degeneration. The American Macular Degeneration Foundation (AMDF) recently released a book entitled Eat Right for Your Sight, and it is an invaluable resource to those wanting to use their diet to reduce their risk of vision loss or slow the process if it is already occurring. It not only offers an easy-to-understand explanation of the disease and lists what nutrients and how much of those nutrients are vital to healthy eyes, but it also offers original recipes with ingredients that contain those nutrients. Some recipes are contributed by famous chefs such as Alice Waters, Ina Garten, and Andrew Weil, and all are easy to read (and I mean literally- the font is large!) with readily available ingredients. I always love a cookbook with good pictures, and this one has some great ones.

The major eye-healthy nutrients highlighted throughout the recipes are:

  • Beta-Carotene (carrots, winter squash, spinach, cantaloupe)
  • Lutein/ Zeaxanthin (aka carotenoids)  (greens such as kale, spinach, broccoli, and eggs, and tomatoes)
  • Omega-3 Fatty Acids (salmon, walnuts, flaxseeds, sardines)
  • Vitamin A (sweet potatoes, carrots, beef liver, dried apricots, butternut squash)
  • Vitamin C (oranges, kiwi, strawberries, red bell peppers)
  • Vitamin D (salmon, mushrooms, beef liver, eggs, fortified milk)
  • Vitamin E (almonds, sunflower seeds, peanut butter, avocados, wheat germ)
  • Zinc (shellfish, cocoa powder, peanuts, fortified breakfast cereal, beef)

One particular note that I appreciated in this cookbook was the page highlighting "Good Food Combos." For example, Vitamin C enhances the absorption of iron from plant-based sources so they recommend serving citrus or strawberries with spinach. Vitamin D enhances calcium absorption. Furthermore, healthy fats are essential to optimum nutrient absorption of fat soluble vitamins A, D, E, K.  They suggest pairing avocado with grapefruit, olive oil with carrots, dressing with greens, or broccoli rabe with pine nuts, as I do in my Broccoli Rabe and Chickpeas with Toasted Garlic Breadcrumbs and Pine Nuts.

You can find a link to some of the recipes featured in the book here, and a link to more information about AMD and the American Macular Degeneration Foundation here.

I strongly recommend this cookbook as a gift to anyone who has an older family member or friend. Or if you are of that age, it is worth the investment. It is a wonderful resource to anyone looking to understand their health and to take charge of reducing the risk of vision loss that can come with aging.

After reading through the book and making a note of way too many recipes I wanted to try, I settled on the Spicy Udon Noodles because I had been craving something with exotic flavors. Other recipes that I dog-eared for later were the:

  • Carrot-Cumin Soup
  • White Bean Soup with Kale
  • Celery, Grapefruit, and Avocado Salad
  • Crunchy Cabbage Salad
  • Mango Pico de Gallo
  • Rice Paper Salmon with Satay Drizzle
  • Broccoli with Sun-dried Tomatoes and Pine Nuts
  • Blueberry Smoothie
  • Jody's Peach Soup

These noodles are addicting. They are a little sweet, a little spicy, veggie-packed, and delicious. It recommends you choose six cups of mixed vegetables, and I chose zucchini, broccoli, bok choy, and carrots. The addition of red bell peppers would have increased the Vitamin C in the dish, but I completely forgot to pick them up from the store. The sauce comes together in a pinch and you sprinkle everything with aromatic basil, mint, cilantro, and roasted peanuts. I made a few modifications to the recipe based on what I had on hand, and you can see my changes in the parentheses. I also modified the cooking procedure just a little as it suggested to add all of the vegetables at once, but I felt certain vegetables (namely the broccoli and carrots) would need a little more time than the zucchini and bok choy. This is reflected in the instructions you see below. I added chopped scallions at the end to garnish with the fresh herbs although it recommends adding them in with the other vegetables to saute. Give this recipe a whirl- either the original version or mine. Your tastebuds will thank you, as will your eyes.

Spicy Udon Noodles

Zest and juice of 1 orange
2 tablespoons hoisin sauce (I used peanut butter)
1 tablespoon low-sodium soy sauce (I used low-sodium tamari)
1 tablespoon Asian chili paste (I used Sriracha)
11/2 tablespoons sugar (I used 1 1/2 large pitted dates)
11/2 tablespoons rice wine vinegar
1 tablespoon toasted sesame oil
1 tablespoon canola oil (I used coconut oil, melted)
11/2 tablespoons minced garlic
11/2 tablespoons minced fresh ginger
6 cups mixed cut raw stir-fry vegetables (broccoli, bok choy, zucchini, onion, scallion, red bell peppers, carrots) (I used broccoli, carrots, zucchini, and bok choy)
3 cups cooked udon noodles (9 ounces dry)*
1/4 cup freshly chopped basil leaves
1/4 cup freshly chopped mint leaves
1/4 cup freshly chopped cilantro leaves
2 tablespoons chopped dry-roasted peanuts, for garnish

Make the sauce. Combine the orange zest and juice, hoisin sauce (or peanut butter), soy sauce, chili paste, sugar (or dates), and vinegar in a bowl; set it aside. If you are using peanut butter and dates like I did, I found it easier to puree everything in a mini food processor.

IMG_6462.JPG
IMG_6463.JPG
IMG_6467.JPG

Combine the sesame oil and canola oil (or melted coconut oil) in a small bowl.

Heat 2 teaspoons of the oil mixture in a skillet over high heat. Add the garlic and ginger and stir-fry until they begin to color, about 1 minute. Add the remaining oil mixture to the pan, and add the mixed vegetables and stir-fry until crisp-tender, 1 to 3 minutes. Stir constantly. I added the carrots and broccoli first and cooked for 1 minute. I then added the zucchini and bok choy and cooked for another 1-2 minutes or until crisp-tender. Add the noodles and reserved sauce. Cook for 1 minute more, tossing to combine. Add the basil, mint, and cilantro; toss to mix. Serve hot; garnish with the peanuts and scallions, if using. Serves 4.

IMG_6468.JPG
IMG_6470.JPG
IMG_6471.JPG
IMG_6472.JPG

* To cook the udon noodles: Bring water to a boil in a medium-large pot, and add a generous pinch of salt. Add the noodles and cook for 6-8 minutes, checking for doneness around 6 minutes. You want them al dente or with just a bit of bite. Remember there will be a little residual cooking as they rest and they will be heated again in the sauce. Immediately drain and set aside while you prepare the other ingredients.

I'm Blogging for Eye Health, #EatRightforYourSight

Recipe from Eat Right For Your Sight: Simple Tasty Recipes That Help Reduce the Risk of Vision Loss from Macular Degeneration, By Jennifer Trainer Thompson and Johanna M. Seddon, copyright © American Macular Degeneration Foundation, 2014. Reprinted by permission of the publisher, The Experiment. Available wherever books are sold. 

IMG_6483.JPG

Disclaimer: I was contacted by the publishers of Eat Right for Your Sight to review their cookbook, but all opinions are my own.


In Mains Tags recipe, noodles, vegetarian, vegan, broccoli, carrots, bok choy
2 Comments

Roasted Carrots and Lemony Millet with Black Garlic and Herbed Yogurt

May 11, 2015 Emily Watson
IMG_6203.jpg

Carrots are rampant at the farmers' market right now. Tender and sweet, they are begging to be the star of a dish and not just the side show. A few weeks ago, I spotted Izy's beautiful carrot dish on her blog, Top with Cinnamon, and knew I had to recreate a version of it for myself at home. The carrots are left whole, slow roasted until they become fork-tender and a little caramelized, and then topped with an herbacious yogurt sauce spiked with funky black garlic. Now I just happened to have black garlic on hand from a recent market purchase of Obis One black garlic, but I am sure a little minced garlic sauteed slowly in a little olive oil until softened will sweeten and mellow its flavor and make a fine substitute. Or if you have roasted garlic clove on hand, even better. Mix that in for a substitute. I add a bit of brightness to Izy's original version with lemon juice and zest as I love the combination of mint, yogurt, and lemon.

This dish is eye-catching. I served it atop millet tossed with lemon juice, zest, salt, and a glug of good quality extra-virgin olive oil. To make it a meal, add some chunks of avocado and a handful or two of cooked beluga lentils or maybe a hard-boiled egg. This is a great dish that can be made ahead of serving time and can be eaten when the carrots and millet are warm or at room temperature. Just be sure to dollop on the cool yogurt sauce before ready to serve. Millet is a bit finicky as a grain once cooked and chilled in the refrigerator, so sprinkle it with drops of water before reheating so that it becomes soft again.

Roasted Carrots and Lemony Millet with Black Garlic and Herbed Yogurt

Carrots:
1 pound carrots, washed, peeled, and tops removed
2 tablespoons olive oil
salt

Lemony Millet:
1 cup millet
2 cups water
juice of 1 lemon
zest of 1/2 lemon
2 tablespoon extra-virgin olive oil
1/4 teaspoon salt, plus more to taste

Black Garlic and Herbed Yogurt Sauce:
1/4 teaspoon black garlic (about 1 clove), minced (see note)
1/4 cup chopped fresh mint
1/4 cup chopped fresh cilantro
1/4 cup 2% plain Greek yogurt
juice of 1 lemon
zest of 1/2 lemon
1 tablespoon extra-virgin olive oil

For serving:
3 tablespoons pumpkin seeds (pepitas), toasted (see note)
handful of chopped fresh mint, for sprinkling
handful of chopped fresh cilantro, for sprinkling

Roast the carrots. Preheat the oven to 350 degrees Fahrenheit. Line a baking pan with parchment paper or a Silpat. Toss the carrots with two tablespoons of olive oil and a sprinkling of salt. Mix and spread into an even layer. Cover the pan with foil and place in the oven. Bake for 30 minutes. Remove the foil, turn the carrots, and bake for 15-20 minutes more or until the carrots are fork tender and beginning to brown at the tips. Remove from the oven and set aside.

Prepare the millet. Bring 2 cups of water to a boil in a pot. Add 1/4 teaspoon of salt and the millet and stir. Bring back to a boil and then reduce heat to a simmer. Cover pot and allow to cook on low for 25 minutes. Remove the pot from the heat, leaving it covered, and allow to rest for 10 minutes. Fluff the millet with a fork, add the juice of 1 lemon, the zest of 1/2 lemon, and 2 tablespoons of extra-virgin olive oil. Taste and add more salt if needed.

Prepare the yogurt sauce. In a blender or mini food processor, add all of the ingredients and process until smooth. Taste and adjust for salt, and set aside.

IMG_6163.jpg

Transfer the millet to a platter. Spread the cooked carrots on top and top with the herbed yogurt sauce. Sprinkle with toasted pumpkin seeds and more fresh herbs. Enjoy! Serves 4 as a main course

IMG_6168.jpg
IMG_6169.jpg
IMG_6170.jpg
IMG_6171.jpg

Notes:
* as a black garlic substitute, you can use a gently sauteed chopped garlic clove or roasted garlic clove
* to toast pumpkin seeds if you only have raw, heat them in a dry skillet over medium heat for 8-10 minutes or until golden and a little puffed

IMG_6189.jpg
In Mains, Side Dishes Tags recipe, carrots, spring, millet, yogurt, cilantro, mint, gluten-free, vegetarian, pumpkin seeds
Comment

Pork Carnitas Tacos with Pineapple Relish

May 2, 2015 Emily Watson

Pork carnitas have been somewhat of an elusive thing to me in the kitchen. They have always seemed like the perfect dish to serve at a big group dinner or at a Cinco de Mayo fiesta, but I had trouble executing carnitas that I was proud of serving. In my previous efforts to make them, the results ranged from fairly bland to too tough to too greasy. When I stumbled upon a recipe for Carnitas Tacos in Philadelphia's March issue of Grid Magazine, I was once again inspired to give them another go. I was skeptical that I would get enough flavor without browning the onions or the meat first, instead just dumping everything in a pot and leaving it alone for almost 4 hours. And the result? Melt in your mouth, flavorful pork that rivaled any carnitas that I have eaten in any Mexican place.

I modified a quite things in the recipe after making it once, but the method and basic ingredients were pretty consistent with the recipe I found. On the second go around, I toasted the spices before grinding them, used chipotle chili powder instead of regular chili powder (and more of it), decreased the cinnamon, used apple cider vinegar and water instead of apple cider, seared the meat a little before shredding for tacos since not enough liquid had evaporated, and served it with a bright pineapple relish and avocado instead of a chile sauce that was recommended. The recipe I have written below reflects those changes.

You can easily make the pork a day or two before and allow it to rest in its cooking liquid until you are ready to serve. If you are going to freeze cooked carnitas, I recommend storing it in a little bit of its cooking liquid to prevent it from drying out. Once ready to serve, remove the chunks of meat from the liquid and heat it in a well-oiled cast iron skillet until just a little brown on the edges. Pull it apart with a fork or your fingers (if it has not already fallen apart) and serve with soft, warm corn tortillas, a little pineapple relish, and avocado slices.

Pork Carnitas Tacos with Pineapple Relish

Carnitas:
3 1/2 lb. pork shoulder, excess fat trimmed and cut into 2-inch cubes
1 medium onion, peeled and chopped
8 cloves garlic, peeled and smashed
1 tablespoon cumin seeds
1 tablespoon dried oregano or marjoram
1/2 teaspoon ground cinnamon
1 1/2 teaspoons chipotle chili powder
1 tablespoon salt
1 orange, zest removed in thick strips with a vegetable peeler
2 bay leaves
1/2 cup apple cider vinegar
2- 2 1/2 cups water

Pineapple Relish:
1/2 pineapple, outer layer removed and yellow flesh finely diced
1 small red onion, peeled and finely diced
1 lime (1/2 teaspoon zest + juice)
3 tablespoons finely chopped fresh cilantro
sprinkle of salt

For serving:
Corn tortillas, warmed to soften
Avocado, cut into slices
Cilantro
Lime wedges

Toast the spices. In a small skillet, toast the cumin seeds for 2-3 minutes over medium-low heat until they slightly darken and begin to release their aroma. Add the oregano, cinnamon, and chili powder and cook for 30 seconds or until they can be smelled. Remove from heat.

Place the pork, onions, garlic cloves, toasted spices, and salt in a large pot or Dutch oven. Toss everything together to coat. Use a vegetable peeler or sharp knife to remove outer peel of orange in thick strips. Tuck the orange zest strips and bay leaves in between the pieces of meat. Squeeze the remaining orange fruit flesh to release all of the juice into the pot. Add the apple cider vinegar and 2 cups of water to mostly cover the pork. It is okay if a little bit of the pork is sticking above the water, but add more water if the pork is still not well covered. Turn the heat to high, bring to a boil, and then reduce the heat to a simmer. Cover and cook on low for 2 hours.

IMG_5995.JPG
IMG_5996.JPG
IMG_6001.JPG
IMG_6003.JPG

After 2 hours, uncover the pot and continue to cook for another 90 minutes or up to 2 hours. A lot of the liquid will evaporate. At this point, you can remove the pork from the heat to cool and then store the pork in its cooking liquid in the refrigerator if you are making ahead of time. Otherwise, you can slightly drain the pork and serve at once, shredding with forks. Or you can remove the pork with a slotted spoon to a well-oiled skillet to crisp up the outer bits of the pork prior to shredding and serving.

IMG_6052.jpg

Make the relish. Combine all of the ingredients in a bowl and stir to combine. You can make this up to a day in advance.

To serve, fill a tortilla with some carnitas, a spoonful of pineapple relish, a few avocado slices, and garnish with extra cilantro and lime wedges, if desired. Serves 8.

IMG_6140_2.jpg
IMG_6143.jpg
In Mains Tags recipe, Mexican, pork, pineapple, gluten-free
6 Comments
← Newer Posts Older Posts →
Hi! I'm Emily. I love to cook whole, nourishing foods, and this is where I share my kitchen experiments and sometimes a little bit of life.

Hi! I'm Emily. I love to cook whole, nourishing foods, and this is where I share my kitchen experiments and sometimes a little bit of life.

Featured
  • July 2017
  • May 2017
  • April 2017
  • March 2017
  • February 2017
  • January 2017
  • December 2016
  • November 2016
  • October 2016
  • September 2016
  • August 2016
  • July 2016
  • June 2016
  • May 2016
  • April 2016
  • March 2016
  • February 2016
  • January 2016
  • December 2015
  • November 2015
  • October 2015
  • September 2015
  • August 2015
  • July 2015
  • June 2015
  • May 2015
  • April 2015
  • March 2015
  • February 2015

  • Appetizers 18
  • Breakfast 18
  • Life 4
  • Mains 39
  • Miscellaneous 2
  • Salads 21
  • Sandwiches 6
  • Side Dishes 8
  • Smoothies 4
  • Snacks 10
  • Soups 14
  • Spreads Dips Sauces 5
  • Sweets 6
  • Vegetarian 1

  • almonds
  • appetizers
  • autumn
  • avocado
  • breakfast
  • brown rice
  • chickpeas
  • chocolate
  • cilantro
  • coconut
  • coconut milk
  • fall
  • gluten-free
  • kale
  • lentils
  • make ahead
  • mint
  • oatmeal
  • recipe
  • salad
  • snack
  • soup
  • spring
  • summer
  • sweet potatoes
  • tahini
  • vegan
  • vegetarian
  • walnuts
  • winter

subscribe

Sign up with your email address to receive new posts directly

We respect your privacy.

Thank you!

All photographs, recipes and content are property of Nourishing Matters, unless otherwise noted. Please do not redistribute without my permission. Thank you!

Powered by Squarespace