• Home
    • About Nourishing Matters
    • About Emily
    • Frequently Asked Questions
  • Recipes
    • Offerings
    • Past Programs and Events
    • Experience and Teaching Style
    • Articles and Features
    • Travel
Menu

nourishing matters

Street Address
City, State, Zip
Phone Number
where wholesome meets delicious

Your Custom Text Here

nourishing matters

  • Home
  • About
    • About Nourishing Matters
    • About Emily
    • Frequently Asked Questions
  • Recipes
  • Work with Me
    • Offerings
    • Past Programs and Events
  • Yoga
    • Experience and Teaching Style
  • Press
    • Articles and Features
  • Adventures
    • Travel

Turkey and Cheddar Burger with Honey Mustard Apple Slaw

October 3, 2015 Emily Watson

I am realizing that I hardly have any meat recipes on here. It is not that I do not eat meat, because I do, but I just find it so much more challenging and fun to create wholesome and nourishing plant-based recipes. While I eat a mostly plant-based diet, I feel better, more energized, with a little meat from time to time. When I am at home, I prefer to cook meat that is locally sourced and free-range, grass-fed, antibiotic and hormone-free, and/or organic. It does cost a bit more to eat meat this way, but because I do not eat it but a few times a week, I am able to justify this extra cost. While I am naturally drawn to more plant-based dishes, when I go out to eat or eat with family or friends, I am more flexible because I enjoy experiencing other peoples' creations. That said, I hope that our culture lessens the emphasis on meat-centric meals, and use meat in a more sustainable and intentional way.

Now, onto this burger. I thought this would be a good way to say good-bye to summer and hello to fall. It merges the summer burger with a fall-inspired slaw. I chose an English muffin here as the bun for a few reasons. English muffins are easy to freeze so they are often something I have on hand. Also, their slight tang complements the juicy burger and sharp cheddar. One of the main reasons I am using an English muffin stems from my experience cooking in restaurants. When I worked as the pastry chef for a restaurant in Norwich, VT, the chef served his most popular item- the burger- on homemade English muffins with Vermont cheddar, and it was dynamite. And guess who was in charge of making those English muffins. Yep, me. I will eventually get around to making a rendition of them on the blog because homemade English muffins are well, words just cannot describe. For simplicity sake, for this recipe, I use a store-bought whole wheat English muffin, toast it, and it gets the job done.

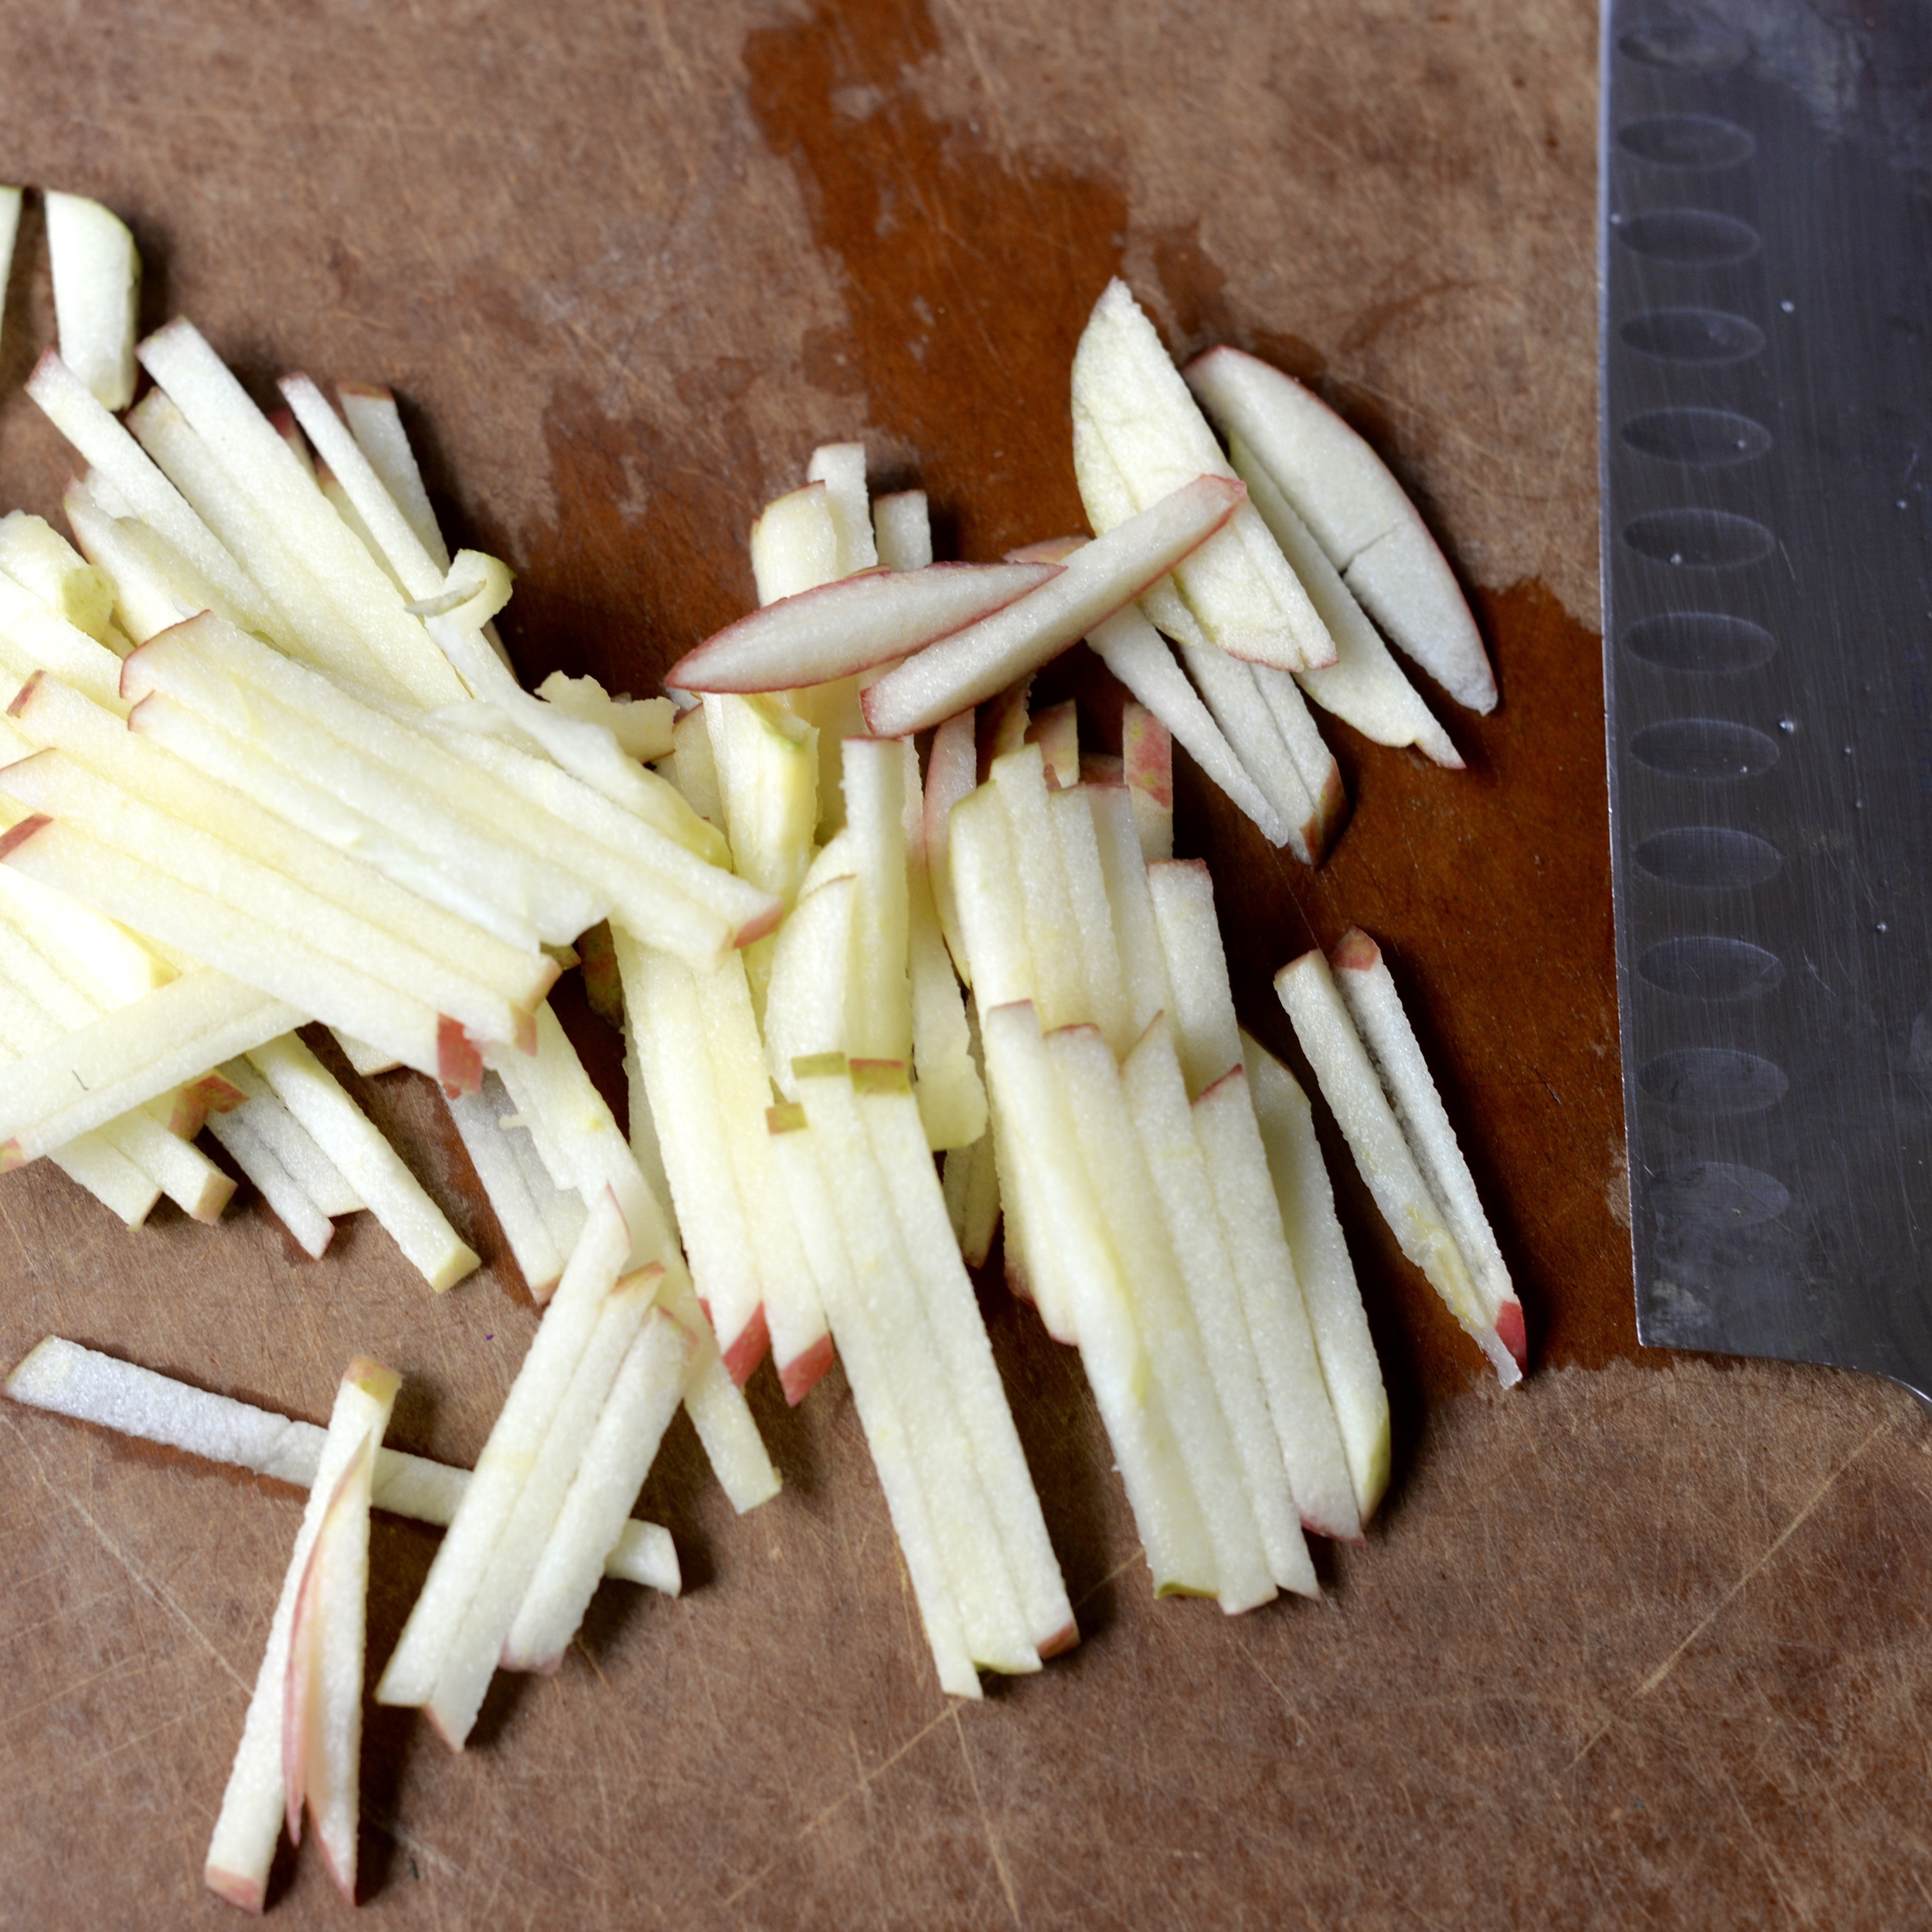
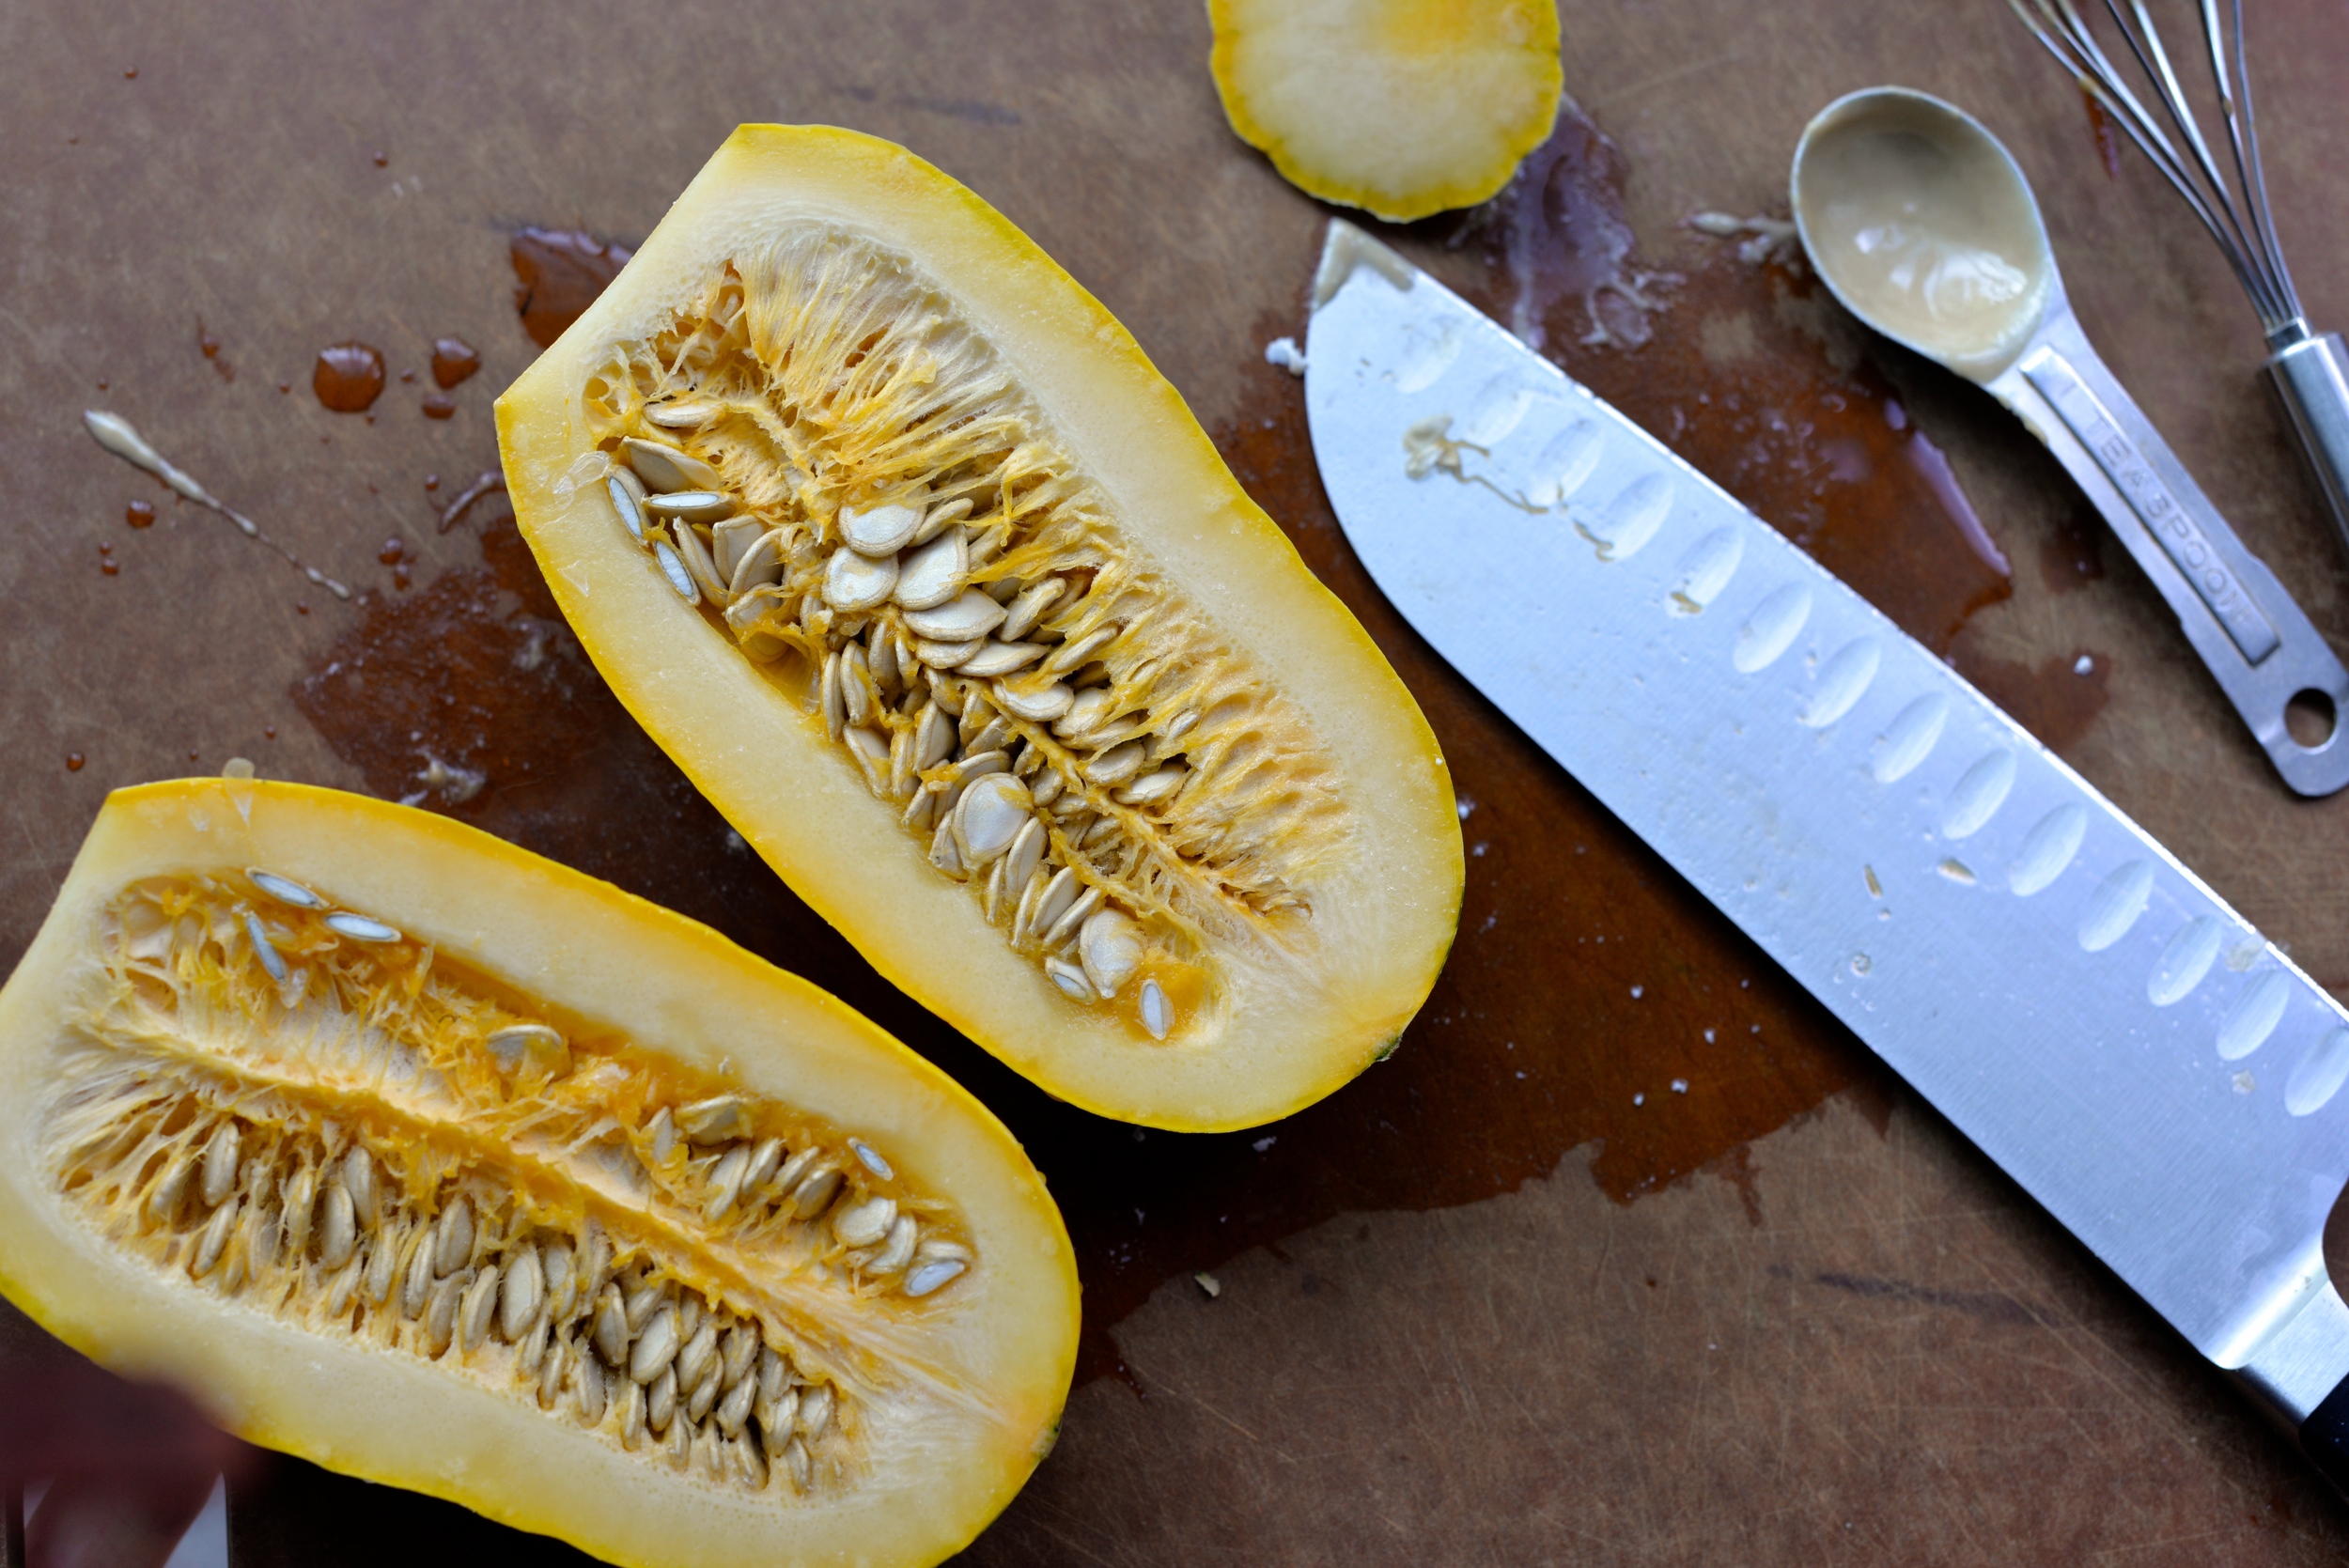
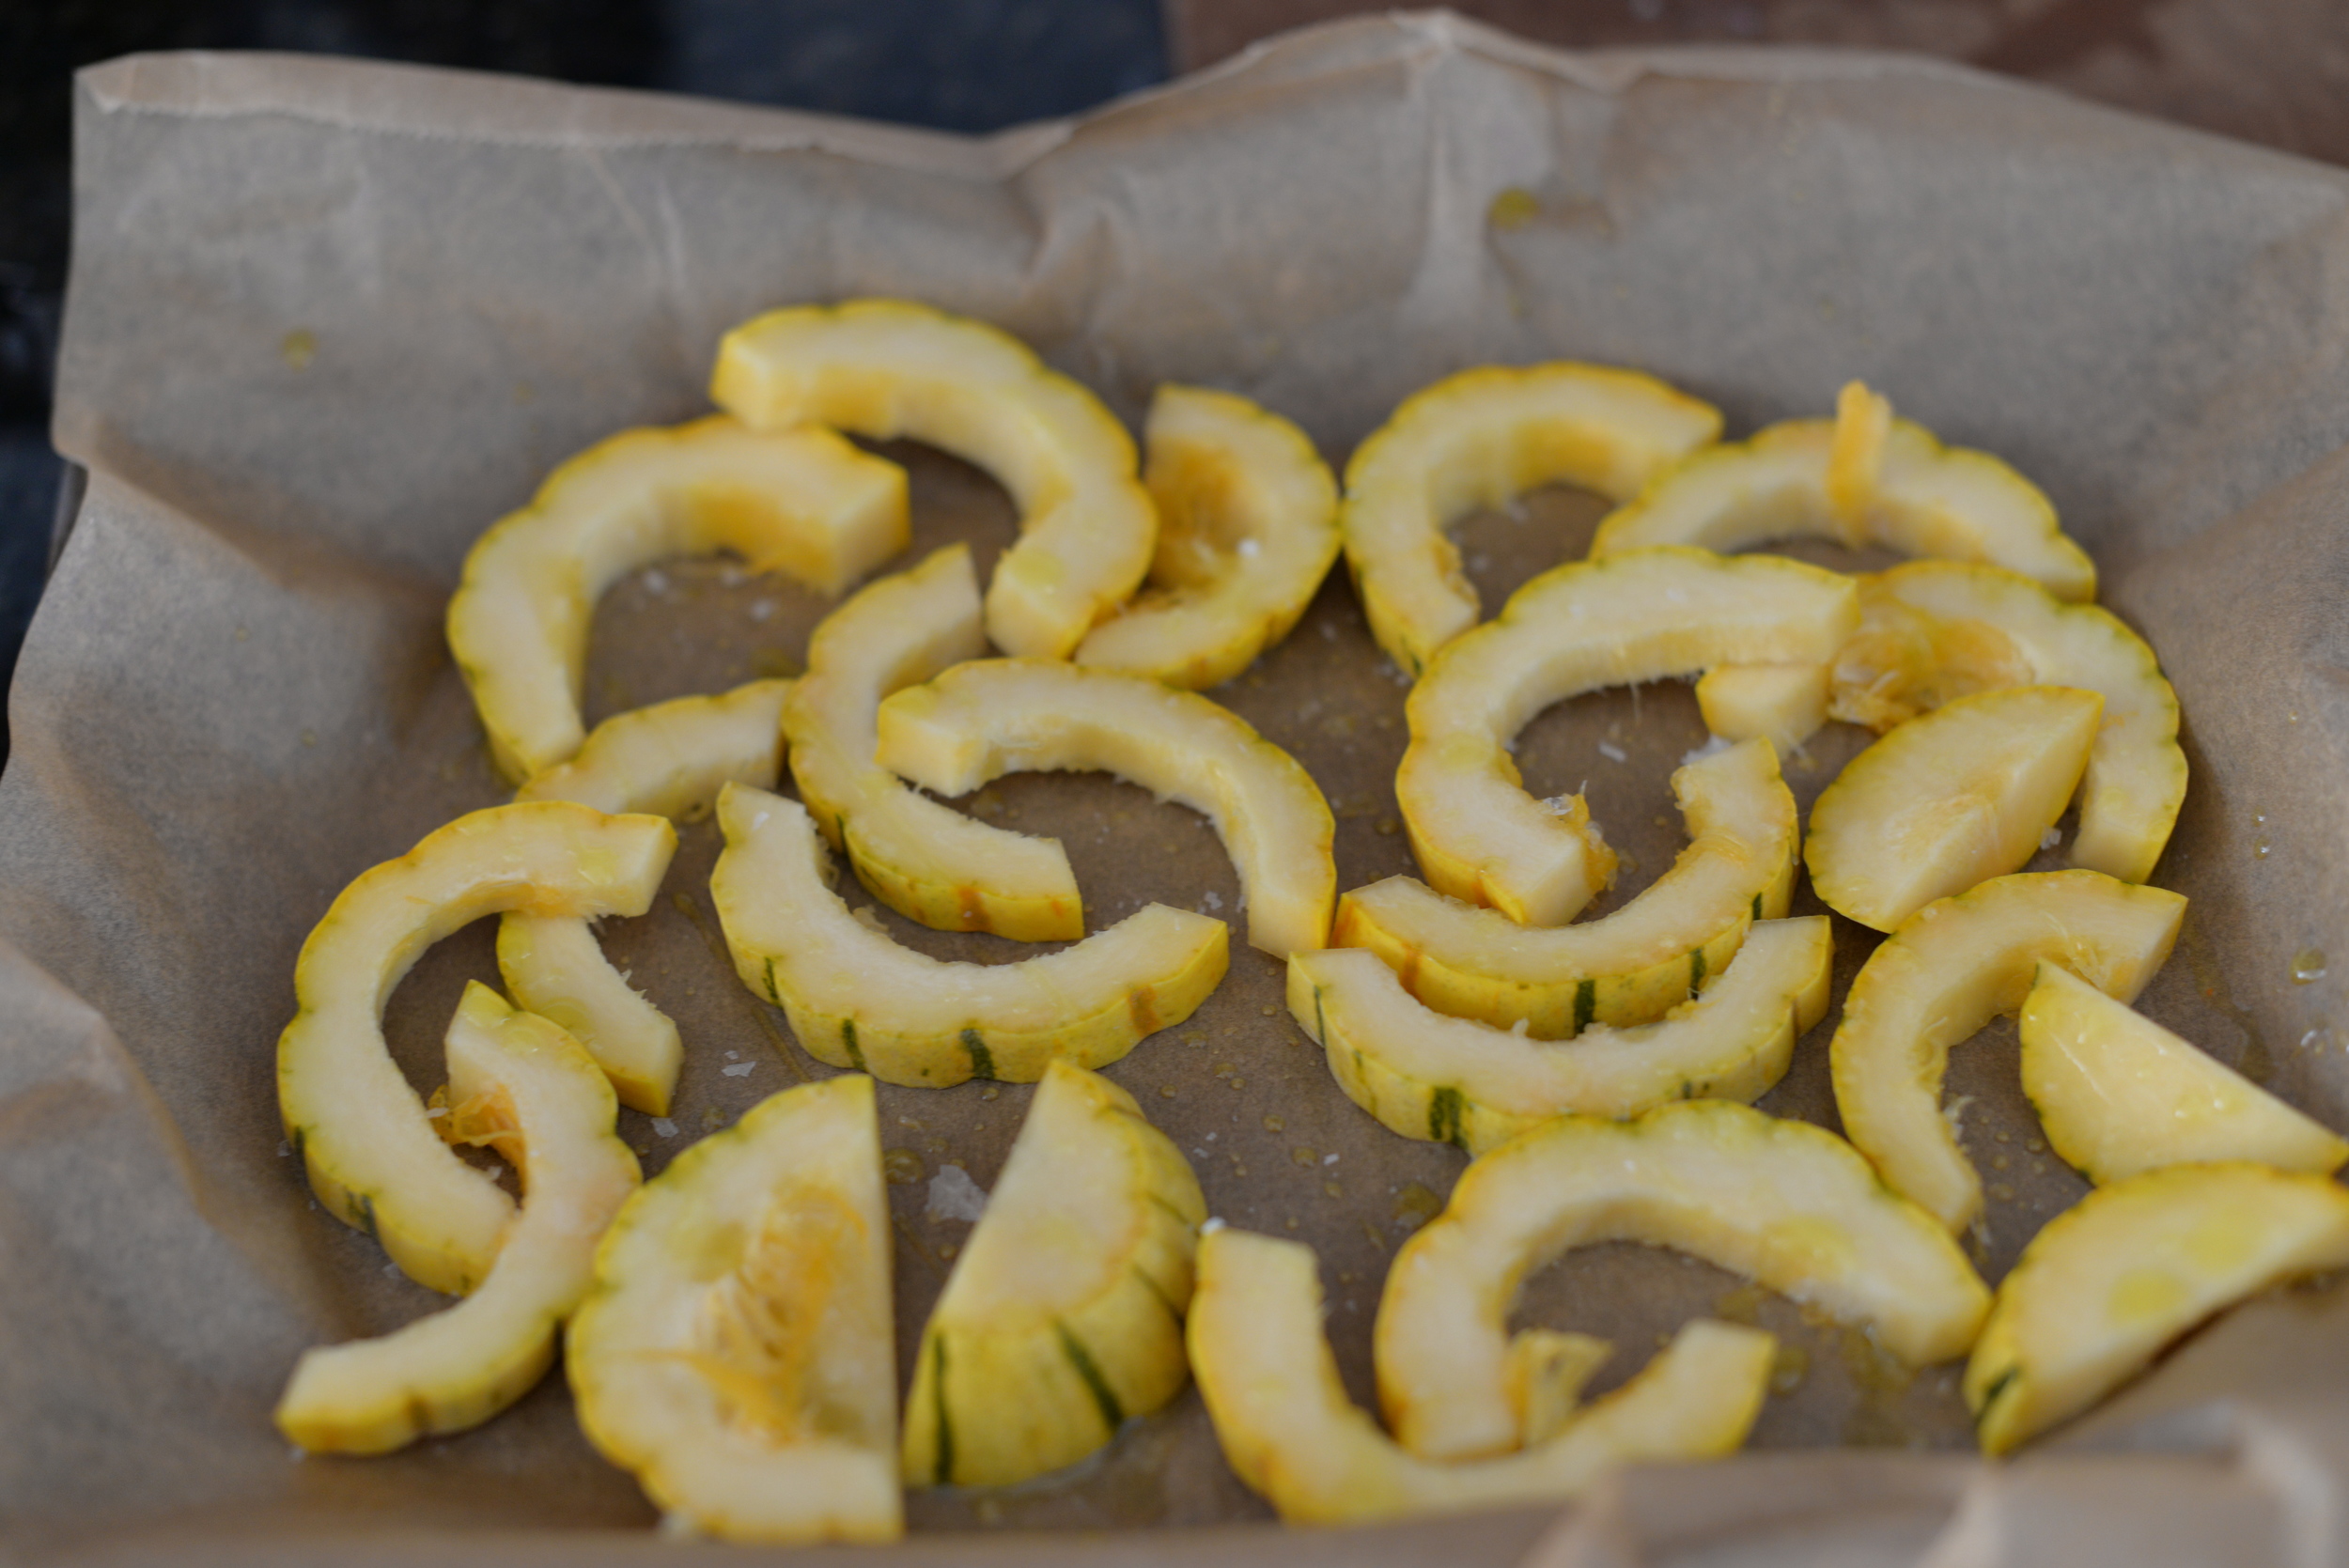
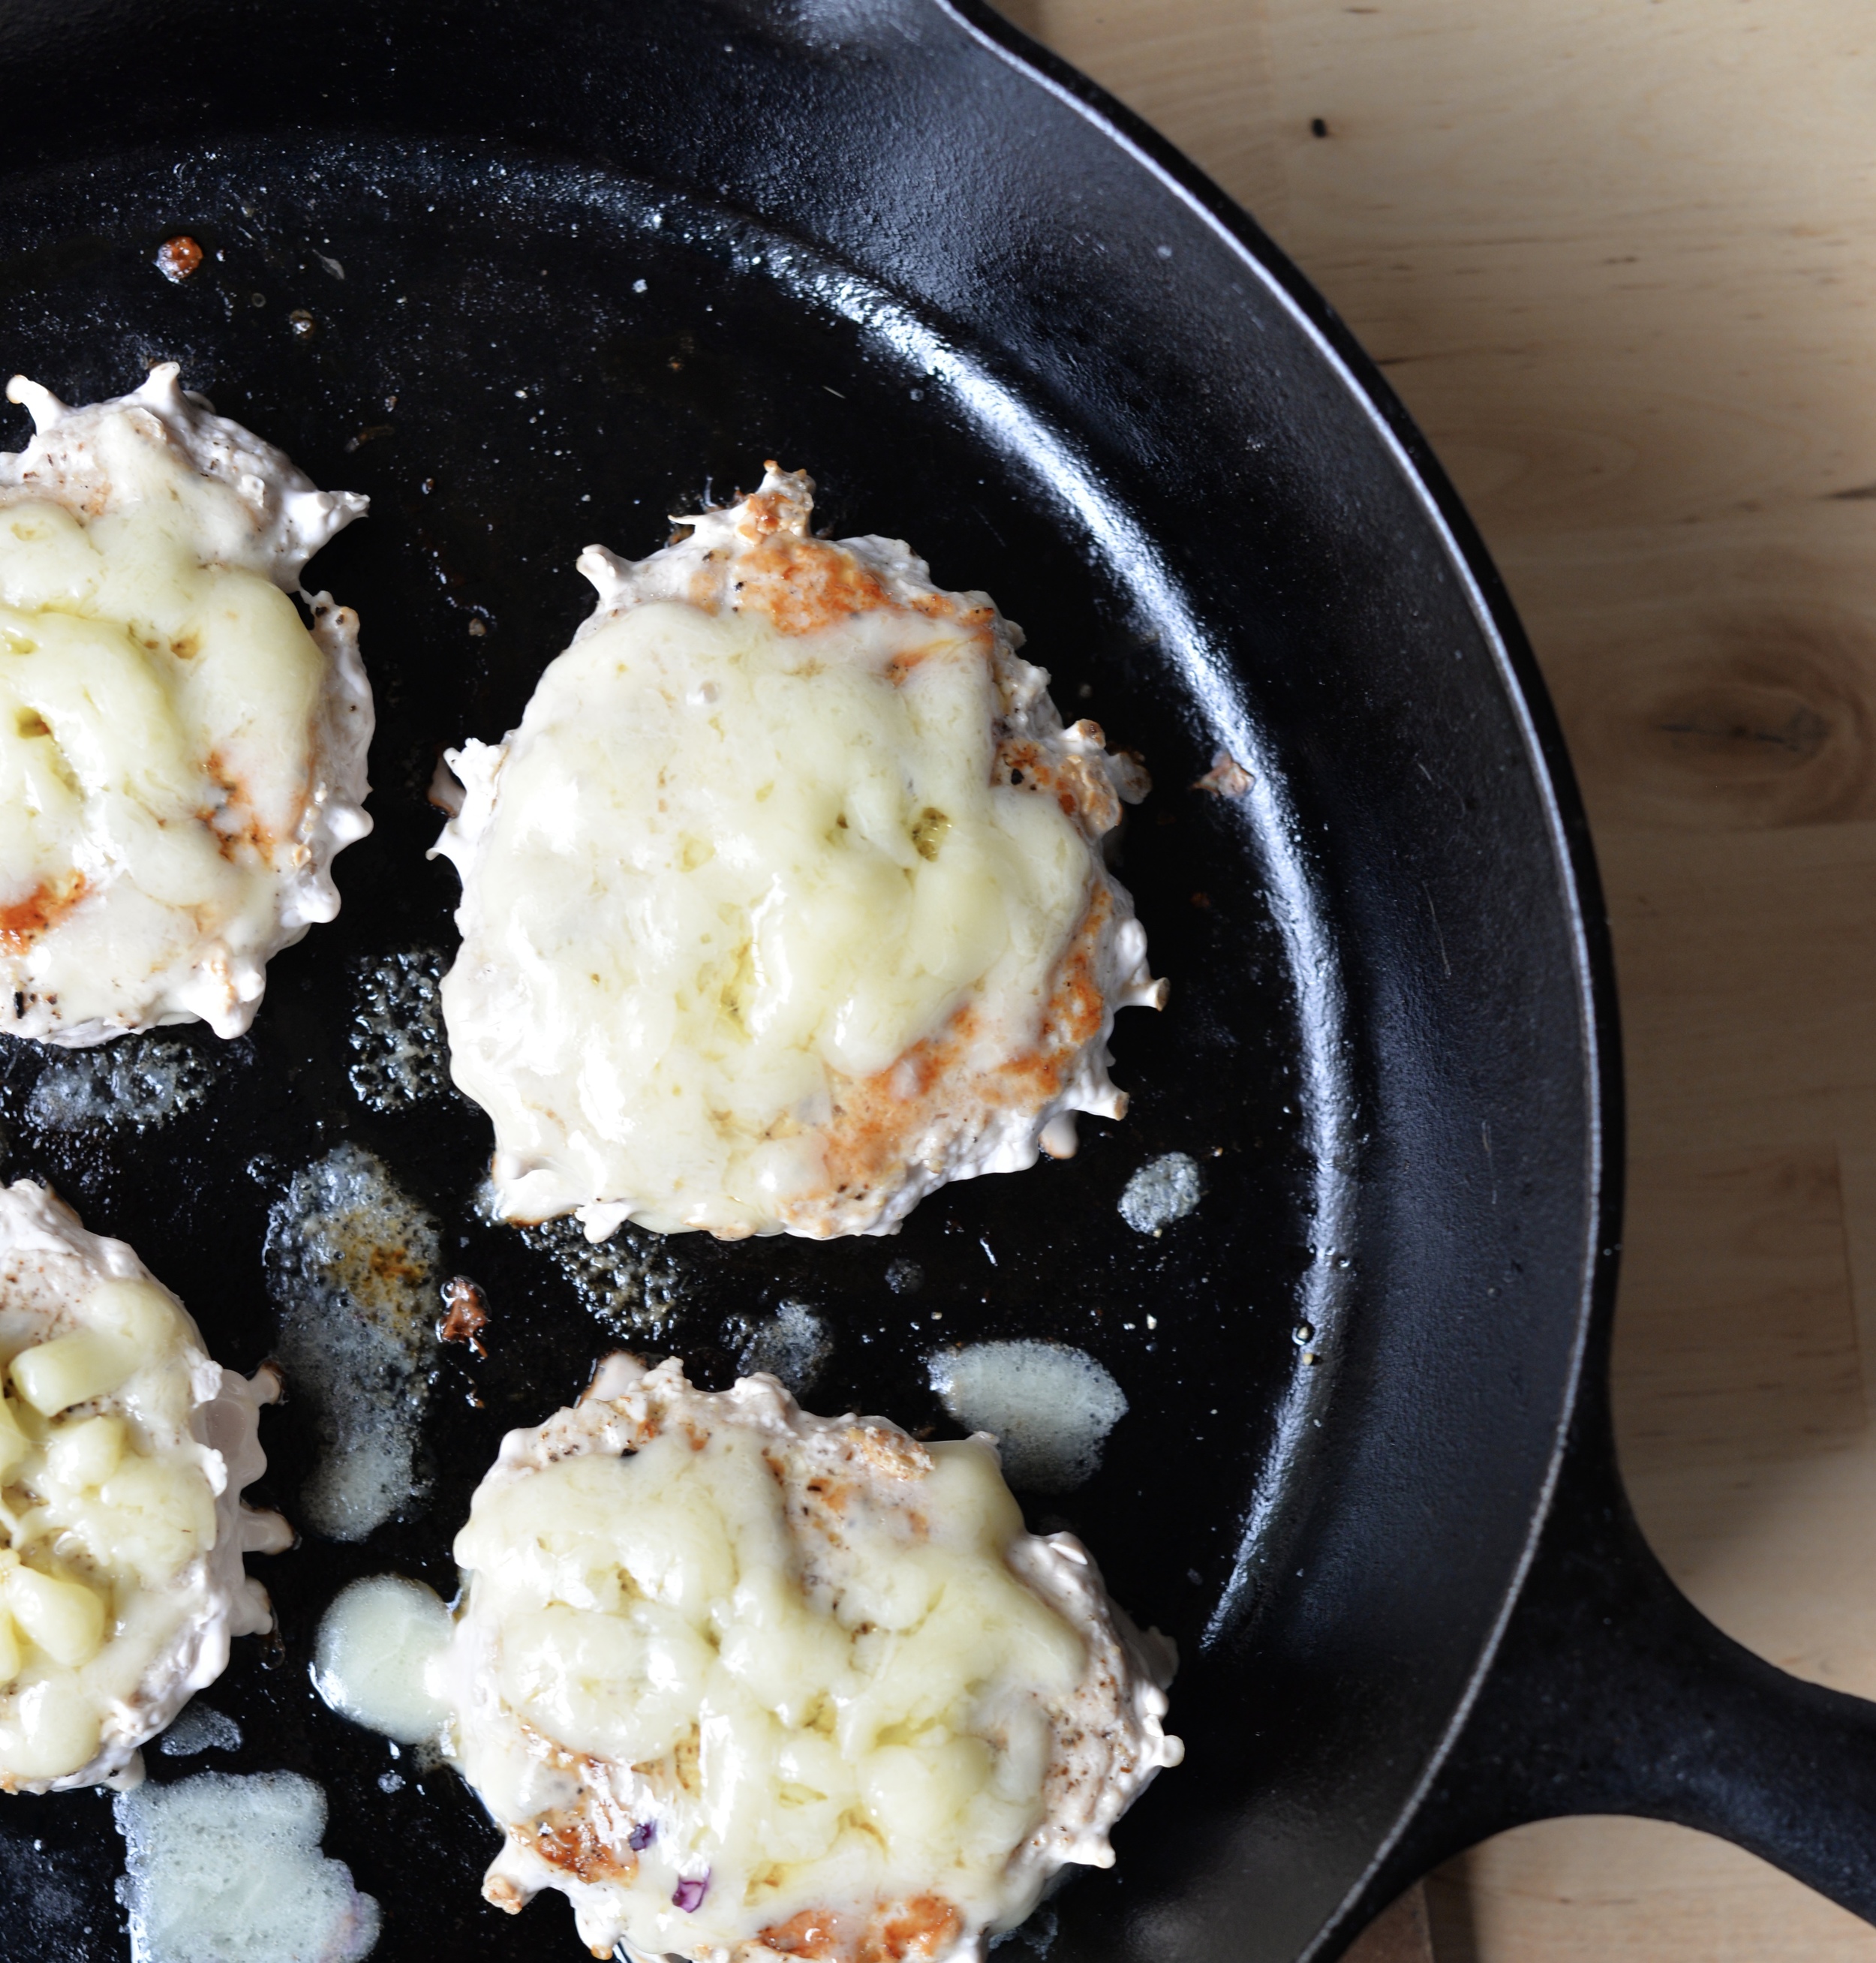
I cook the burgers in a cast iron skillet, although grilling is always an option. With the cast iron pan, I can sprinkle the cheese on after flipping and all the extra bits that fall to the side crisp up while the burger continues to cook. The slaw comes together in a flash. You can use your favorite crunchy apple, but I recommend something sweet and crisp. It may seem like a lot of cabbage at first, but it wilts right down after a good massage with salt, and letting it rest in the honey mustard dressing. Tahini + honey mustard dressing pulls it all together.

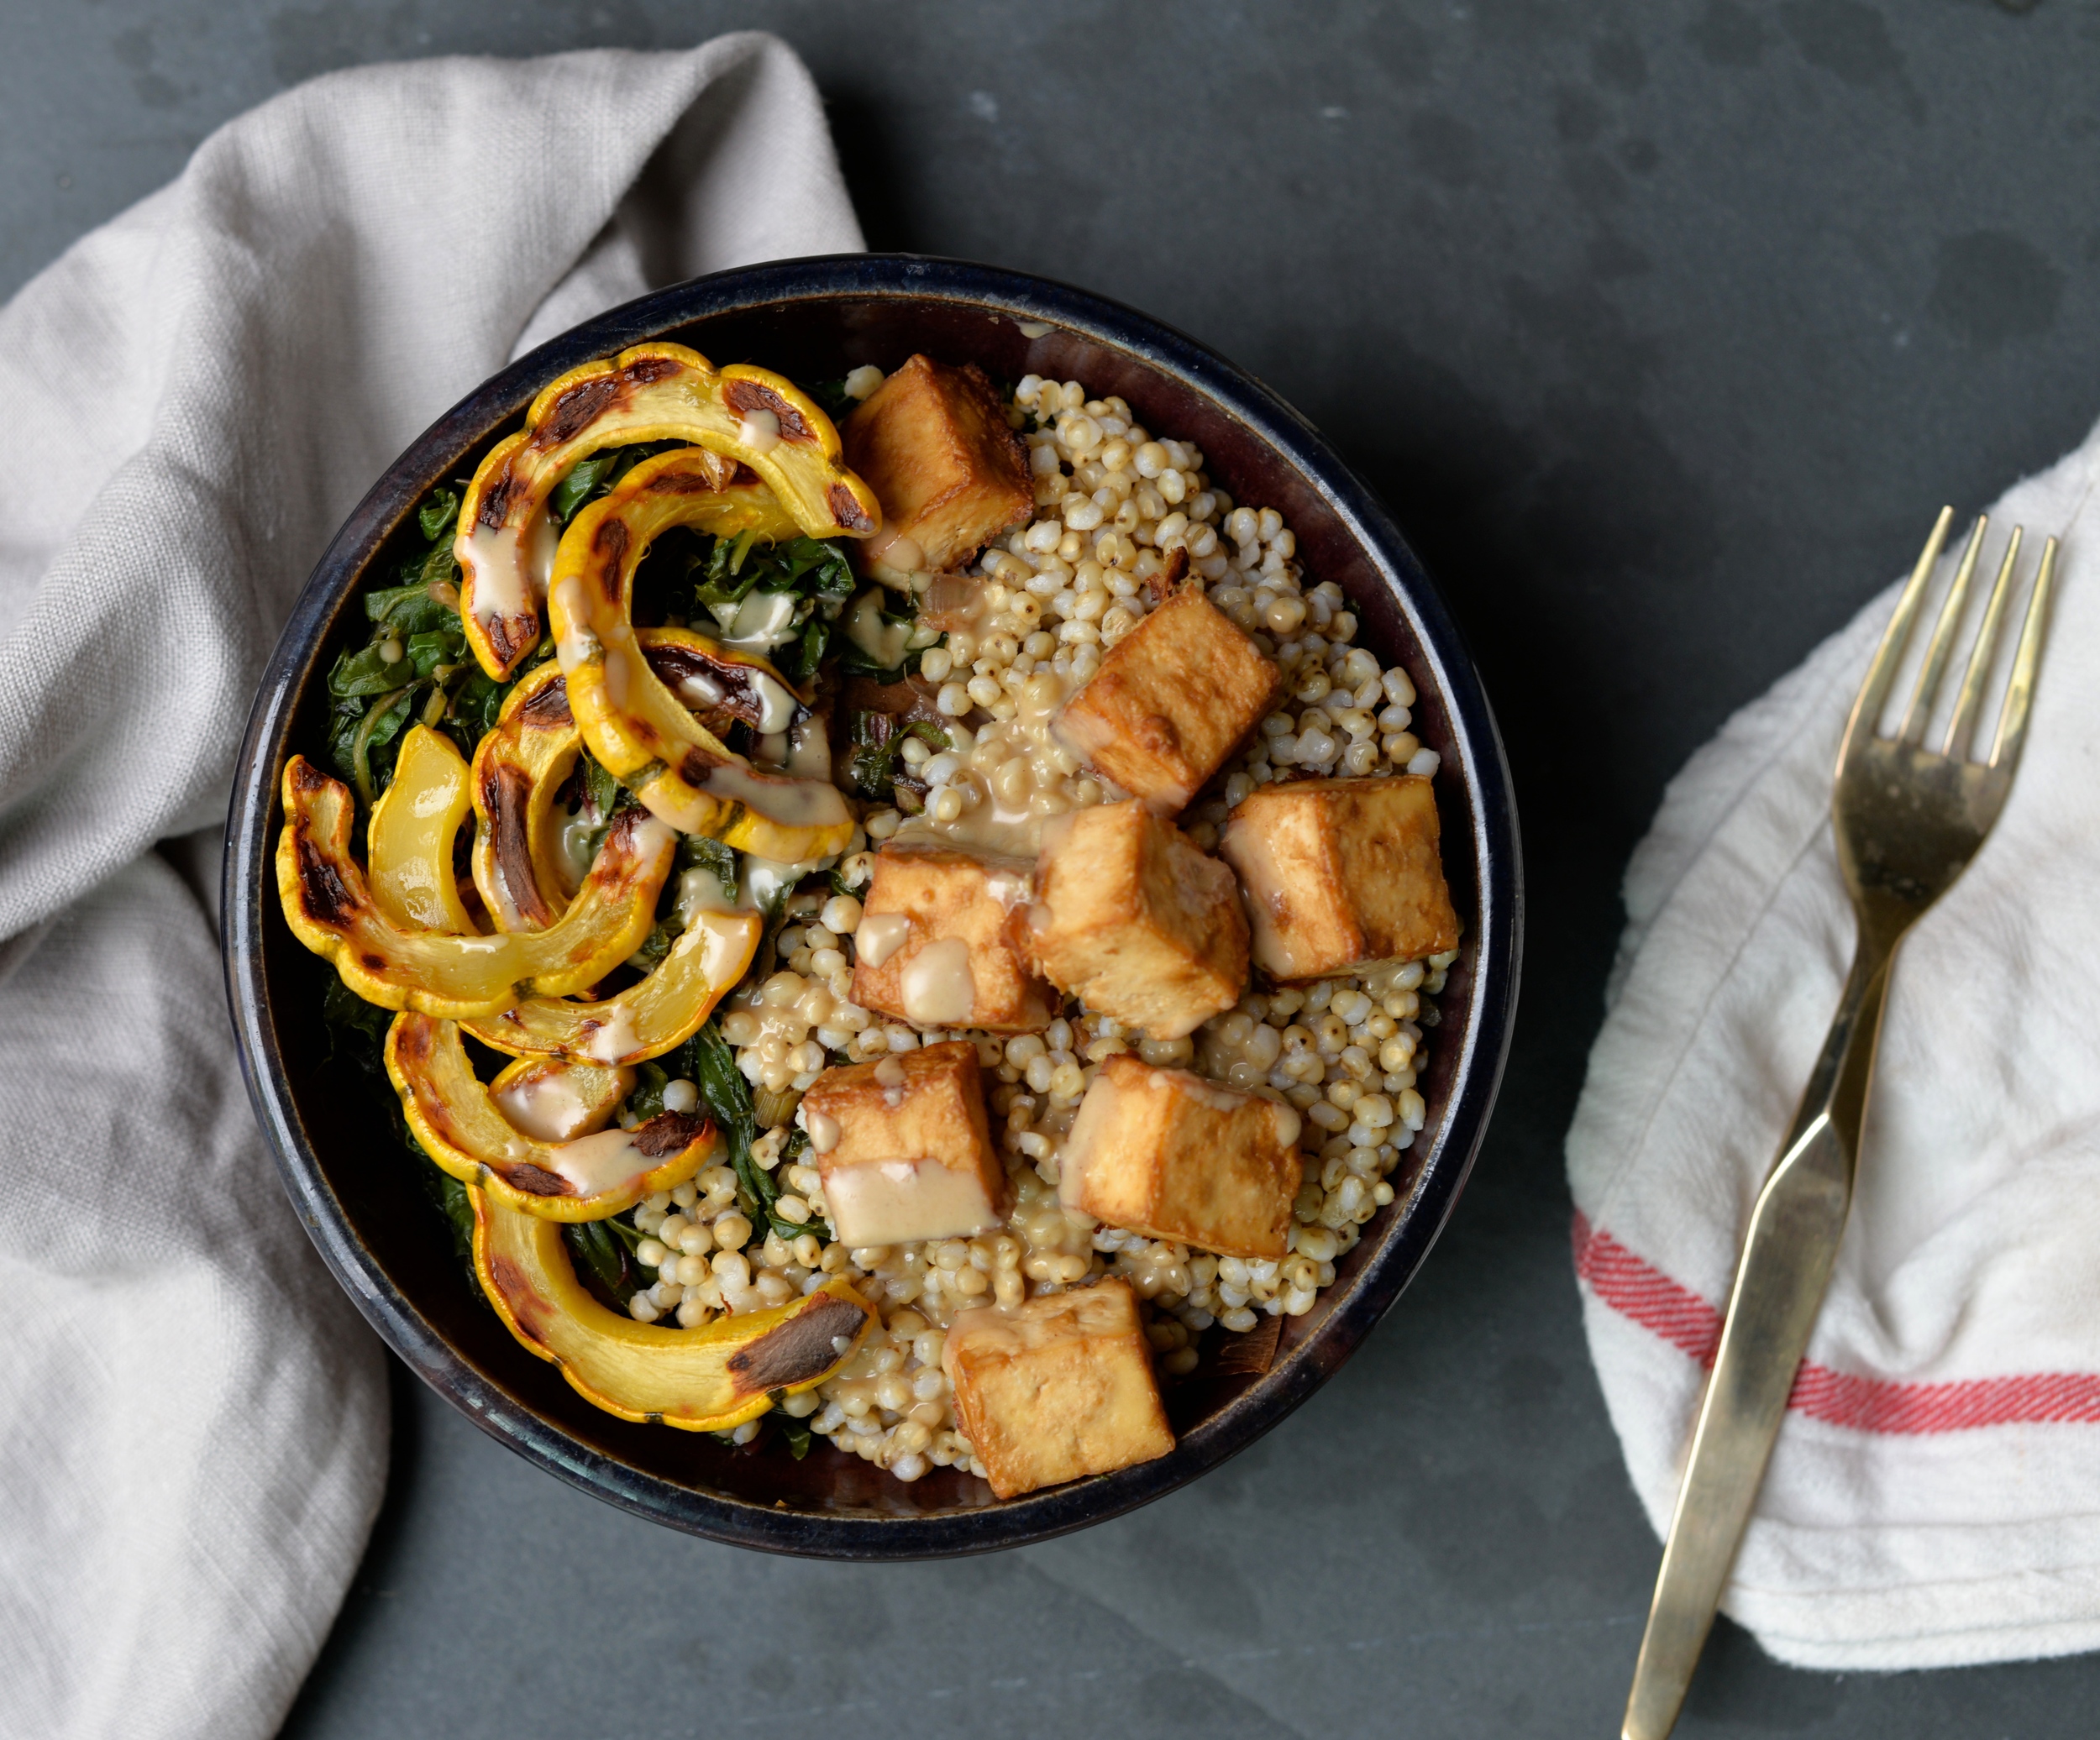
Serve alongside some easy Rosemary Garlic Sweet Potato Fries, and you have dinner.

Turkey and Cheddar Burger with Honey Mustard Apple Slaw

Burger:
1 lb. ground turkey, preferably local
2 teaspoons olive oil
sea salt and pepper to taste
4 ounces extra-sharp cheddar cheese (I used Cabot extra-sharp), grated (about 1 cup)
Honey Mustard Apple Slaw (recipe below)
2 tablespoons tahini, for burger sauce
1 tablespoon reserved honey mustard dressing from slaw below
4 whole wheat English muffins, toasted

Preheat oven to 350 degrees Fahrenheit. Allow cast iron skillet to heat in oven for 15 minutes. Meanwhile, form 4 patties with the ground turkey. Sprinkle one side with salt and pepper. Remove skillet from oven (turn oven off) and place on stove-top over medium-high heat. Add 2 teaspoons oil, swirl to coat. Add patties, seasoned side down and allow to cook for about 4 minutes. Sprinkle with salt and pepper on the other side. Flip burgers and sprinkle with 1 ounce grated cheddar cheese each. Allow burgers to cook for 3-4 minutes or until done. Remove from heat and allow to rest 5 minutes to allow juices to settle before serving.

Make burger sauce. Mix 2 tablespoons of tahini with 1 tablespoon remaining honey mustard dressing used for slaw.

Assemble burgers. Spread a thin layer of sauce on each English muffin half. Add patty to bottom halves, top with slaw, and top with English muffin. Enjoy! Makes 4 burgers.

DSC_1325.jpg
DSC_1352.jpg

Honey Mustard Apple Slaw

1/2 head small read cabbage, sliced very thinly (about 4 cups)
1 carrot, grated
1 1/2 teaspoons sea salt
1 1/2 tablespoons Dijon mustard
1 1/2 tablespoons apple cider vinegar
1 1/2 tablespoons extra-virgin olive oil
1 1/2 tablespoons honey, preferably
sea salt and pepper to taste
1 medium crisp, sweet apple, julienned (I used Honeycrisp)

Add cabbage and carrot to a bowl. Add salt, and massage salt into vegetables. Vegetables will begin to wilt. Mix remaining ingredients minus apple in a small bowl to make dressing. Reserve 1 tablespoon of dressing for burger sauce. Pour remaining dressing over cabbage mixture and toss until well combined. Set aside for 30 minutes to allow flavors to meld. Add apple, adjust seasoning to taste, and serve.  

DSC_1300.jpg
DSC_1312.jpg
DSC_1322.jpg
In Mains Tags recipe, burger, meat, fall, cabbage, apple
2 Comments

Chard, Delicata Squash, and Tahini Tofu Bowl with Sorghum

September 30, 2015 Emily Watson

Have you ever heard of sorghum? If not, not to worry. You are probably not alone. I made a big pot of it a few days ago, and my fiance asked me if I was serving little eyeballs for dinner. Probably not the best image to leave you with if I want you to give it a go, but it is a pretty unique little thing. I had read about sorghum in some magazine several months ago and waited to get my hands on a bag when it went on sale. Well I finally snagged a bag, and I feel like this recipe really accentuates all of its wonderfully delicious qualities.

So what is it? It is a round grass reminiscent in shape of Israeli couscous, the fat couscous you may have come across (Moroccan couscous is itty bitty), but it has a little black dot on each kernel, hence the eyeball comparison. It is native to Africa and has the most delightful chewy texture and subtle sweetness. Maybe you have heard of sorghum molasses? It is also high in fiber and iron, making it even more worth incorporating into your diet.  Sorghum does take a little while to cook- about 50 minutes in fact- so if you are short on time, you can substitute another grain of your choice as the base or even use Israeli couscous.

The slight sweetness of the sorghum pairs beautifully with the earthy chard and delicata squash and the slightly sweet but nutty tahini tofu. This bowl provides a rainbow of colors and textures, so it is super satisfying. The ingredients can be doubled or even tripled because it makes delicious leftovers.

Have you ever tried sorghum? If so, what is your favorite way to cook with it?

Chard, Delicata Squash, and Tahini Tofu Bowl with Sorghum

Bowl:
1 cup sorghum
2 1/2 cups water
1 delicata squash, washed, seeds removed, and sliced into 1/4-inch half-moons
2 teaspoons olive oil + 1 tablespoon
1 recipe Tahini Tofu (recipe below)
1 bunch Swiss chard (I used rainbow, but any type will do)
2 garlic cloves, minced
2 teaspoons red wine vinegar
salt and pepper to taste
2-3 tablespoons tahini, for drizzling (I like Philly's local Soom tahini because it is so wonderfully nutty)

Cook sorghum. Combine sorghum and water in a pot. Bring to a boil over high-heat. Reduce heat to low and cover, and allow sorghum to cook for 50 minutes. After 50 minutes, keep covered and remove from heat and allow to rest for about 10 minutes. Remove lid, stir, drain any excess water, and then sprinkle with a pinch or two of salt, and set aside.

Roast squash. Preheat oven to 400 degrees Fahrenheit. Line a baking sheet with parchment paper. Toss squash with two teaspoons olive oil and salt. Roast in single layer for 25 minutes or until squash is tender and beginning to brown.**You can also bake the tofu as the squash is cooking**

Prepare Swiss chard. Wash and loosely dry chard. It is okay if some water lingers on the leaves. Remove the stems from the chard leaves, and finely chop. Roll the leaves into a cylinder and cut into 1/2-inch ribbons like you were going to chiffonade basil. Heat 1 tablespoon olive oil over medium-high heat. Add chopped chard stems and cook until softened, about 5 minutes. Add garlic and cook for 30 seconds or until fragrant. Add sliced chard leaves, a generous pinch of salt, and stir. Cook until chard wilts and is tender, about 6-8 minutes, tossing occasionally. Add red wine vinegar, stir, and then remove pan from heat. Season to taste with salt and pepper. Set aside when done.

Assemble the bowls. Use a few scoops of sorghum as the base and top with roasted squash, sauteed chard, tahini tofu, and a drizzle of tahini. Enjoy! Serves 3-4.   

DSC_1216.JPG
DSC_1219.JPG
DSC_1223.JPG
DSC_1225.JPG
DSC_1231.JPG

Tahini Tofu:
1 package extra-firm tofu, drained
1 tablespoon low sodium soy sauce or low-sodium tamari, if gluten-free
1 tablespoon olive oil
2 teaspoons maple syrup
2 teaspoons Dijon mustard
1 tablespoon tahini

Preheat oven to 400 degrees Fahrenheit. Line a baking sheet with parchment or a Silpat. Remove the tofu from the package, drain, and set on a plate. Take a cutting board or plate and press gently and evenly on the tofu to expel a little of the soaking water. Set the tofu on a cutting board and cut into 16 cubes. In a small bowl, whisk the remaining ingredients together. Add the tofu to the bowl, mix gently to coat, and spread in an even layer on the parchment. Bake for 30 minutes or until golden on the edges and firm. Remove from oven, and allow to cool for about 5 minutes (this will also help them hold their shape), before scooping from the tray.

DSC_1210.JPG
DSC_1213.JPG
DSC_1233.JPG
DSC_1256.JPG
In Mains Tags recipe, vegan, vegetarian, tofu, sorghum, swiss chard, tahini, delicata squash, fall, bowl
2 Comments

Zucchini and Manchego Polenta with Saffron Tomato Jam

September 14, 2015 Emily Watson

A piping bowl of cheesy polenta is one of the most comforting foods. I love cooking it in the winter plopped under a lovely stew, the perfect foil to those heartier toppings. For the summer, polenta may seem too heavy, too dense, but I decided to lighten it up a little by tossing in summer vegetables to cook right along with the polenta. My first thought was to throw in some corn to make the corn flavor really pop, but I was late to the farmers' market and none was to be had. Instead, I threw in some finely shredded zucchini, and I dare say this version is even more fun. It dots the polenta with little specks of green and lightens the whole dish. I knew I was going to top the polenta with my Saffron Tomato Jam, so I drew on the Spanish cuisine and sprinkled in some shredded Manchego. Of course, another aged cheese would work, even good ole cheddar.

This is the perfect way to sneak in some vegetables if you have some veggie skeptics. While it is delicious as is, a poached egg could turn this into something really special.

Zucchini and Manchego Polenta with Saffron Tomato Jam

5 1/2 - 6 cups water
1 1/2 cups polenta (cornmeal, not instant)
1 1/2 teaspoons salt
1 large zucchini, grated
1 tablespoon extra-virgin olive oil
6 ounces or 1 1/2 cups grated Manchego cheese
salt and pepper, to taste
Saffron Tomato Jam, for serving
1/2 cup toasted pine nuts, for serving

Bring 5 1/2 cups of water to a boil in a large pot. Add polenta and salt and whisk thoroughly. Reduce heat to low and cover and allow to cook for 20-25 minutes, stirring occasionally to prevent polenta from sticking to the bottom of the pot. Stir in shredded zucchini, cover, and allow to cook for 10 more minutes. If polenta is rather thick, stir in 1/2 cup more of water and stir to absorb. This can vary depending on how pulpy your zucchini is. Remove pot from heat, stir in olive oil, grated cheese, and adjust for salt and pepper. Top with saffron tomato jam and toasted pine nuts. Enjoy! Serves 6.

DSC_1024.JPG
DSC_1034.jpg
In Mains Tags cornmeal, zucchini, summer, recipe
1 Comment

Middle Eastern Grilled Eggplant with Lemon Tahini Sauce

August 31, 2015 Emily Watson

Some days, I am paralyzed with indecision of what to cook, so I cook nothing at all. For example, I have loads of zucchini. I could make a ratatouille, throw them in a minestrone, confit them, grate them into little zucchini fritters. Instead, I do nothing with them, putting off the decision for another time. I turn into a grazer, eating a little bit of this, a little bit of that, until I feel satisfied. It may be some leftovers + avocado toast with an egg + a sliced tomato with sea salt + a cup of yogurt with nuts and chocolate + some leftover brown rice with cheese... it can go on. I tend to keep whole and nutritious foods on hand, so it is not like I am grabbing bags of processed this and that, but it is a lot less satisfying, a lot less satiating to graze and assemble than it is to sit down to a composed meal.

Ideally I would use the weekend and decide what to make for the week ahead, go to the farmers' market and grocery store and only buy those ingredients and get started on my cooking. This is something I am working on, and I know it can be done- my older sister and her husband have this whole menu planning thing down to an art and have for several years. Instead, what usually happens is I go to the farmers' market and grocery store and buy ingredients I happen to be in the mood for, that are looking rather pretty, or are on sale. Then I go home and eventually figure out what to do with them. While I certainly like the spontaneity of this sort of wing-it style, planning and organizing would help me avoid many of those indecision-induced grazing sessions.

A solution to my moments of indecision is to have a third party decide for me what I am doing with all of my ingredients, or rather, narrow my options of what to do with them. This is where Foodie Dice comes in. I saw them in a magazine last year and knew I had to order them. They could get me out of my decision ruts and spur me into action. The idea behind Foodie Dice is that you roll 6 dice, each with a different component to make a full meal. The categories are: protein, starch/ carb, herb, cooking method, bonus ingredient, and seasonal vegetable (there are 4 dice for this category). You roll and voila!...your dinner template is revealed. You obviously can re-roll any dice for which you do not have the ingredient on hand and see if something else comes up. What is wonderful about the dice is that you are still in charge of executing the dish and bringing the whole thing together, but the main parts are chosen for you. Fewer options for the win.

I had a bounty of summer vegetables that I purchased from the local farmers' market. Everything was beautiful- zucchini, eggplant, peppers, tomatoes, cucumbers, corn, but I just stared at it all when I got home. I could not commit to a dish I wanted to make, so I pulled out my little bag of dice and decided to leave dinner's fate in the dice's roll. And the results were... lamb or beans, rice, oregano, grill, garlic, and eggplant.

DSC_0779.JPG

I had chickpeas on hand and a multi-grain/ brown rice mix that I had cooked a few days earlier. I did not have any fresh or dried oregano, but I did have a jar of Middle Eastern za'atar which contains dried oregano, thyme, and sesame seeds which I decided would work beautifully with the eggplant. I had a grill, garlic, and a gorgeous deep purple eggplant from the market. I added in some lemon, fresh cilantro, and tahini to tie it all together, and the result: a beautiful, summer dish inspired by the flavors of Israel, from where my little jar of za'atar had come.

DSC_0635.JPG

This dish can easily be made ahead of time without the extra tahini sauce on top. Just reheat in the oven. When you remove it from the oven, the heat will help the tahini sauce get into all of the nooks and crannies. Sprinkle with a little extra cilantro or parsley, and you will be ready to serve. I used a brown rice/ grain mix here, but plain brown rice, quinoa, millet, etc. would work, and another white bean or even lentils could serve as a chickpea substitute. Have fun with it!

DSC_0797.jpg
DSC_0801.JPG

Middle Eastern Grilled Eggplant with Lemon Tahini Sauce

Grilled Eggplant:
1 large eggplant, top removed, and cut into 1/4" slices, lengthwise
1 1/2 tablespoons olive oil
1/2 teaspoon salt

Filling:
1 1/2 cups cooked brown rice
1 cup cooked chickpeas, drained (canned are fine)
1 1/2 teaspoons za'atar spice mix or dried oregano
1 large handful of cilantro or parsley, washed and roughly chopped
1/2 teaspoon salt, plus more to taste

Lemon Tahini Sauce:
1 lemon, zest and juice
1 garlic clove, minced
2 1/2 tablespoons tahini paste
1 tablespoon extra-virgin olive oil
salt and pepper

Grill eggplant. Heat grill to high heat. Drizzle eggplant slices with 1 1/2 tablespoons olive oil and sprinkle evenly with salt. Grill eggplant slices, turning once, until softened, about 5-8 minutes total. Remove from grill and set aside.

In a small bowl, mix lemon zest and juice and garlic clove. Allow to sit for 5 minutes for garlic to mellow. Whisk in tahini paste, extra-virgin olive oil, and a sprinkling of salt and pepper.

In another bowl, combine rice, chickpeas, za'atar, cilantro, salt, and 1/2 of the lemon tahini sauce. Stir until well-combined.

Preheat oven to 400 degrees Fahrenheit. Lay out eggplant slices on a cutting board or counter-top and place a heaping spoonful of filling on one end of each slice. Roll each slice up. Tuck away in a baking dish, seam side down. If any filling remains, you can sprinkle it around the edges of the dish. Bake for 20 minutes. Remove from oven and drizzle remaining lemon tahini sauce on top and sprinkle with remaining herbs. Enjoy! Serves 4.


DSC_0805.JPG
DSC_0806.JPG
In Mains Tags recipe, eggplant, summer, chickpeas, brown rice, vegan, vegetarian, gluten-free, tahini, foodie dice
6 Comments

Poblano Peppers Stuffed with Millet and Black Beans

August 20, 2015 Emily Watson

One summer, my older sister and I decided it would be a good idea to try to make the real, deep-fried chile rellenos ourselves. We were feeling ambitious. This was going to be our first foray into the deep-frying world, and we were going to go all out. We roasted the poblanos, peeled away the blackened skin, stuffed them with cheese, tooth-picked them together, dipped them in batter, and then plunged the first one in a pot of oil with bated breath, ready for it to puff up to a spectacular golden brown. What we got was a blackened blob and an apartment full of smoke. Her husband walked in at about this same time and despite the door being fifteen feet from the kitchen, we could not see him and he could not see us. The oil was clearly too hot and the pepper had completely incinerated, and we were bowled over in tears- partially from the smoke and partially from laughing so hard at our failed attempt. With all windows and doors opened and a new pot of oil, we tried again, this time doing a little batter fry-test before wasting another precious pepper. The end result was pretty delicious, but it was an afternoon's worth of work for what is essentially some deep-fried cheese disguised in a pretty green pepper.

These stuffed peppers are just as comforting, but lighter and even more flavorful than Mexican chile rellenos. And they are most definitely easier. You do have to have a cooked grain on hand (I used millet), but you could certainly use leftover rice or even quinoa. Another fantastic option would be leftover grits or polenta. Yum. I mixed in some black beans and a sharp cheddar, but if you have pepper jack on hand or tossed in some feta, you could jazz it up a little more.

Poblano peppers are everywhere at the farmers' market right now, and because their flesh is much thinner, they cook right in the oven without any parboiling needed. Another win. But the real winner here is the sauce. It is based on a sauce that I often use when I make enchilada casserole. I sometimes use different chili powders or add a little cayenne and maybe a little smoked paprika, but this is the base I riff off of. I have made some delicious sauces with dried chilies, soaking and pureeing them or toasting them and grinding them with other spices, but this sauce is way more flavorful than its ingredients suggest and much friendlier for a busy cook. Feel free to double the sauce and use it on just about anything. It also freezes well if you are the make-ahead type. 

I garnished everything with a drizzle of local goat yogurt from Shellbark Hollow Farm. Most goats' milk yogurts contain a number of stabilizers, but this one does not so it is quite runny- prefect for drizzling. It gives the most subtle tang which works so well on these peppers, but sour cream or another yogurt would pair nicely with this, too. Enjoy!

Poblano Peppers Stuffed with Millet and Black Beans

Peppers:
4 poblano peppers, washed, sliced in half lengthwise, and seeds removed
1 1/2 cups cooked millet or other grain
1/2 cup cooked black beans, drained
1 cup sharp cheddar cheese, divided (I used Cabot extra sharp cheddar)
handful of cilantro, chopped, plus more for garnishing
yogurt or sour cream for garnishing (I used a local goat's milk yogurt which is a bit runnier but delicious!)

Mexican Spiced Tomato Sauce:
1 tablespoon olive oil
1 small onion, finely chopped
3 garlic cloves, minced
2 tablespoons chili powder (I used a mix of chipotle and regular chili powder)
2 teaspoons ground cumin
2 teaspoons dried oregano
1/2 teaspoon salt
1 15-ounce can tomato sauce
3/4 cup water

Prepare sauce. In a medium saucepan, heat oil over medium-high heat. Add onion and garlic cloves, and cook for 5-8 minutes or until softened and slightly golden. Add chili powder, cumin, oregano, and salt, and stir and cook for 30 seconds or until fragrant. Add tomato sauce and water. Stir to incorporate and turn heat to low and cook for 20 minutes.

Preheat oven to 400 degrees Fahrenheit. Prepare filling. In a medium bowl, stir together cooked millet, cooked black beans, 1/2 cup grated cheese, and handful of chopped cilantro. Spoon mixture into poblano pepper halves. Extra filling will probably remain, so just spoon it around the pepper halves after placing them in the sauce.

When the sauce is done, layer 1/2 of the sauce in the bottom of oven-proof dish. Nestle pepper halves in the sauce (sauce should come up half-way up the sides). Spoon a little sauce over the top of each pepper half and sprinkle peppers with remaining grated cheese. Cover pan with foil and place in oven to cook for 30 minutes.

Remove foil from pan after 30 minutes, turn broil to high and broil for 2-3 minutes or until cheese is a little toasty. Remove from oven, top with yogurt or sour cream and additional cilantro. Enjoy! Serves 4.

DSC_0654.JPG
DSC_0658.JPG
DSC_0661.JPG
DSC_0662.JPG
DSC_0703.JPG
In Mains Tags recipe, gluten-free, millet, black beans, vegetarian, mexican
2 Comments
← Newer Posts Older Posts →
Hi! I'm Emily. I love to cook whole, nourishing foods, and this is where I share my kitchen experiments and sometimes a little bit of life.

Hi! I'm Emily. I love to cook whole, nourishing foods, and this is where I share my kitchen experiments and sometimes a little bit of life.

Featured
  • July 2017
  • May 2017
  • April 2017
  • March 2017
  • February 2017
  • January 2017
  • December 2016
  • November 2016
  • October 2016
  • September 2016
  • August 2016
  • July 2016
  • June 2016
  • May 2016
  • April 2016
  • March 2016
  • February 2016
  • January 2016
  • December 2015
  • November 2015
  • October 2015
  • September 2015
  • August 2015
  • July 2015
  • June 2015
  • May 2015
  • April 2015
  • March 2015
  • February 2015

  • Appetizers 18
  • Breakfast 18
  • Life 4
  • Mains 39
  • Miscellaneous 2
  • Salads 21
  • Sandwiches 6
  • Side Dishes 8
  • Smoothies 4
  • Snacks 10
  • Soups 14
  • Spreads Dips Sauces 5
  • Sweets 6
  • Vegetarian 1

  • almonds
  • appetizers
  • autumn
  • avocado
  • breakfast
  • brown rice
  • chickpeas
  • chocolate
  • cilantro
  • coconut
  • coconut milk
  • fall
  • gluten-free
  • kale
  • lentils
  • make ahead
  • mint
  • oatmeal
  • recipe
  • salad
  • snack
  • soup
  • spring
  • summer
  • sweet potatoes
  • tahini
  • vegan
  • vegetarian
  • walnuts
  • winter

subscribe

Sign up with your email address to receive new posts directly

We respect your privacy.

Thank you!

All photographs, recipes and content are property of Nourishing Matters, unless otherwise noted. Please do not redistribute without my permission. Thank you!

Powered by Squarespace