• Home
    • About Nourishing Matters
    • About Emily
    • Frequently Asked Questions
  • Recipes
    • Offerings
    • Past Programs and Events
    • Experience and Teaching Style
    • Articles and Features
    • Travel
Menu

nourishing matters

Street Address
City, State, Zip
Phone Number
where wholesome meets delicious

Your Custom Text Here

nourishing matters

  • Home
  • About
    • About Nourishing Matters
    • About Emily
    • Frequently Asked Questions
  • Recipes
  • Work with Me
    • Offerings
    • Past Programs and Events
  • Yoga
    • Experience and Teaching Style
  • Press
    • Articles and Features
  • Adventures
    • Travel

Saffron Tomato Jam

September 14, 2015 Emily Watson
DSC_1016.jpg

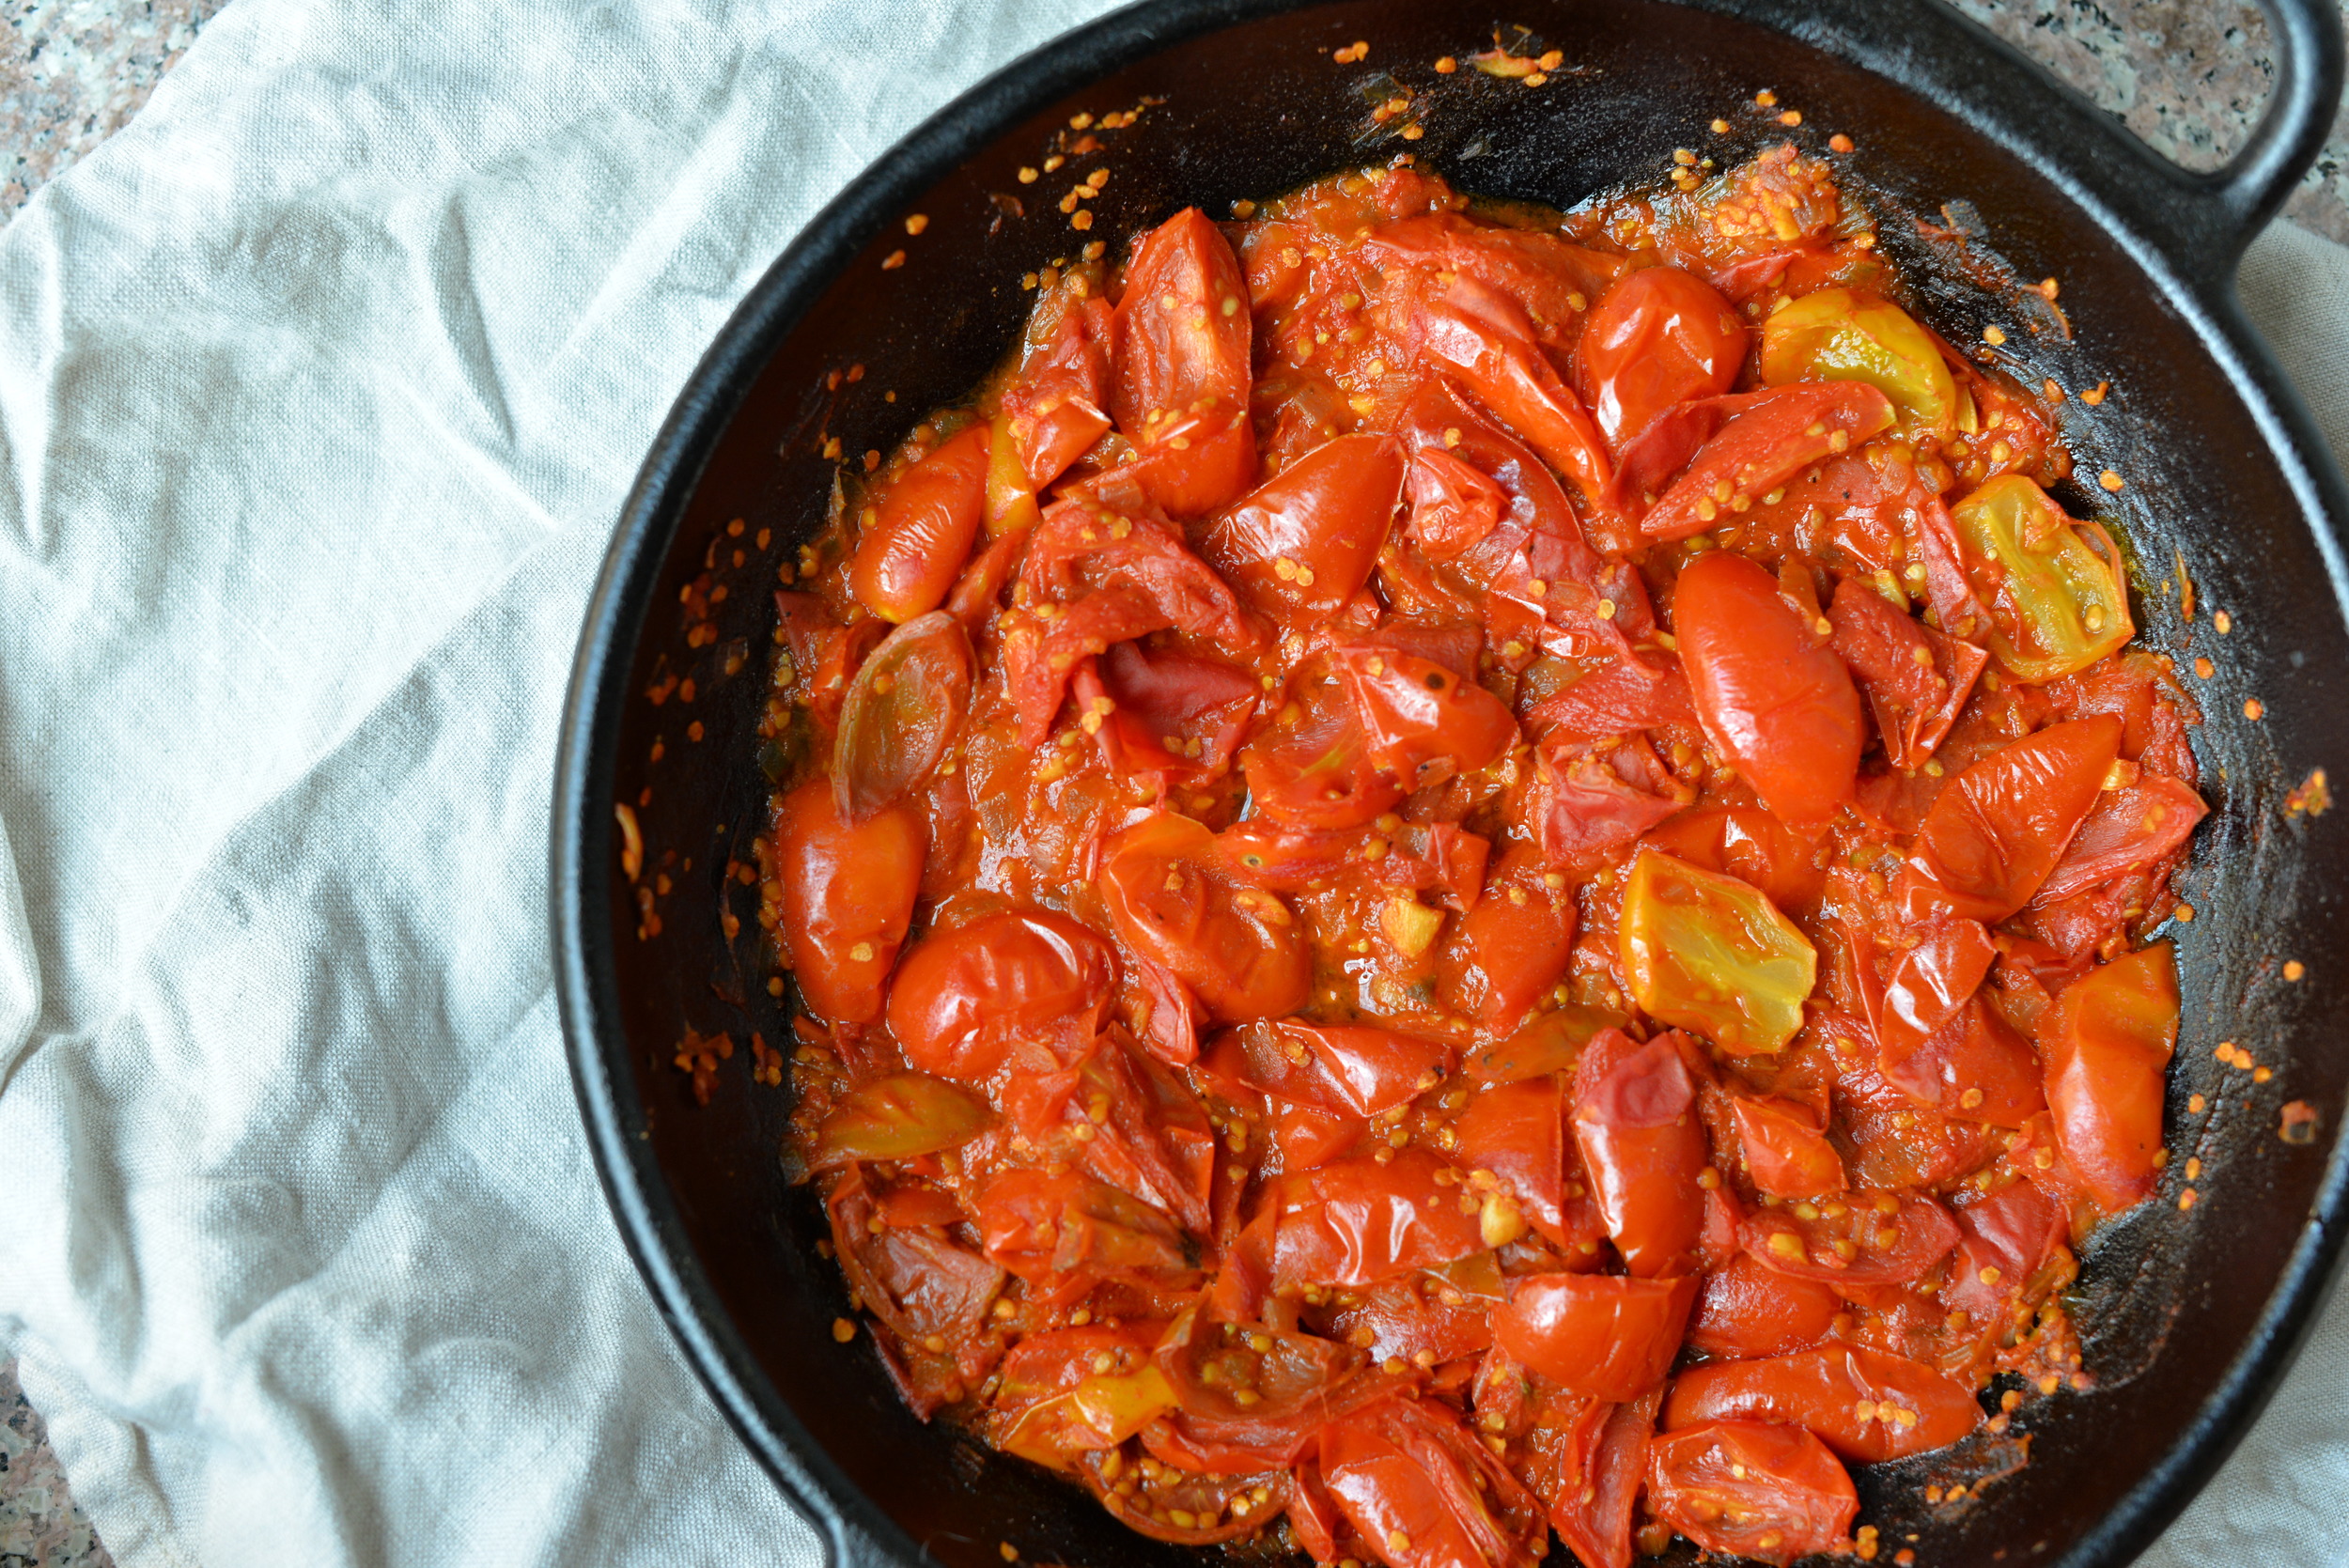
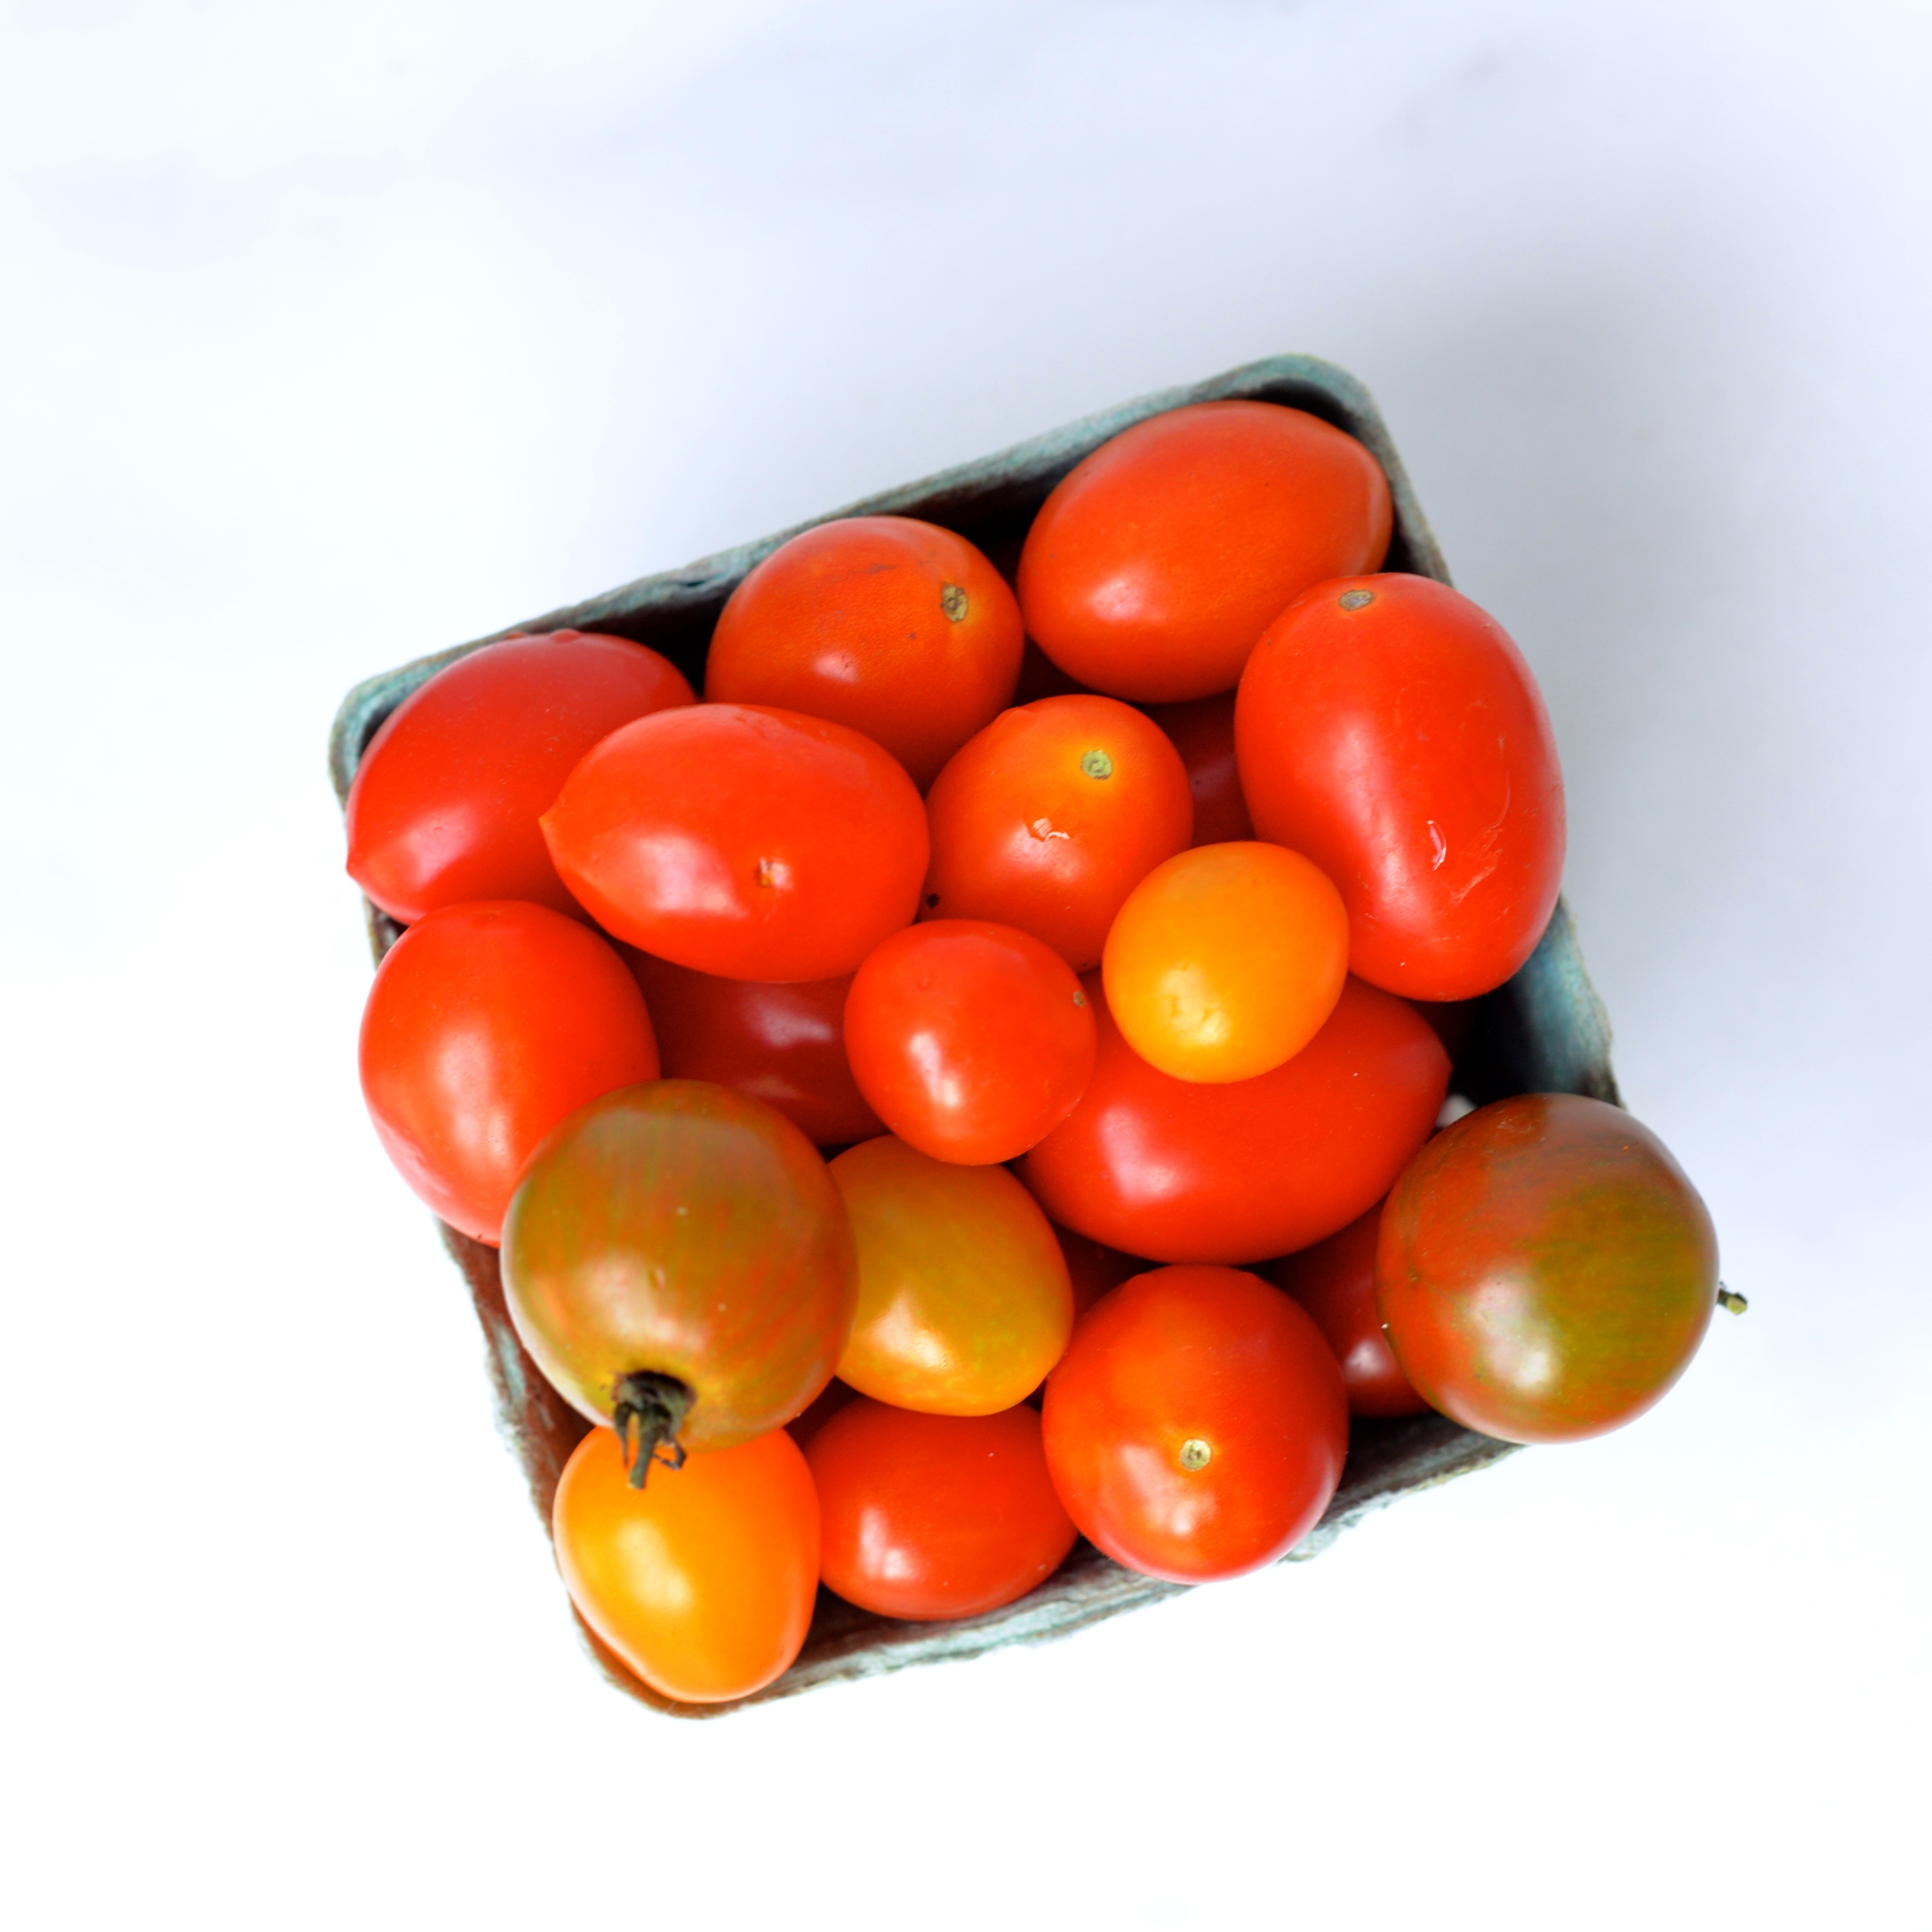
Those baskets of cherry tomatoes at the market are almost too pretty to eat. Almost. Still a little warm from the sun, they are summer's best candy. This little number cooks them down so that their juices caramelize just a bit and their natural sweetness comes out. The best part is that you do not even have to turn on the oven to make this magic happen. It is reminiscent of the flavors of a Spanish paella, but in a spread that you can smush on bread or dollop into all sorts of things like your morning eggs or your warm bowl of grains. It is rather addicting so do not be ashamed if you take your fork to it.

DSC_1000.JPG

Saffron Tomato Jam

1/4 cup olive oil
1 small yellow onion, peeled and minced
2 garlic cloves, peeled and minced
generous pinch of saffron threads
1/4 teaspoon ground cumin
1 teaspoon smoked paprika
1/8 teaspoon ground cinnamon
1 1/2 pounds cherry tomatoes, sliced in half or quarters if large
2 teaspoons white wine vinegar
salt and pepper, to taste

Heat olive oil in pan over medium-high heat. Add onion and garlic and cook 8-10 minutes or until onion is soft and translucent. Stir in spices and cook for 30 seconds or until fragrant. Add tomatoes and generous pinch of salt. Stir and when tomatoes start to release some liquid, reduce heat to medium. Continue to cook for 45-55 minutes or until tomatoes have broken down and become jammy. Stir often to prevent sticking. When just 2 minutes remain, stir in 2 teaspoons white wine vinegar. Remove pan from heat and allow to cool. Store in jars for up to two weeks in the fridge. Makes about 2 cups.

DSC_0979.jpg
DSC_1009.JPG
In Spreads Dips Sauces, Miscellaneous Tags tomatoes, summer, vegan, vegetarian, gluten-free, spreads, appetizers, spanish, recipe
Comment

Magical Hummus

July 20, 2015 Emily Watson

Really delicious hummus is hard to come by. Mediocre hummus seems to be everywhere, taking up grocery store refrigerators and lounging in vegetable platters at barbecues and potlucks. The problem with most hummus dips is that they tend to be too thick and taste a bit tinny. One solution to this "tinny" problem is to cook your own chickpeas rather than rely on the canned version. If you have the time to cook your own chickpeas from the dried bean, it makes a world of difference. Every few weeks, I cook a large potful of chickpeas. I drain them, freeze them in a single layer on a baking sheet, and then pour them into a freezer bag for easy scooping into recipes. To thaw, I just pour hot water over them and let them sit for a few minutes. This method is even easier than using the canned version once you get used to it.

The canned chickpea problem solved, the other problem is often the texture of the hummus is way too dense. I like a smooth, pillowy hummus, almost fluffy. I find that a generous amount of tahini whipped into hummus can help achieve this fluffiness while adding a rich flavor. Yotam Ottolenghi's homemade hummus, one of my favorites, for example, has just under 1/4 cup of tahini per 1 cup of chickpeas. My favorite hummus here in Philadelphia is Michael Solomnov's hummus. He even has a whole restaurant devoted to hummus, called Dizengoff. I have a feeling that the ratio of tahini to chickpeas in his version is fairly high as well since it taste prominently of sesame.

This magical version has a surprise ingredient that gives this hummus a luscious texture that does not sacrifice on flavor. It takes a few notes from a hummus that appears on the amazing Food52 website in their Genius Recipes column. It was inspired by a recipe from Tara Duggan who wrote Root to Stalk Cooking and draws from other recipes like babaganoush and roasted red pepper spread that use softened vegetables as their base.

The original recipe calls for no chickpeas- just Swiss chard stems, garlic, olive oil, tahini, salt, and lemon juice, but I think that chickpeas are a must if you are going to call it hummus. I also like the extra bulk and protein they provide. And again, if you manage to cook your own chickpeas, even better. I also add lemon zest and an extra garlic clove because I like the zing they both give. I love that I have a new use for my chard stems- not just in pickled form! 

Magical Hummus

1 pound Swiss chard stalks, washed and chopped (I used rainbow chard)
1/2 cup cooked chickpeas
2 small garlic cloves, peeled
1/4 cup tahini (sesame paste)
1 lemon, zested and juiced
1/4 cup extra-virgin olive oil
1/2 teaspoon salt, plus more to taste

Bring a large pot of water to boil over high heat. Add the chopped chard stems, and cook for 15-20 minutes over medium heat or until chard stems are very tender. Remove from heat and drain.

In a food processor, combine chard stems and remaining ingredients. Process until smooth consistency is reached. Add more salt as necessary. Drizzle with a little extra-virgin olive oil before serving. Enjoy! Makes a little over 1 cup.


DSC_0271.JPG
DSC_0277.jpg
DSC_0286.jpg
In Appetizers, Spreads Dips Sauces Tags vegetarian, vegan, spreads, chickpeas, tahini, swiss chard, appetizers, gluten-free, recipe
Comment

Toasted Coconut and Almond Butter

July 14, 2015 Emily Watson

I love almond butter and I love coconut butter, so why not combine the two? This is a super-roasty, toasty nutty spread that you will find an excuse to put on everything: toast, bananas, mixed into oatmeal, scooped into a smoothie, swirled into brownie batter, or just by the spoonful. If you have never made nut butter at home before, it is super simple. Put nuts in a food processor, turn it on, and watch the magic happen. It usually takes about 5-7 minutes and stopping every so often to scrape down the sides, but that is as complicated as it gets.

This is just a little more complicated than your basic nut butter, but the extra few minutes to toast the nuts and coconut really takes this over the top. The only thing you have to be careful about is not burning the almonds or the coconut, especially the coconut. It can burn quickly! Feel free to add a dash of cinnamon to the food processor if you want a little spice, but it is delicious as is.

I had leftover cherries in the fridge, so I slathered some multi-grain bread with the coconut and almond butter, topped it with quartered cherries, and drizzled it with local honey. It was the perfect afternoon snack.

What's your favorite nut butter?

Toasted Coconut and Almond Butter

2 cups raw almonds
1 cup unsweetened shredded coconut
2 pinches of sea salt
2 1/2 teaspoons honey, preferably local (or use maple syrup or agave if vegan)

Preheat the oven to 400 degrees Fahrenheit. Line a baking sheet with parchment paper. Place the almonds in a single layer, and toast in the oven for 8-10 minutes or until lightly golden. Remove from pan immediately so that they do not continue to toast.

Sprinkle the coconut over the same pan, place in the oven, and toast for about 3 minutes. The coconut will start to toast as soon as it comes into contact with the pan, so watch the coconut carefully. You want it a very light golden color. Remove from the pan immediately when done.

Add the toasted almonds and toasted coconut to a food processor. Add 2 pinches of sea salt, and turn the food processor on. Scrape down the sides every minute or so, but it will take about 5-7 minutes total to get to nut butter consistency. When the desired consistency is reached, add the honey and pulse a few times to incorporate the honey. If you add the honey sooner, the mixture tends to be a bit gluey. Enjoy! Makes about 1 cup nut butter.

DSC_0133.JPG
DSC_0141.jpg
DSC_0147.JPG
In Spreads Dips Sauces, Snacks Tags almonds, coconut, vegetarian, vegan, snack, spreads, recipe
1 Comment

Edamame and Goat Cheese Spread

May 27, 2015 Emily Watson

For the longest time, I associated edamame only with Asian cuisines. It is delicious in the little pods, sprinkled with coarse salt, but shelled edamame can be so much more versatile than Japanese restaurants would lead us to believe. The first time I had edamame with goat cheese, my world was rocked. Whole new possibilities for the little green soybeans opened up, and life has been better ever since. A local Asian fusion restaurant we stumbled upon a few years ago was serving edamame dumplings with goat cheese, truffle oil, and pea shoots in a miso broth. We ordered one bowl only to order another because they were just too delicious.

This spread borrows from that edamame- goat cheese combination we had, but uses lemon and chives to brighten it up and extra-virgin olive oil to round it out.  While I call it a spread, it doubles as a dip and just may replace your favorite hummus this spring. It is green, tangy, and bright, and I promise it could not be easier.

Edamame and Goat Cheese Spread

1 cup fozen shelled edamame, thawed
1/4 cup + 2 tablespoons fresh goat cheese (local if you can find it!)
2 tablespoon fresh chives, chopped
2 tablespoons extra-virgin olive oil
1 lemon, zested and juiced
generous pinch or two of salt, to taste

Combine all ingredients in a blender or food processor and blitz until mostly smooth, scraping down the sides as necessary. Use it like hummus, and serve alongside vegetables, on crostini, or on a sandwich. Makes about 3/4 cup.

IMG_6751.jpg
In Spreads Dips Sauces Tags recipe, spreads, goat cheese, edamame, vegetarian, spring
Comment

Strawberry Vanilla Chia Jam

April 24, 2015 Emily Watson

Homemade fruit jam is one of those things that I always tell myself to make when the fruit is in peak season, but I have yet to take the plunge. There are a few things stopping me. First, I would often rather eat the perfectly ripe fruit plain or in a dish that celebrates its freshest form. Second, the act of canning sort of scares me. Supposedly it is nothing to be intimidated about, as you just make sure your jars are sterilized, you have enough sugar in them to prevent spoilage, and that they are completely sealed. Basically, I have a romantic idea of canning and preserving, but in all likelihood, it will remain an idea.

So what am I to do if I want homemade jam to slather on toast, swirl into yogurt, or dollop on my oatmeal but without all of the fuss? Make chia jam! Chia jam is essentially fruit + sweetener + chia seeds that are blended together and allowed to sit until the chia seeds swell and create a jelly-like texture. I had seen chia jam in a few places before attempting my own, but the Raspberry Chia Jam from Sarah of A House in the Hills had attracted my attention for its ease and simplicity.

In my version, I used frozen strawberries (thawed), honey, chia seeds, and the beans of half of a vanilla pod because strawberry-vanilla chia jam sounded fancier. And for the record, it tastes fancier, too. If you do not have a vanilla bean, you can leave the vanilla out or substitute 1/2 teaspoon vanilla extract.

Strawberry Vanilla Chia Jam

1 1/4 cup frozen strawberries, thawed
1 tablespoons chia seeds
1 tablespoon honey
1/2 vanilla bean pod, seeds removed (optional)

Combine all ingredients in a food processor or blender and blend until mostly smooth. Pour in a jar and allow to set for at least 30 minutes. Refrigerate to store and use within the week. Makes about 8 ounces.

**I served this on a toasted multi-grain bread with ricotta cheese and toasted almonds, but the possibilities are endless, including on my Lemon Ricotta Pancakes!

IMG_5541.JPG
IMG_5551.jpg
IMG_5545.JPG
IMG_5546.jpg
In Spreads Dips Sauces Tags strawberries, jam, spreads, vanilla, chia, recipe
2 Comments
Hi! I'm Emily. I love to cook whole, nourishing foods, and this is where I share my kitchen experiments and sometimes a little bit of life.

Hi! I'm Emily. I love to cook whole, nourishing foods, and this is where I share my kitchen experiments and sometimes a little bit of life.

Featured
  • July 2017
  • May 2017
  • April 2017
  • March 2017
  • February 2017
  • January 2017
  • December 2016
  • November 2016
  • October 2016
  • September 2016
  • August 2016
  • July 2016
  • June 2016
  • May 2016
  • April 2016
  • March 2016
  • February 2016
  • January 2016
  • December 2015
  • November 2015
  • October 2015
  • September 2015
  • August 2015
  • July 2015
  • June 2015
  • May 2015
  • April 2015
  • March 2015
  • February 2015

  • Appetizers 18
  • Breakfast 18
  • Life 4
  • Mains 39
  • Miscellaneous 2
  • Salads 21
  • Sandwiches 6
  • Side Dishes 8
  • Smoothies 4
  • Snacks 10
  • Soups 14
  • Spreads Dips Sauces 5
  • Sweets 6
  • Vegetarian 1

  • almonds
  • appetizers
  • autumn
  • avocado
  • breakfast
  • brown rice
  • chickpeas
  • chocolate
  • cilantro
  • coconut
  • coconut milk
  • fall
  • gluten-free
  • kale
  • lentils
  • make ahead
  • mint
  • oatmeal
  • recipe
  • salad
  • snack
  • soup
  • spring
  • summer
  • sweet potatoes
  • tahini
  • vegan
  • vegetarian
  • walnuts
  • winter

subscribe

Sign up with your email address to receive new posts directly

We respect your privacy.

Thank you!

All photographs, recipes and content are property of Nourishing Matters, unless otherwise noted. Please do not redistribute without my permission. Thank you!

Powered by Squarespace